

Today, I’m bringing home my post from This heArt of Mine’s Winter Wonder series.
_______________________________________

Hi This Heart of Mine readers! I am thrilled to be here for Amy’s Winter Wonder series. What a great way to brighten up cold, dreary winter days. We’ve been in the negative temperatures lately, so maybe I should say frigid. 😉
.jpg)
For today, I’ve come up with an easy beanie pattern and tutorial.
All you need is an old sweater, an old t-shirt, and some ribbed knit or “ribbing.”

If you don’t know what ribbing is, it’s that bumpy/lined knit material used for edges of sleeves and necklines on T-shirts.

A serger is not required but highly recommended for attaching the ribbing.
You can certainly use the existing ribbing from a sweater and just sew up the hat omitting the lining and ribbing. Copy my pattern and extend the hat straight down a 2-3 more inches.
.jpg)
Today, I’m going to show you how to make a lined beanie with ribbing.
Materials:
-an old sweater
-knit t-shirt material
-knit ribbing (notes about fabric is in step one)
-serger (you can make this entire project on a serger if your sweater isn’t too stretchy)
-sewing machine – if using a sewing machine it is helpful to use a ball point needle and a walking foot. I don’t have a walking foot, but I hear those are very helpful with sewing with knits.

1. Find an old sweater. Wool sweaters work the best, other sweaters work well in varying degrees. If you choose a sweater that is really stretchy it will be more difficult to sew.
The lining can be cut from an old t-shirt and ribbing can be found by the bolt at most fabric stores. I bought mine at Joann’s in the clearance section. The thicker the lines in the ribbing the better.

2. Save and print my free hat pattern: here.
Cut out your hat pattern and use that to cut two sweater pieces on the fold. If you cut them at the same time you may need to re-cut the notch in one of the pieces. Also cut two pieces of knit for the lining. An old T-shirt works great.

3. Using the sizing guide from your pattern also cut a piece of ribbing. Fold it in half, sew it and then cuff it up.
4. Prepare your hat piece and lining piece. Fold each hat piece in half right sides together. Sew the notches. If your sweater material is really stretchy than you’ll want to use your sewing machine with a lengthened stitch rather than a serger.

5. Sew your hat pieces together with a half inch seam allowance. If you do not use a serger, then cut notches around the curved edges and then cut off the extra bulk.

*Tip: When sewing the sweater pieces, sew a few stitches, lift the presser foot and then repeat so that you are not stretching the sweater as you go. The striped sweaters I used were really stretchy so I didn’t line it up as perfect as I’d hoped. I’ve made stockings with the same sweaters, but was off my sewing game the day I made these or something. 🙂 I am guessing a walking foot would have helped, so if you have one, definitely use it.
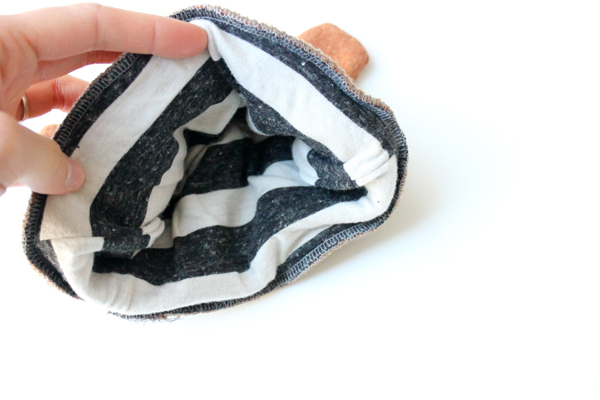
6. Turn the sweater hat right side out and leave the lining wrong side out. Insert the lining into the sweater piece.

**If you want to make a bear beanie…

Sew the ears with a 1/4 inch seam allowance (which is different from the rest of the hat), turn them right side out, and then insert the ears before sewing the hat pieces together. You can leave the ears flat or pin them in cinched. Then proceed as normal…
7. Pin around the ribbing and hat section at four equally spaced points (the seams work great). The ribbing should be narrower than the hat.

8. Serge all the way around, stretching the ribbing to fit the hat piece. Be careful not to stretch the hat though. If you do not have a serger, you can use a wide, condensed zig zag stitch or a dense overlock stitch.
9. Flip the cuff out. If the cuff looks too wavy press it (don’t go back and forth, just press) with a hot steamy iron and it should smooth out a bit. Be mindful of your material though and just make your iron as hot as your sweater fabric allows.
The waves will also smooth out when worn. If the hat is the perfect size, all the wrinkles should smooth when put on your child’s head.

And that’s it. Yay! You’ve made a beanie.


Leave it as is, attach a bow, or even a pom pom.
.jpg)


They come together really quick, so make one or many. I cranked out three in assembly line fashion in just over a half an hour.

I made several for my daughter who needed some new hats the most.
Natalie is just about growing out of the 6-9 month size, so I made a 9-18 month size as well, which matches her brother’s hat. As you can see, it doesn’t fit perfectly yet, but is still cute.

This one is the 6-9 month size.


***An important note about sizing:
Reid’s hat is the 18 month to 3 year size…he is four years old. My children don’t have super small heads (about 30-40 percentile), but my pattern runs a bit bigger for them (except for my oldest, since he is almost eight and toward the end of the size range). I even made these hats narrower than generally excepted sizing guidelines, but if you are worried about it, go down a size or bring the pattern in just slightly while still keeping the height of the hat. You will also have to take a little bit off the width of the ribbing, if you do this.

I actually have ribbing in a few colors but just realized that I only used gray! Ha! That is except for the brown bear beanie. I salvaged the brown ribbing from an old turtleneck sweater. It was my favorite ribbing to sew with, so if you can find a really thick ribbing, I highly recommend it.

I could have cut the ribbing down to size but I left it twice as long so that I could cuff it up, allowing the hat to grow with the child.

And there you have it. Some easy, warm beanies using sweater scraps!
Stay warm out there!
Oh these are too cute. I'm in love with the pom pom ones.
Those beanies are so lovely! I'm impressed by the bow version, which will be soon on my "to do" list 🙂
A.Dor.Able! 🙂
Now, I want to make hats. I have been wanting to do this for a while, but now I really want to do make some. 🙂 Great job.
I just found you through pinterest. I'm new to sewing…..like JUST sewed two pieces of fabric together on a hand-me-down sewing machine new 😉 but I am loving your talent and site. I hope to get some ideas to start with. I really love your bows!!!!
Awesome Job.
These are perfect! My husband can’t keep track of our son’s hats to save his life so I made four of these and they are awesome! Hopefully four will get us through winter!
Awesome! It’s always nice to have a few spares. 🙂
Thanks for the pattern! I’m new to using a serger so I’m excited to try it 🙂
Of course! I hope you like it! <3
Great hats! And – have you got the pattern for the fleece vest on the photo with your daughter (pink inside, white with hearts outside)? I love it. Thank you.
Thanks! The pattern is from Made Everyday. Here is a link: http://www.madeeveryday.com/product/the-flip-vest/
Thank you :).
Where is the link for the pattern? I couldn’t find it in the post
Oh! The pattern is included in the post. 🙂
hello ,I love your hats patterns
cant find the pdf
There is a link to the pdf in step 2.