

I have already posted about them here, here, and here. (The last link is an oldie. It’s one of the first posts I created when I started this blog).
Well, how about another? Today, I’m making them with leather and vinyl. It looks so cool and is a faster sew than fabric ones!

Materials:
*Leather scraps
3/4 inch wide elastic, ribbon, or scrap vinyl/leather for the strap
vinyl (sold at Joann by the bolt)
leather needle (optional) ** I used a universal needle myself
velcro
matching thread
fabric glue (optional)
*You can use an old purse, jacket, or just vinyl by the bolt at Joann to get your leather/pleather “fabric.”
**Quick tips before we begin: lengthen your stitch and sew slow when sewing with leather or vinyl. Both materials can be stretchy. Be mindful of that and try your best to not let it stretch while sewing. Lift your presser foot often if you need to.

1. Cut your pieces.
Main bow tie: Because you don’t have to fold the leather/pleather in half before sewing it, cut it to the finished width from the start. I like how it looks folded at the sides, so that is how I made it, but you can make the whole bow tie one small rectangle.
Strap: First measure around your child’s neck while they are wearing a button up shirt. Add two inches to that and you have your length. (I had to piece two strips together because I was using recycled materials.) Cut your straps 3/4 inch wide and the length you determined.
***You can use my measurements I show in the picture above. I actually made the strap longer than I should have, so it was too long for my kids’ necks. That was an easy fix though.
Tie loop: Make this 3/4 inch by about 5 inches. It’s better to make this longer than you’ll likely need. You can cut it to size later.

2. Fold the main bow tie piece in half, right sides together (RST) and sew it.
3. Repeat with the small loop that goes around the bow.
4. Turn both pieces right sides out. Slide the loop around the main bow piece.
5. Prep your strap.
Sew velcro to the ends of the strap (each one on the opposite sides of the strap). You can use a straight stitch. I prefer a close zig zag stitch for more strength.
*You can use elastic, ribbon or a strip of fabric (sewed RST into a tube, pulled right side out and pressed). If you use elastic or ribbon for the strap, be sure to add your velcro with a zig zag stitch. The zig zag stitch will keep the elastic and ribbon ends from fraying and give it a clean look.
6. Slide the strap through the loop. Leave it as is or add dabs of fabric glue to keep the bow tie from shifting during use.
So simple, right?

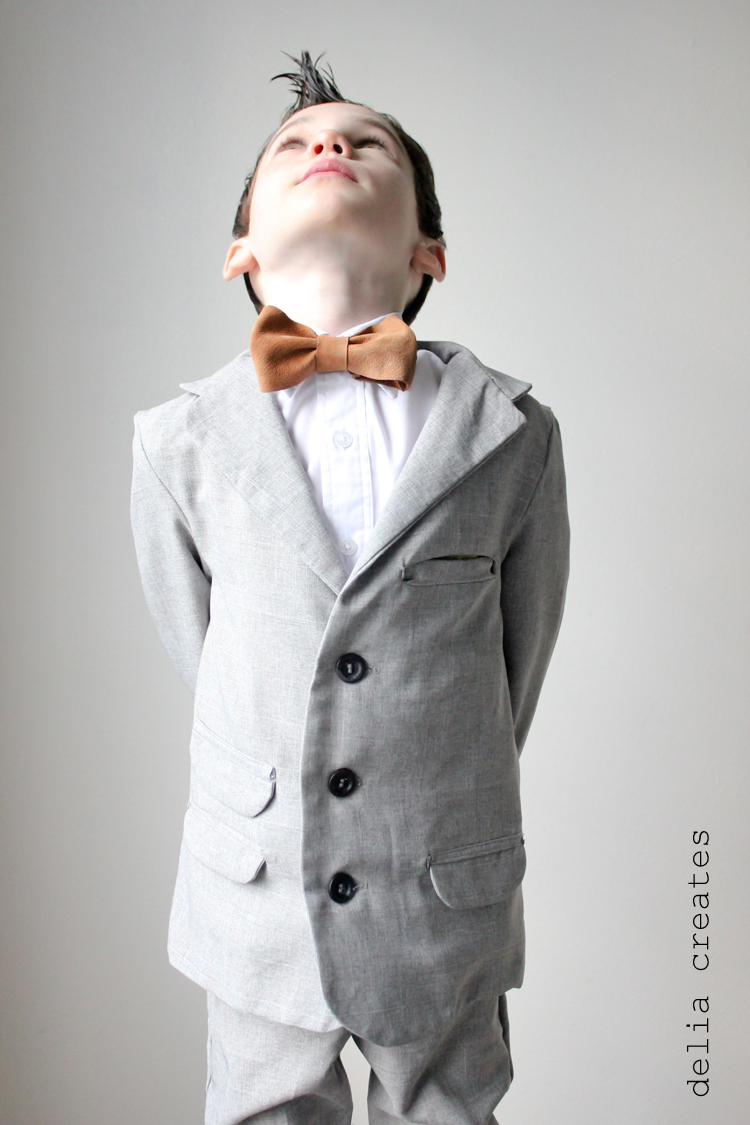
I just love how such a small accessory really adds depth and interest to Owen’s suit.
Very hip and handsome.
I also made some bow ties with fabric as the main bow tie and a piece of leather or vinyl as the loop that cinches it together. I almost like this variation better! This is a great scrap busting project as well.

Just be sure to make the fabric piece twice a wide as you want it (plus an inch) so that you can sew it together (RST) and turn it right sides out before continuing with the rest of the steps above. You can refer to this tutorial for a clearer explanation.
This corduroy and leather one is probably my favorite out of the bunch.

If you don’t have a boy…You can make a leather or vinyl bow and stick a clip in it.

Just glue the clip in with hot glue and you’re good to go!
I know this project is for Winter Whites, but I couldn’t resist slipping a yellow vinyl bow tie in the mix:

It’s a lot stiffer than the leather, but still really cool looking.

And there you have it. An easy boy accessory that makes your boy look both dapper and modern.
**If you’re curious about Owen’s suit. I made them using Blank Slate patterns from Melly Sews. See the post here for more information.
Don’t forget to say hi to Kirstin and Jordan at Kojodesigns and see what they are cooking up for Winter Whites today!
Also… I am so happy to be guest posting at It’s Always Autumn for her Sharing the Love series. Come say hi if you get the chance!
Owen sure is a cutie pie. Love his poses!
I LOVE these! Can't wait to make one for my little guy. So cute 🙂
That is fabulous. I love the tan suede one.
These are so fun!! My twins are about to turn one.. I think that they will have to have these for their birthday party 🙂 A bow tie and a hair bow.
Also – you have the cutest models!!!
so handsome!
I love bow ties! You picked a great model!
These are adorable! The leather one is killing me. And your boy is so handsome! It's fun that they still like you to take their pictures. 🙂
Megan – That is so perfect. Happy birthday to your babes!
Lindsay – I know! I am so grateful they still let me photograph them. There are some days that they refuse, but most of the time they are good about it.
These ties are so fabulous! And your little men are so handsome! Truly remarkable. I bet they're every bit as nice too!
I just asked my son if he would wear a bow tie if I made him one. Without even a hesitation or a turn of his head to look me in the eye, he said "No!". My daughter ran over and said she would wear one though! Your bow ties are adorable, and your son looks like a natural at modeling!
Love love loooove these. I bet Gabe would love one too.
Delia, these are FANTASTIC! You and I share a love for leather, so I can always count on you for fantastic inspiration! 🙂
Popping back in to tell you I used this tutorial today and my bowtie turned out great! Can’t wait to show you on Monday! Thanks again, Delia! 🙂
Just what I was looking for! I love the whole getup!! Where did you get his suit. He is precious, and his expressions are out-of-this world.
Thank you Elephant!
I made his suit. 🙂 See here for the post: http://www.deliacreates.com/2012/12/holiday-suits.html
He is so cute!
I just posted a new post on how to make a fabric ribbon (similar to this one):
http://www.sewing-patterns.org/blog/166-how-to-make-a-fabric-ribbon