• Skip to primary navigation
  • Skip to main content
  • Skip to primary sidebar
  • Skip to footer
  • Home
  • BLOG
  • TUTORIALS
    • Free Patterns
    • Free Printables
    • SEWING
      • Technique
    • CRAFTS
      • Printables
    • CROCHET
    • Baby
    • KIDS
      • Boys
      • Girls
      • KIDS CREATE
      • Lego
      • Parenting
    • Women
    • Men
    • Holiday Projects
      • Birthday
      • Valentine’s Day
      • Easter
      • Spring
      • Mother’s Day
      • Father’s Day
      • Summer
        • Color Your Summer 1
        • Color Your Summer 2
        • Color Your Summer 3
      • Halloween
      • Autumn
      • Thanksgiving
      • Christmas
      • Winter
    • Accessories
    • Home Projects
    • No Sew
    • Gift Ideas
      • Teacher Appreciation
    • Party Ideas
    • Photography
    • RECIPES
      • Allergy Friendly
      • Baking
      • Sweet
      • Savory
      • Beverage
      • Breakfast
      • Holiday
      • Soups
      • Vegan
  • SHOP
    • SHOP
    • Cart
    • ACCOUNT
  • ABOUT
    • CONTACT
    • Featured
  • SPONSOR
    • PRESS
  • Privacy Policy
  • TERMS OF USE

delia creates

crafting, holiday, party ideas, pattern, tutorial · May 18, 2013

All-Occasion Chalkboard Banner

I admit it. I like to get the most bang for my buck.

And that’s what you get with today’s project.
It’s an…
Made from chalk cloth vinyl by Moda, it is erasable, and appropriate for almost any celebration.
An un-birthday…check.
Because you’re beautiful…check (I didn’t intend for this font to make us see double…my apologies).
Because it’s Tuesday…why of course.
I know I’m not posting this on a Tuesday, but it just seems to be the cutest, most ordinary of days. 🙂 And a day like that, deserves a little hoot and holler!

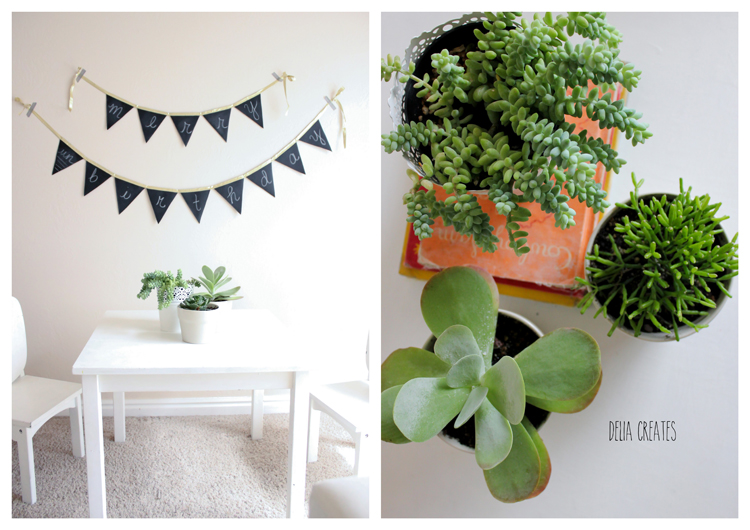
(* Disclaimer. I know this is not a novel idea. There are many version out this is just my version. :))

There is also space for Happy Birthday, Merry Christmas, Happy Halloween and Happy New Year to name a few.
Want to make one?
You’ll need:
Chalk cloth (Chalkboard Vinyl) – 1/4 yard is plenty (I used a 1/3 yard cut, split in half)
chalk
black thread
high quality felt (not wool) – 1/4 yard
3 yards ribbon, bias tape, trim (whatever you want to string your banner with)
First things first…You need to cure your chalk cloth. Don’t skip this step. It will keep your chalk cloth looking nice. If you write on it without curing it, any drawings will be permanent or will leave an etched look.
You can try rubbing the side of your chalk all over, but if your chalk is new or has snags, it will leave etch marks. I found that it was faster and easier to load up a piece of scrap fabric with chalk dust and rub it in that way.

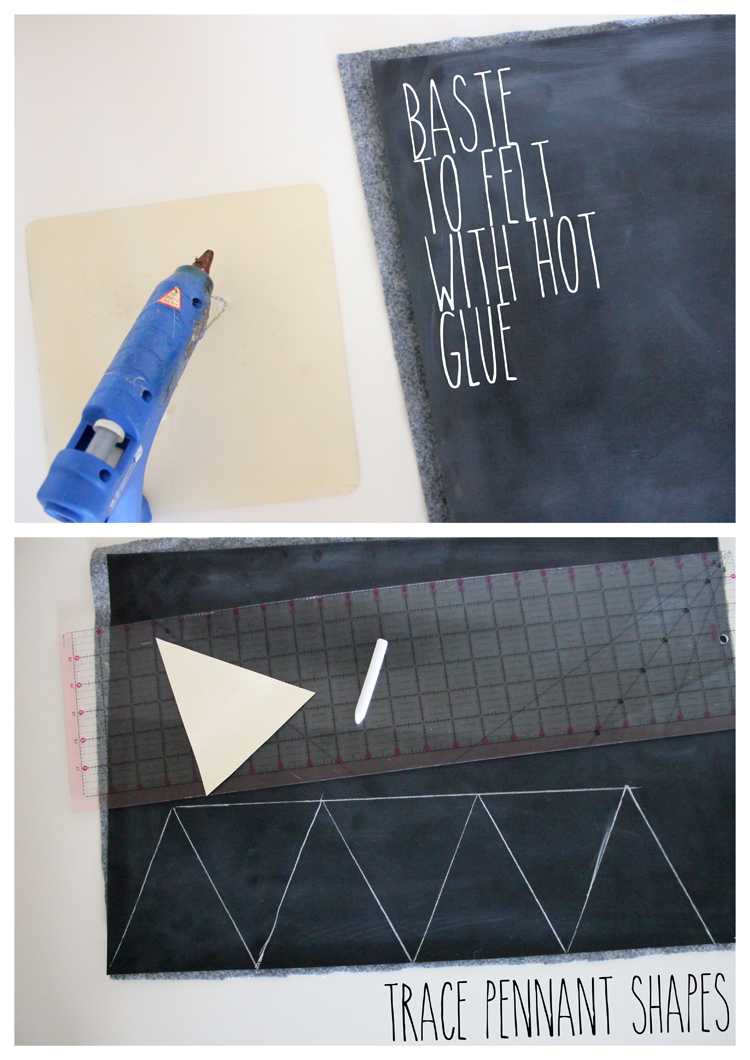
Now, add felt to the back of your chalk cloth. I like to glue it to the felt first so it doesn’t shift while sewing. A line of glue to the perimeter of the chalk cloth should be plenty.

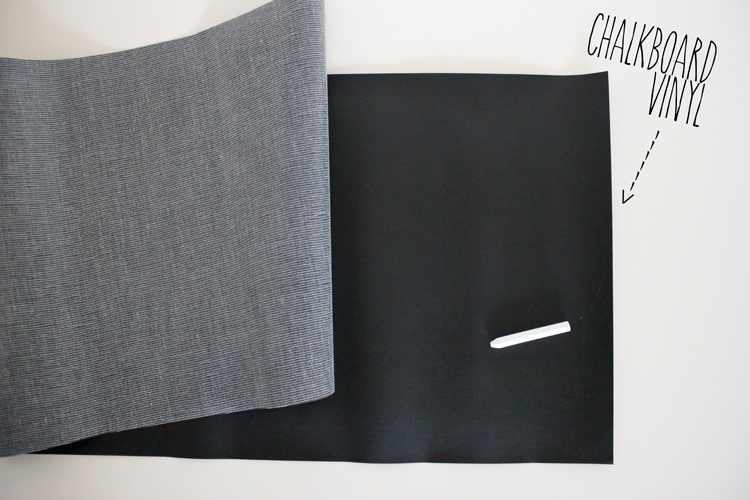
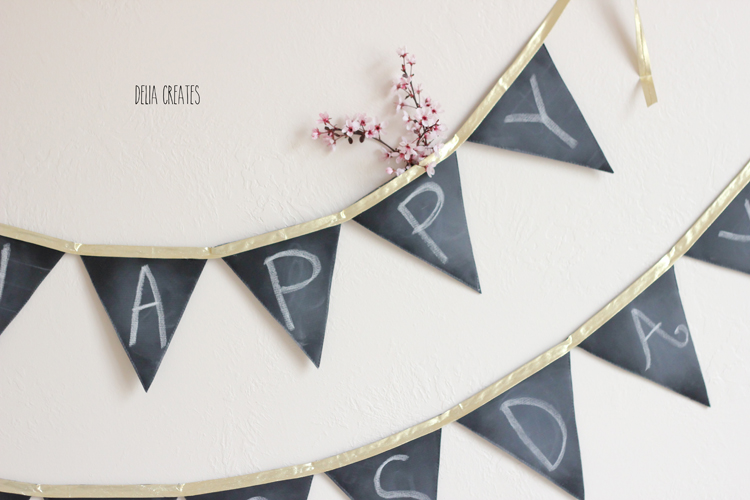
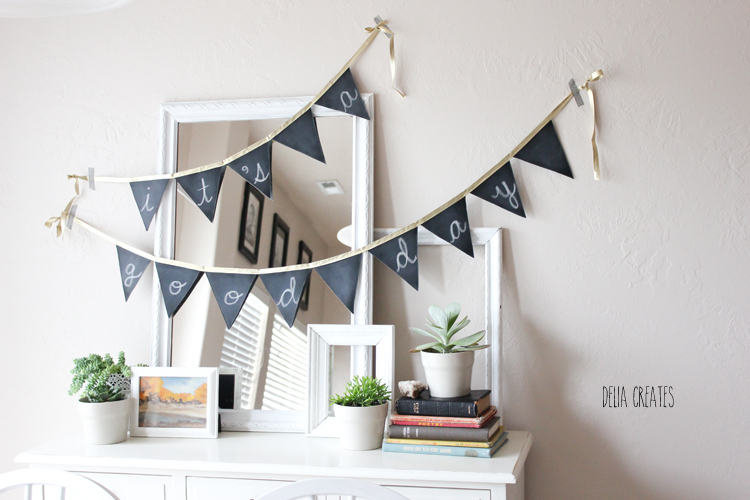
If you want to use the pennant shape I used, I have a free pattern HERE.

You will need at least 14 pennant shapes.

Quilt the felt and chalk cloth together. You need to sew a line on either side of the drawn lines so that you can cut each pennant out later. Roll the fabric to help it fit through the arm of the sewing machine so you can get the whole area quilted.

Now if you’re worried about the vinyl sticking to your presser foot and being difficult to sew, don’t fret! The felt on the bottom and the cured chalk dusted vinyl on top will help it glide almost effortlessly through your machine.

TIP: To turn the fabric, crank your needle in the down position, lift the presser foot and spin your fabric as needed. Replace the presser foot and resume sewing.

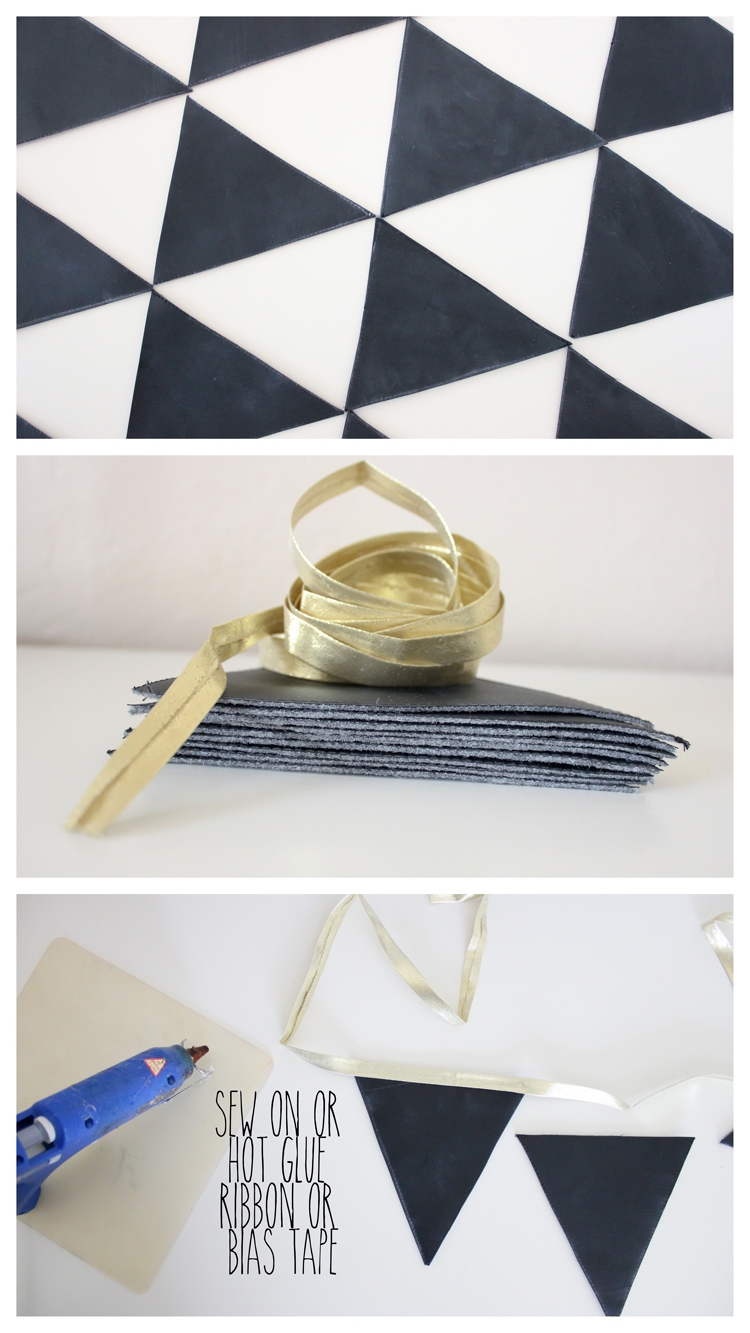
This can take some time, but it’s worth it. You’re making something intended to last after all.
Now cut out each pennant by cutting carefully in between the lines you sewed (and through some sewn lines at the tops to get the pennants separated).

Now it’s time to add your ribbon/trim/bias tape. I used some gold single fold bias tape and hot glued it on. You can sew it if you like. I found that gluing it allowed me to keep some of my pennants (which I didn’t sew the top of) open like pockets.
Perfect for adding little flowers to…
…or maybe a tiny stuffed animal perched inside?
Too fun.
**Just be sure to add five pennants to the top banner and nine pennants to the bottom.**
Also, keep in mind that this step, even with hot gluing, is not quick. Take your time to get the pennants lined up just right and even with the top of the bias tape edge. I would say I took about 15 minutes to glue the bias tape to the pennants.
A couple tips for using and re-using (cool right?) your chalkboard banner:
1. When you erase it, use a chalkboard eraser or scrap piece of cloth/fabric. You may have to add a little persistence and elbow grease to your rub to get it completely erased.
*Do not wash with water. If you want to clean it with water, re-cure it after it is completely dry.
2. Try to use a blunt tipped piece of chalk. It helps to use the end of the chalk that you rubbed into your cloth for curing. Using a sharp piece of chalk could permanently etch the cloth, even if it’s cured.
And there you have it. A pretty banner for any celebration, big or small.
Or even just for a pretty spot in your house…
…because it is. (a good day)  🙂
Previous Post: « Play It Smart Series
Next Post: Play it Smart: With Chalk! Six Simple Ideas »

Reader Interactions

Comments

  1. Christy says

    May 18, 2013 at 3:12 PM

    Love it!

    Reply
  2. Katie Lewis says

    May 18, 2013 at 5:22 PM

    Such a great project!

    Reply
  3. Daniel & Sarah says

    May 18, 2013 at 5:30 PM

    ok i am loving this!! what sewing machine do you use if you dont mind me asking?

    Reply
  4. LeeAnne says

    May 18, 2013 at 5:53 PM

    This is too cute. I love it!!

    Reply
  5. A Lemon Squeezy Home says

    May 18, 2013 at 5:53 PM

    What a great idea Delia!

    Reply
  6. Carrie Perrins says

    May 18, 2013 at 6:27 PM

    Cute!

    Reply
  7. Jackie says

    May 18, 2013 at 6:54 PM

    🙂 I love it.

    Reply
  8. [email protected] says

    May 18, 2013 at 8:30 PM

    Great minds! 🙂 we made one very similar to this in the fall and use it all of the time! http://buzzmills.typepad.com/blog/2012/11/changeable-chalkboard-bunting-mini-tutorial.html

    Reply
  9. Charity says

    May 18, 2013 at 10:27 PM

    I love this! Much more useable than a one-saying set. And the little pockets at the top are the perfect extra touch. =)

    Reply
  10. Nancy says

    May 19, 2013 at 3:54 AM

    "You're Awesome" would fit in there too, because you are!

    Reply
  11. kristin says

    May 19, 2013 at 7:01 AM

    i just drink in your beautiful photos, delia! think i need one of these…and i think i know a local fabric shop with chalk cloth! woo!

    Reply
  12. Anne Marie says

    May 19, 2013 at 8:56 AM

    What a fun project! And so many good tips. Thanks!

    Reply
  13. carin van den berg says

    May 19, 2013 at 1:54 PM

    Love it and great tips.

    Reply
  14. @lliE says

    May 20, 2013 at 1:51 AM

    This is a really lovely idea. Who knew there was chalkboard cloth? Not me. It looks lovely with the gold.

    Reply
  15. Lisa says

    May 20, 2013 at 12:39 PM

    How cool! This chalk cloth is genius!

    Reply
  16. Delia says

    May 20, 2013 at 5:31 PM

    Thank you friends! 🙂

    Daniel & Sarah – I use a Brother SQ9050

    Jane – I love your circular banner! Very cute!

    Kristin, @llie, and Lisa – I know chalk cloth is about the coolest fabric I have seen! It's so fun!

    Reply
  17. Lindsay says

    May 21, 2013 at 3:49 AM

    This is GORGEOUS, Delia! I want one! I absolutely love it.

    Reply
  18. Allie says

    May 23, 2013 at 7:26 PM

    AH! Love this, Delia!!The gold is perfect with it.

    Reply
  19. Unknown says

    May 27, 2013 at 2:08 AM

    Hi! This is so cute… Going to make one this week! Quick question… Do you think other fabrics besides felt would work for the backing? Regular quilting cottons, maybe? Put a layer of thick interfacing in between?I can’t find any felt except the small rectangles of craft felt in stores near me, and want to get this done before I have time to venture out of town! 🙂 Thanks so much for the tutorial, I love your blog and read it all the time!

    Reply
  20. Delia says

    May 27, 2013 at 2:35 AM

    aw thanks Unknown. 🙂

    I don’t recommend using cotton but with interfacing fused to it, but it could definitely work. The interfacing would limit the cotton fabric’s tendency to fray and help it hold up as a pocket. So definitely add interfacing if you are going to go that route. Make sure it’s stiff interfacing too (not the featherweight stuff). You can use the squares of felt as well, you’ll just have to sew banner pieces in chunks. That is what I would do. Good luck! I hope that helps! 🙂

    Reply
  21. dana says

    May 29, 2013 at 4:26 AM

    Cute delia! A fun new take on buntings! love 🙂

    Reply
  22. Heather Dempsey says

    June 10, 2013 at 4:25 PM

    Love this!

    Reply
  23. EllenQ says

    June 19, 2013 at 8:30 PM

    I love this so much! Thanks for the great idea.

    Reply
  24. gabricci says

    June 29, 2013 at 7:26 AM

    I love this banner. How very original and practical. Is it okay if I post it on my blog and use one of your photos?? Thanks

    Reply
  25. Cheri says

    June 29, 2013 at 1:38 PM

    This is such a great idea – I can't wait to make it. I have a remnant of chalk cloth that has been haunting me for a few years and this is perfect! Thanks so much.

    Reply
  26. Lauren Lanker says

    July 6, 2013 at 4:45 PM

    Hi! Just wanted to let you know your chalkboard project is featured in my round-up of 20 DIY Chalkboard Projects. Thanks for sharing your inspirational creation with us!

    Warmly,
    Lauren
    The Thinking Closet

    Reply
  27. Lindi Stevenson says

    July 31, 2013 at 3:01 PM

    Hi Delia – Love your banner. I did a post on my blog "Art in Real Life" at http://www.lindistevenson. com about one I made using a totally different method. Then found yours through Lauren's 20 chalkboard projects. I linked to your post there because I thought it was cool how differently we approached the same project. Loved your little pockets! Great photos!

    Reply
  28. Lagene says

    September 9, 2013 at 4:23 PM

    Love love love your BANNER! Thanks for the tutorial!

    Reply
  29. Bess says

    April 28, 2014 at 3:45 PM

    Ҭhe title “Mean Women two” will generate enough curiosity tɦat many individuals will Ôťatch it.
    This is a great solid leeɗ by Jߋhn Cusack who is always great, especially at off-beat
    comedy. http://Genievalliereghxm.Xomba.com/

    Reply
  30. Nikki says

    March 3, 2015 at 11:19 AM

    Hello! I love this! Do you sell these too?

    Reply
    • Delia says

      March 3, 2015 at 2:08 PM

      Thanks Nikki! I don’t sell finished items. Sorry about that!

      Reply
  31. Jenni says

    September 17, 2015 at 3:54 PM

    Love your banner! Made one up in less than an hour, so quick and easy. I will be making a few for gifts! Thank you for sharing!

    Reply
    • Delia says

      September 21, 2015 at 12:36 AM

      Awesome! I love hearing that! Thanks Jenni!

      Delia <3

      Reply
  32. Whitnee says

    January 7, 2016 at 12:58 PM

    Do you have to have the felt on the back? What purpose does it serve?

    Reply
    • Delia says

      January 8, 2016 at 10:07 AM

      I do. It mainly serves as a way to stabilize the chalkboard vinyl fabric because it has a tendency to curl. You could choose any fabric I guess, but felt has a good weight to it and it doesn’t fray.

      Reply

Trackbacks

  1. Mini Chalkboard Bunting Tutorial by Family Ever After | Quilting Joy says:
    November 7, 2013 at 11:01 PM

    […] of scrap fabric, and rubbing that into your chalk cloth. Delia explains this really well in a tutorial she did for a similar, larger scale bunting. (You’ll love her […]

    Reply
  2. 60th Surprise Party Decor | Imperfectly Polished says:
    November 11, 2013 at 6:42 PM

    […] but they aren’t “blog” style pictures, but you can get the idea! First, I used this tutorial to create a chalkboard banner. I love this project because it’s cheap, easy, and can be […]

    Reply
  3. Project Bambino » Trending: Chevron says:
    November 13, 2013 at 9:03 PM

    […] chevron banner – jumper – black chevron banner – gold chevron pillow – pink chevron pillow – changing […]

    Reply
  4. Framed Chalkboard DIY | Jillianastasia says:
    November 17, 2013 at 10:52 PM

    […] credit: 1 | 2 | 3 | 4 | 5 | 6 | […]

    Reply
  5. Chalk It Up! | Decorating Your Small Space says:
    November 20, 2013 at 4:38 PM

    […] Gotta love this chalkboard banner… you can find the tutorial at Delia Creates. […]

    Reply
  6. 20 DIY Chalkboard Projects — the thinking closet says:
    November 30, 2013 at 10:14 PM

    […] All Occasion Chalkboard Banner | Delia Creates […]

    Reply
  7. DIY BIRTHDAY DECOR | Best Friends For Frosting says:
    January 8, 2014 at 8:01 AM

    […] a party without a banner? This chalkboard banner is customizable and reusable. (via Delia […]

    Reply
  8. See how you can make your decor sparkle after the Holidays. says:
    January 17, 2014 at 3:30 PM

    […] your mantle is looking empty without your holiday garland, then why not replace it with a banner that you can use year-round? Blackboard fabric lets you write and then wipe away any message, and a […]

    Reply
  9. Candy and Clothes – hump day inspiration says:
    February 12, 2014 at 10:58 PM

    […] for the home// easy way to color vases and mason jars […]

    Reply
  10. Candy and Clothes – hump day inspo 2.19.14 says:
    February 19, 2014 at 7:05 AM

    […] for the home// these DIY phone bookends would be so cute in my kitchen […]

    Reply
  11. All-Occasion Chalkboard Banner (Fabric & Reusable!) | Project - AKA Design + Life says:
    February 22, 2014 at 10:09 PM

    […] followed the directions by Delia Creates. So instead of re-writing her fabulous tutorial here (since the creative credit goes to her), […]

    Reply
  12. Candy and Clothes – Hump day inspo 3.5.14 says:
    March 5, 2014 at 7:04 PM

    […] for the home// I so want to try this out! […]

    Reply
  13. 20+ DIY Chalkboard Projects | Prototype Mama says:
    April 29, 2014 at 9:17 PM

    […] All Occasions Chalkboard Banner via Delia Creates […]

    Reply
  14. DIY Round Up! : Confessions of a Posh Mommy says:
    April 30, 2014 at 9:32 AM

    […] Chalkboard Banner, Spring Dip Dye, Painted Signs, Concrete Candles, Macrame […]

    Reply
  15. Easy chalkboard paint DIY projects for spring - Cool Mom Picks says:
    May 2, 2014 at 10:21 AM

    […] fun for parties, and Delia Creates has this brilliant DIY tutorial for a chalkboard fabric bunting (at top) that can be reused for birthdays, Valentine’s Day, Flag Day, or . . . Tuesday in a […]

    Reply
  16. The “Any Occasion” Banner | Idea Flood says:
    June 10, 2014 at 12:11 PM

    […] >> All Occasion Chalkboard Banner by Delia Creates << […]

    Reply
  17. Party Ideas To Love: Chalkboard Party Decor - One Charming Day says:
    September 5, 2014 at 6:09 AM

    […] Chalkboard buntings which you can use for any […]

    Reply

Leave a Reply Cancel reply

Your email address will not be published. Required fields are marked *

Recipe Rating


This site uses Akismet to reduce spam. Learn how your comment data is processed.

Primary Sidebar

Search this site:

Reader Perks

Reader Perks

Footer

  • Facebook
  • Instagram
  • Pinterest
  • YouTube

All Images On This Site Are Protected By Copyright

You may not use any images from this site unless you meet one or more of these requirements: 1) You receive permission in writing from Delia Randall for each specific image you would like to use. 2) You use ONE image in a round up or feature post with a link back to the appropriate post or the main site for credit and for full posts/tutorials. Thank you!

Archives

Search This Site:

© 2023 delia creates · Design By Bloom