

This is a sponsored post for Plaid Crafts/Mod Podge as part of a campaign for Blue Print Social. Collage Clay is not recommended for children ages 12 and under, and the product is NOT edible. Small parts are a choking hazard for children.
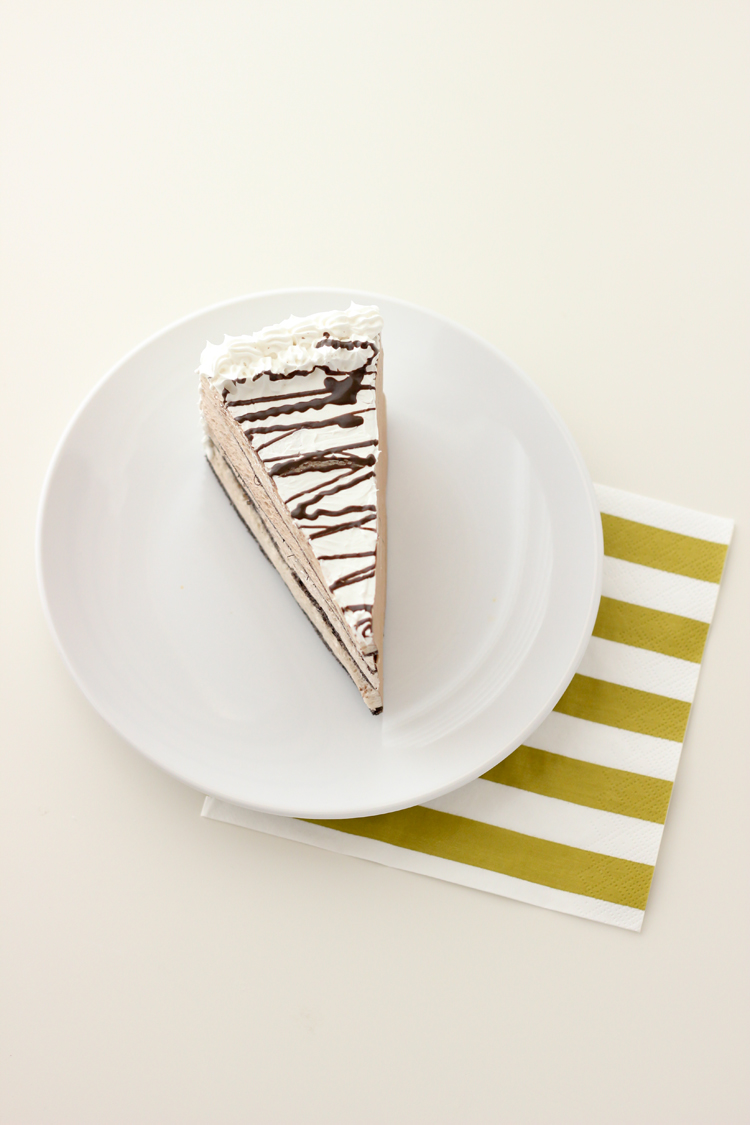 I remember when I saw THIS fake cake postcard from SheKnows. I loved the idea! When Plaid Crafts/Mod Podge sent me some of their new Mod Podge Collage Clay I knew it would be perfect for this project.
I’ve modified the project a little bit, but be sure to check out SheKnows’ original version if you haven’t already.
For this project, you need:
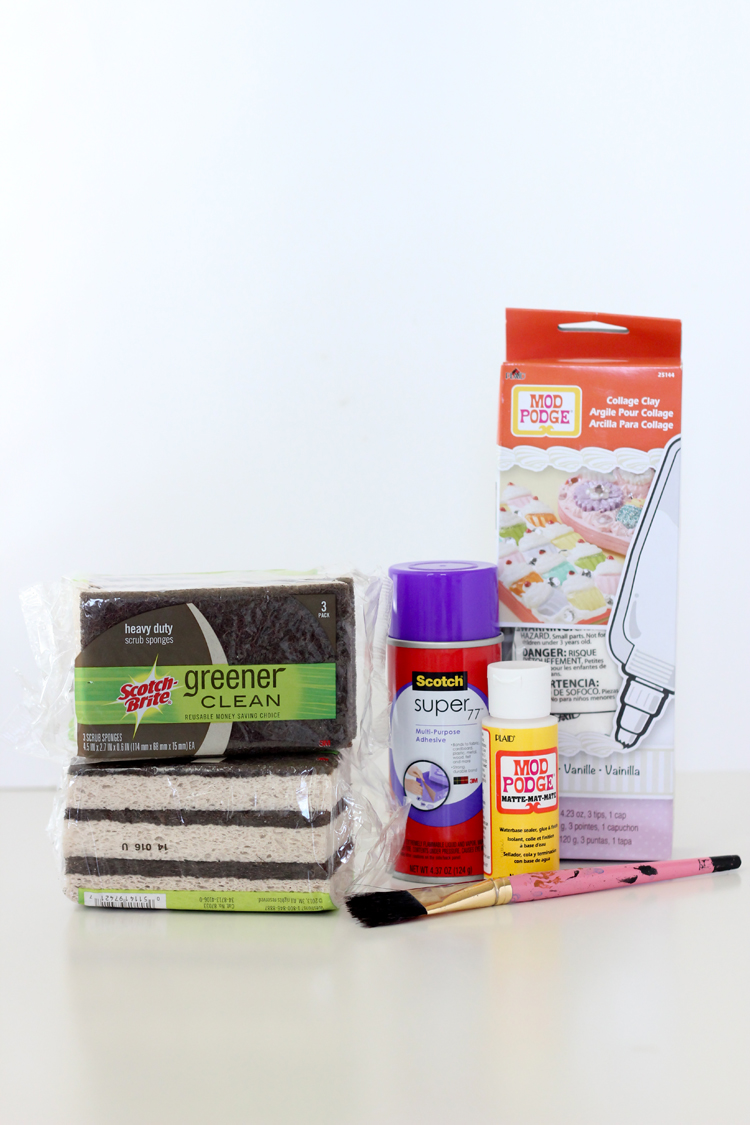 – 4 Scotch Brite Greener Clean sponges (They are the only sponges I know that come in brown like this. They have a tan version too.)
– Spray adhesive
– Mod Podge original glue/sealant and brush
-Mod Podge Collage Clay in white
– Rotary cutter and/or large sharp scissors
– Ruler
– Plastic disposable butter knife
– Postcard printable, print off HERE*
– 4 Scotch Brite Greener Clean sponges (They are the only sponges I know that come in brown like this. They have a tan version too.)
– Spray adhesive
– Mod Podge original glue/sealant and brush
-Mod Podge Collage Clay in white
– Rotary cutter and/or large sharp scissors
– Ruler
– Plastic disposable butter knife
– Postcard printable, print off HERE*
*The postcard printable is sized to fit this tutorial and the Scotch Brite sponges exactly. The printable is hosted through Google Drive. You should not need to sign in to Google to access the printable but it may help if you experience trouble with the link. If you would like to receive the printable by email, contact me at [email protected]. Please allow up to 10 days for email delivery.
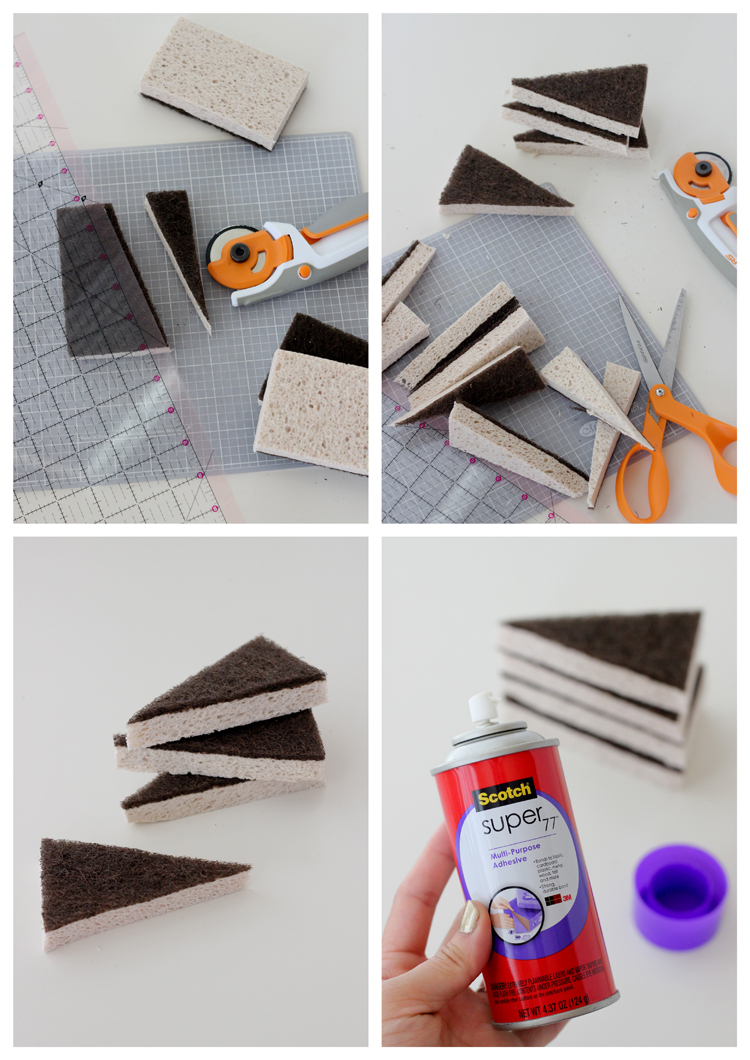 1. Find the center of one of the short sides of a sponge. Cut from that center mark to the opposite corner by marking a line with a ruler and cutting with scissors, or using a rotary cutter and ruler. If using a rotary cutter, a lot of pressure needs to be applied to the ruler and sponge. It will likely take a few cuts to get through the width of the sponge.
When you’re done, you should have FOUR sponge triangles.
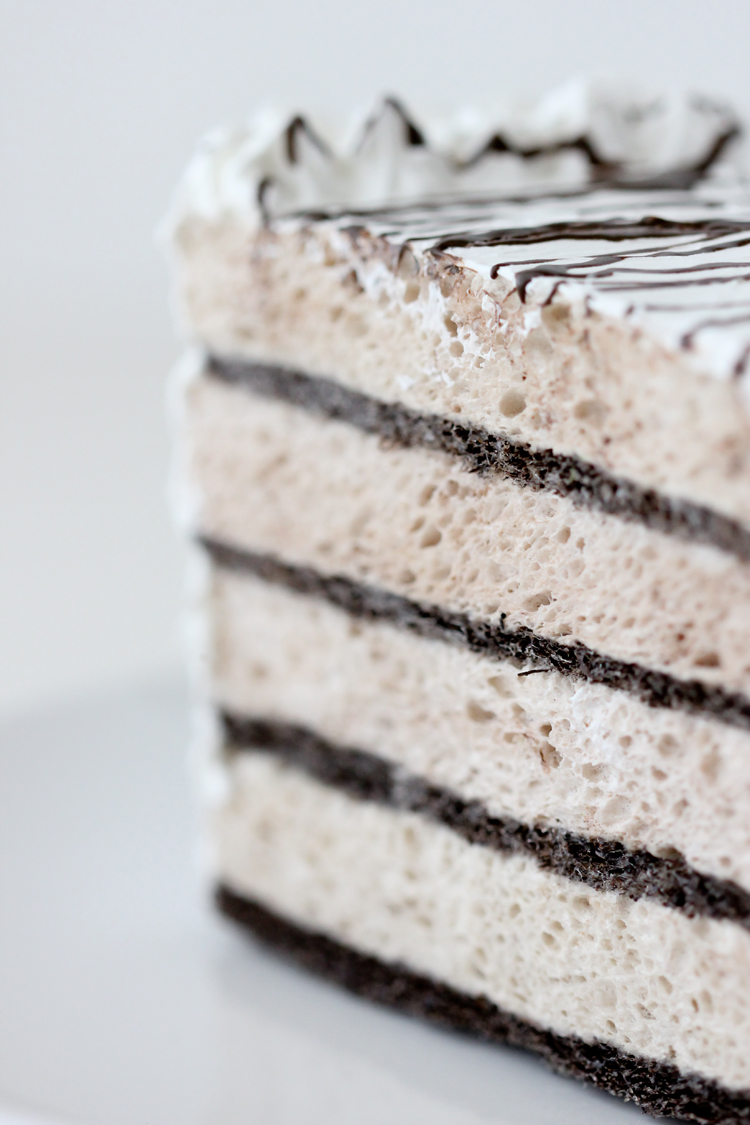
2. Using spray adhesive, glue the sponge triangles together into a stack, with the dark brown and light brown sections alternating.
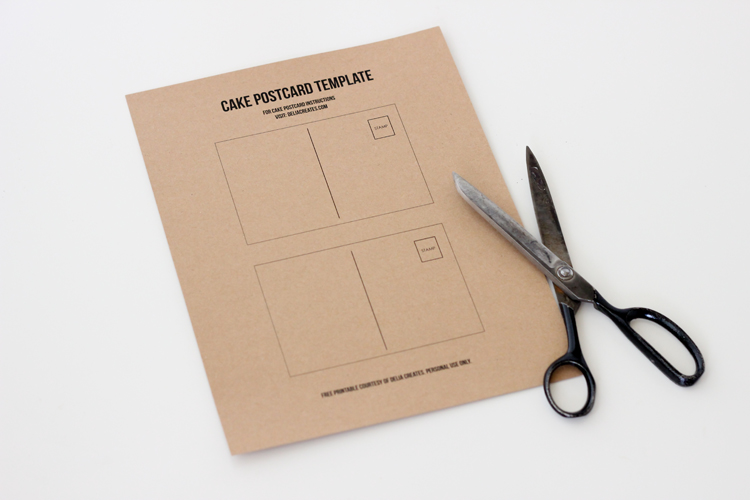
 3. Cut out one postcard from the template and glue it to one of the wide, flat sides of the stack.
4. Apply a generous coat of Mod Podge to the other side of the stack. Sponges lose moisture and shrink when outside of their packaging. The Mod Podge helps reduce how much it shrinks, so the postcard will keep its shape. Optional: You may also want to add a coat of clear spray paint to be sure the sponges are well sealed.
Let mod podge (and spray paint) dry before proceeding with Step 5.
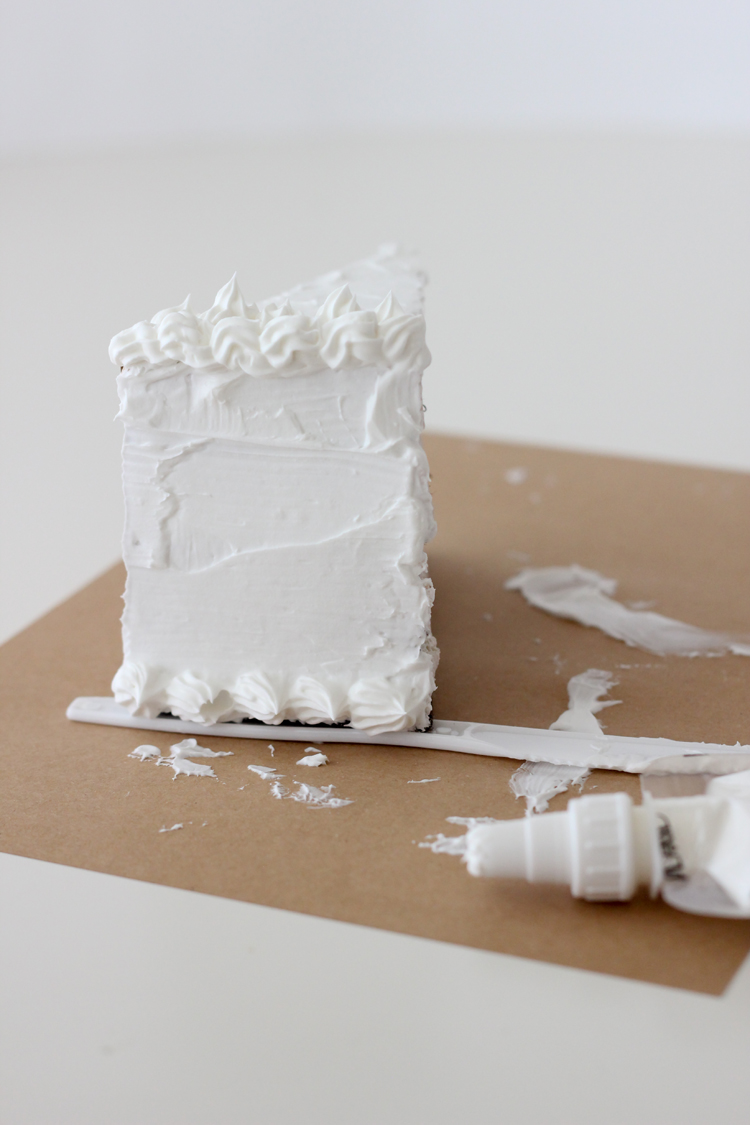
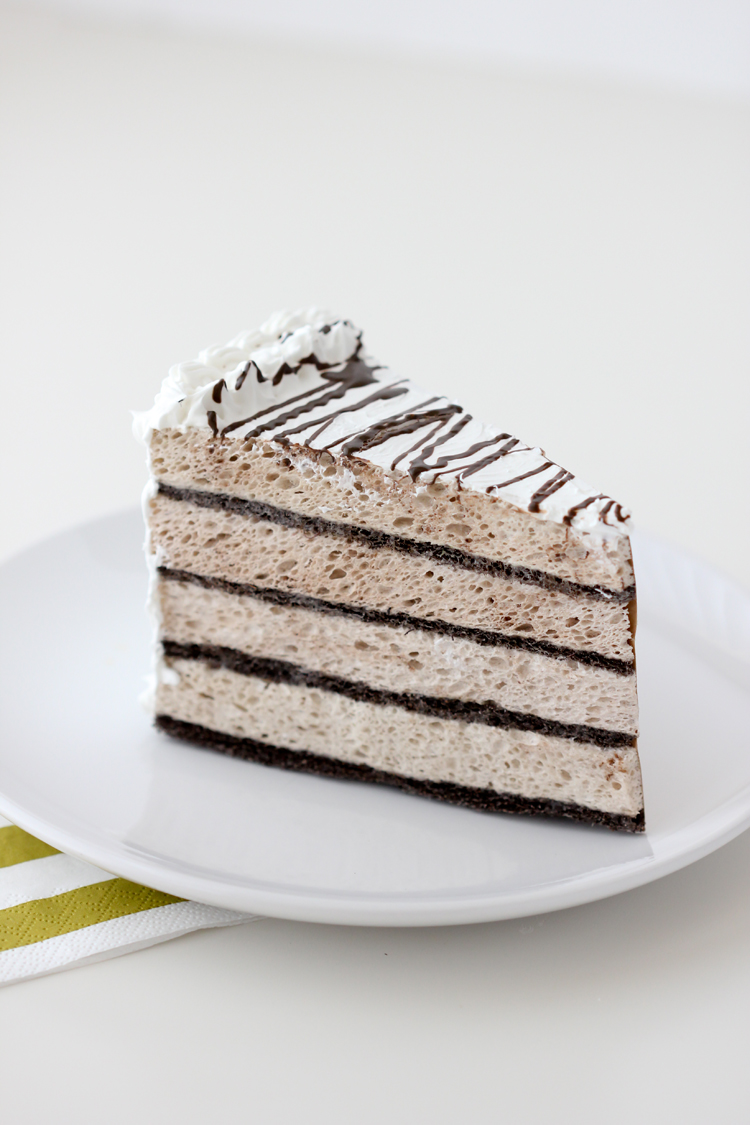
5. Frost the Mod Podge Collage Clay on the top and back sides of the stack or cake. I was pleasantly surprised to find that the collage clay is easier to spread than real frosting. It dries slowly, so it is very forgiving during the crafting process.
Using the different frosting tips provided with the collage clay, pipe decorative swirls onto the sides of the fake cake as desired.
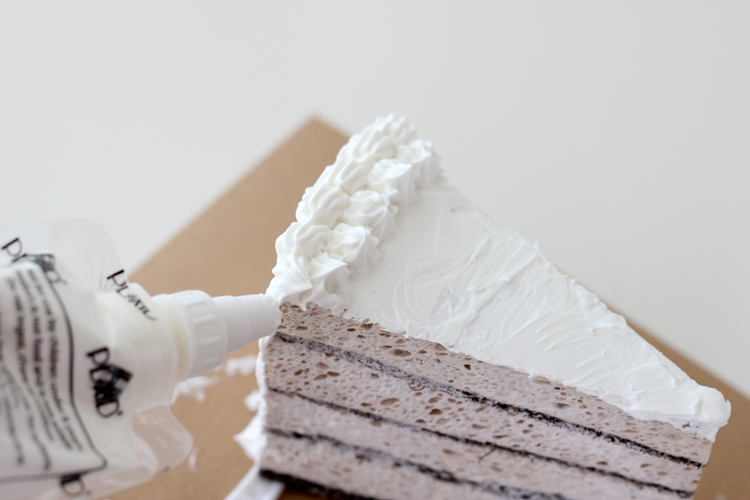 TIP: I used the disposable butter knife to prop the cake up off my work surface so the collage clay wouldn’t adhere to the paper.
 Optional: Mod Podge also makes this fun drizzle paint that looks like syrup. Drizzle that on top if desired.
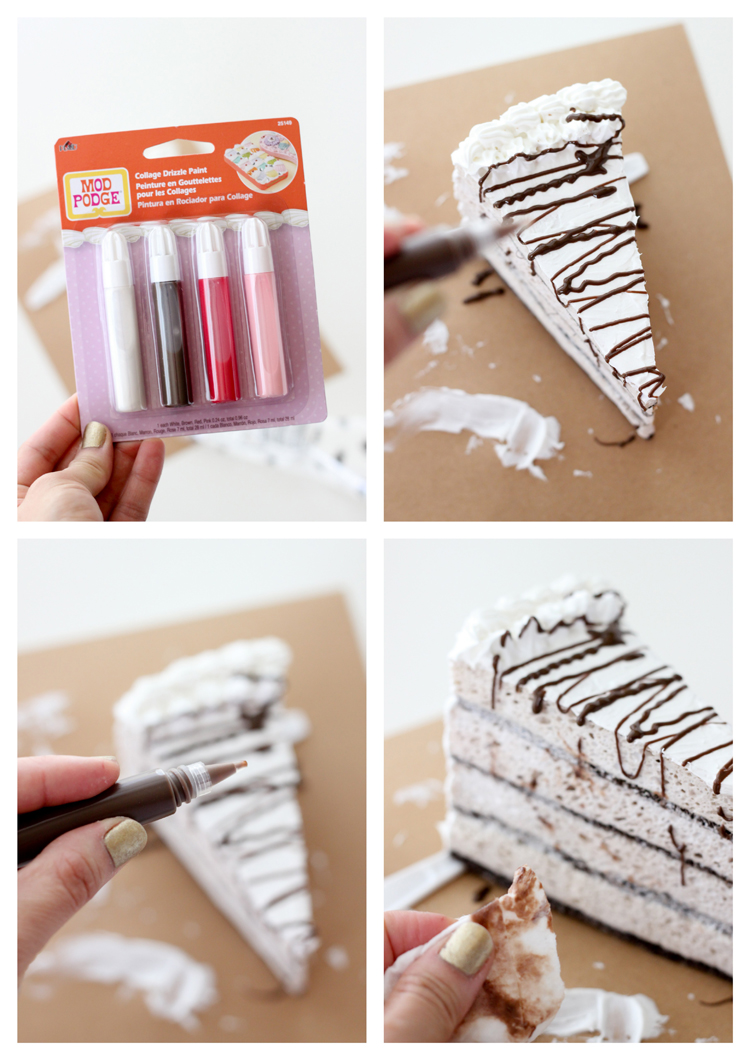 It easily wipes away from the sides with a wet rag. The paint leaves a little bit of a tint, but I think it adds an authentic look to the cake.
Or you can add tape and wax paper to the sides to prevent it from getting drips on it in the first place.
 Let it dry overnight before handling. Let it dry for five days before mailing.
The “frosting” cracked a little bit as it dried, but has never crumbled or shown any other imperfections.
After it has completely cured it is pretty much unbreakable. I threw mine around and against the wall to test it, with no damage at all to report.
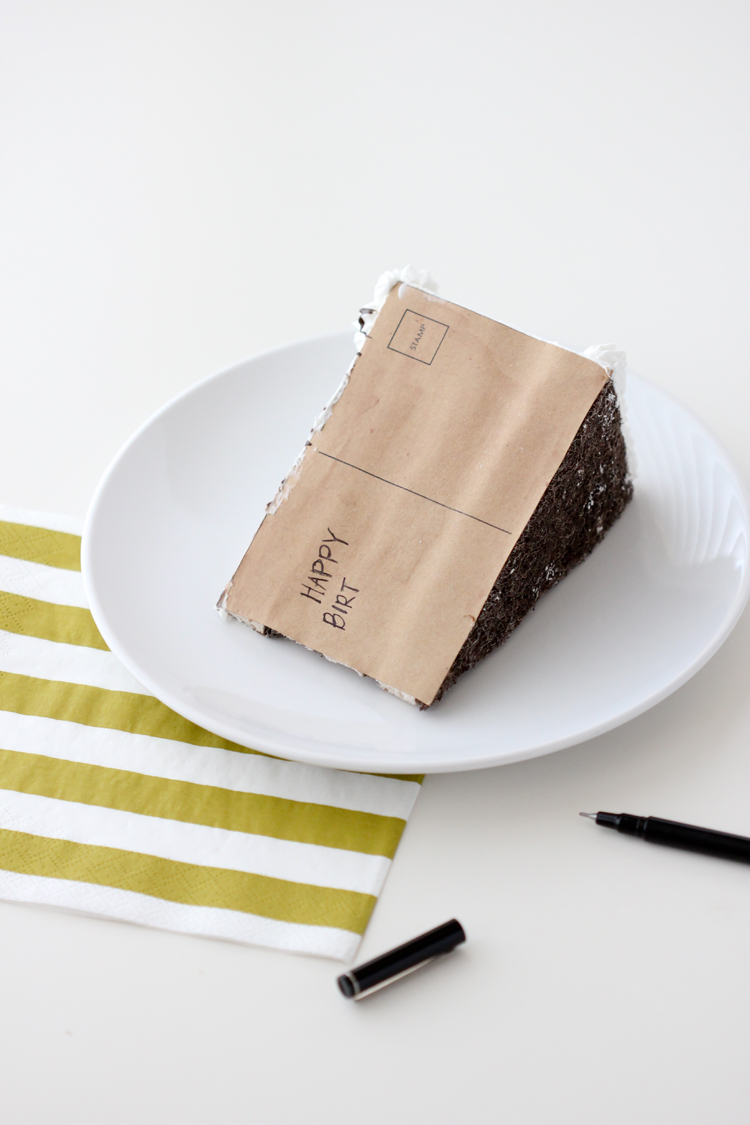
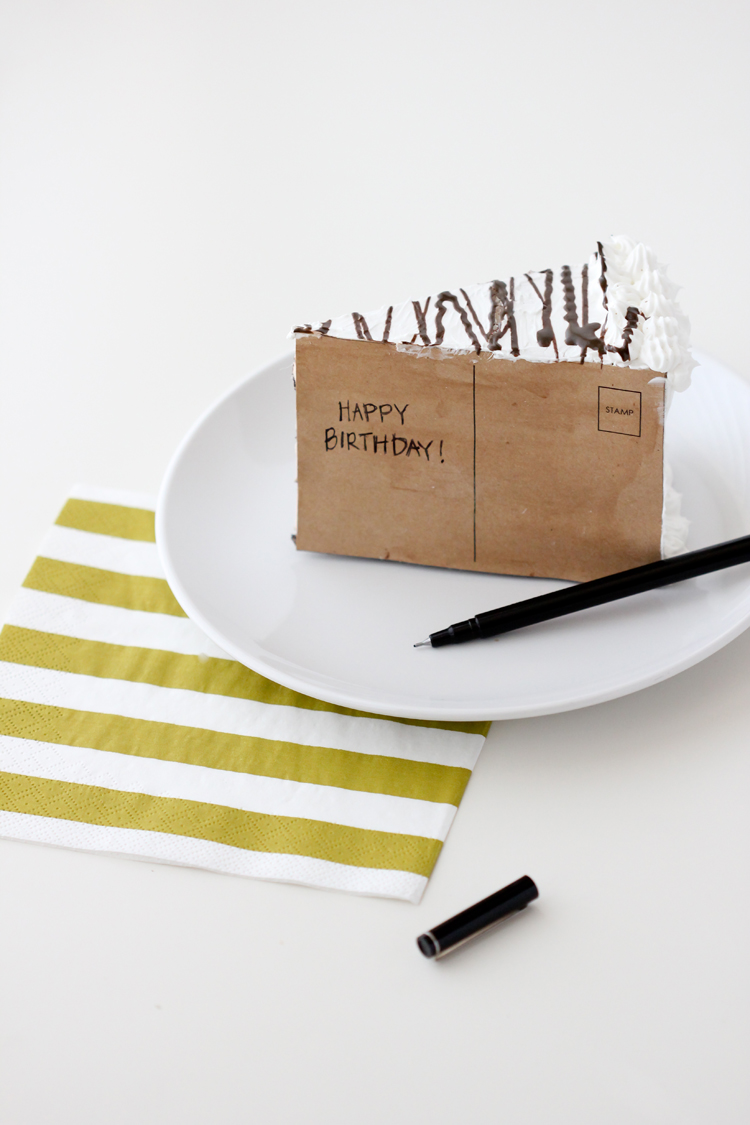 Add a birthday message and take it into your local post office to send it on it’s way!
Please note: I have never sent a fake cake postcard before, so I am unfamiliar with how much postage is required. Consult your local postmaster for postage requirements. SheKnows assures us that it WILL make it through the mail though! 🙂
______________________________________________________________
You can purchase these supplies at Michael’s. For more information and to purchase your own Mod Podge Collage Clay or other related Mod Podge products, click on the links below: Mod Podge at Michael’s | Mod Melts | Mod Molds | Drizzle Paint | Collage Clay Or enter to win some of these products by entering HERE.
This is a sponsored post for Plaid Crafts/Mod Podge as part of a campaign for Blue Print Social.
Learn more about Plaid Crafts/Mod Podge here:
Plaid Palette Blog | Plaid Newsletter | Pinterest | Facebook | Instagram | Twitter | YouTube | Google+
Or enter to win some of these products by entering HERE.
This is a sponsored post for Plaid Crafts/Mod Podge as part of a campaign for Blue Print Social.
Learn more about Plaid Crafts/Mod Podge here:
Plaid Palette Blog | Plaid Newsletter | Pinterest | Facebook | Instagram | Twitter | YouTube | Google+
I actually like the looks of you fake cake better than the ones on SheKnows!
Super fun project and love how the cake turned out. Thanks!
That looks absolutely delicious! It wouldn’t taste nearly as good as it looks though…. sponges and clay. Blech. I so want to try this!
Took me a second to realize its a fake cake !
Delia, this is so cool!! Looks DELICIOUS — too bad you can’t eat it.
Oh my gosh, this is so cool! How fun it would be to receive this in the mail!
This is amazing! I would love to get one of these in the mail. I’ll have to send it to a friend celebrating a birthday. 🙂
Super cute project!
Thanks Cathie!
I have a question, am I supposed to have 4 slices cut from one sponge. I cut one (1) sponge into 2 slices——which is correct? Every Christmas I host a Christmas Dessert Party and I thought it would make a great invitation
Oh fun! Good question. So for this thick of a slice, I used four sponges and cut a triangle out of each one to get the four layers. To create less waste you could totally make the slices thinner and get two slices out of one sponge. That way you’d only need two sponges per invitation. I hope this helps. Good luck!
Thank you for the explanation. Now I can’t find the Mod Podge Collage clay or the Drizzle paint.
Any suggestions where I can find or what I substitute with? I appreciate your time.
I did a search and found some at Michaels on clearance. https://www.michaels.com/mod-podge-collage-clay/M10326611.html
I’m afraid that may mean they are discontinuing the line, but I’m not sure. I found it for a higher price on Amazon. If you can order it from Michael’s soon, it’s only $4 a box right now. It looks like it’s a whipped clay, so you may be able to find a recipe to make your own as well. The drizzle paint I think could easily be substituted by mixing paint with regular mod podge or something like that. I hope this helps!
Oh! I just found other brand substitutes on Amazon. They look to be pretty affordable. Like this one: https://amzn.to/2BgR3LY