


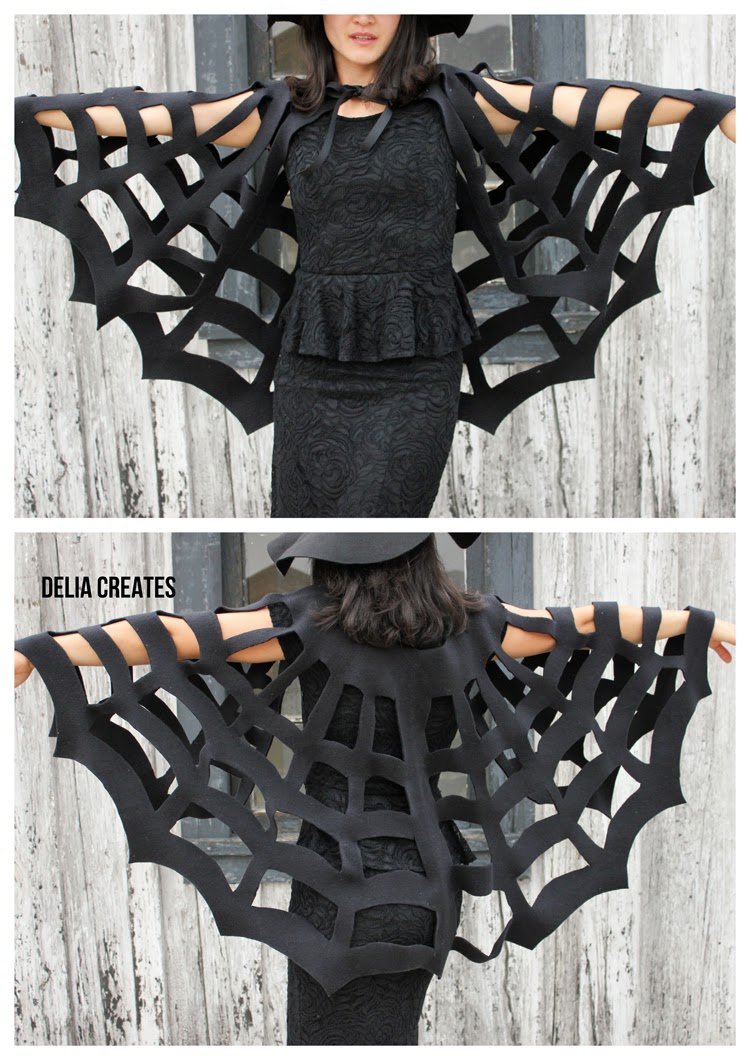
With October just around the corner, I’m sharing a Halloween costume tutorial today for


MATERIALS
- *fleece (or felt) fabric – about 1 yard for a small child, 1 1/2-2 yards for an adult
- **tailor’s chalk or sidewalk chalk
- 1 yard of ribbon
- sharp fabric scissors
- ruler or measuring tape
Material Notes
*Update: This project was originally created in 2013. As I update this in 2025, it has been brought to my attention that the fleece that is now widely available, may produce a very floppy spiderweb. You may want to consider buy felt instead. It’s less comfortable but it will be easier to cut and will hold its shape better.
**Sidewalk chalk is preferred because regular chalkboard chalk is sometimes hard to draw with on fabric, especially fleece. Sidewalk chalk that has gotten wet and then dried again, is softer and easier to work with on this project.
TUTORIAL

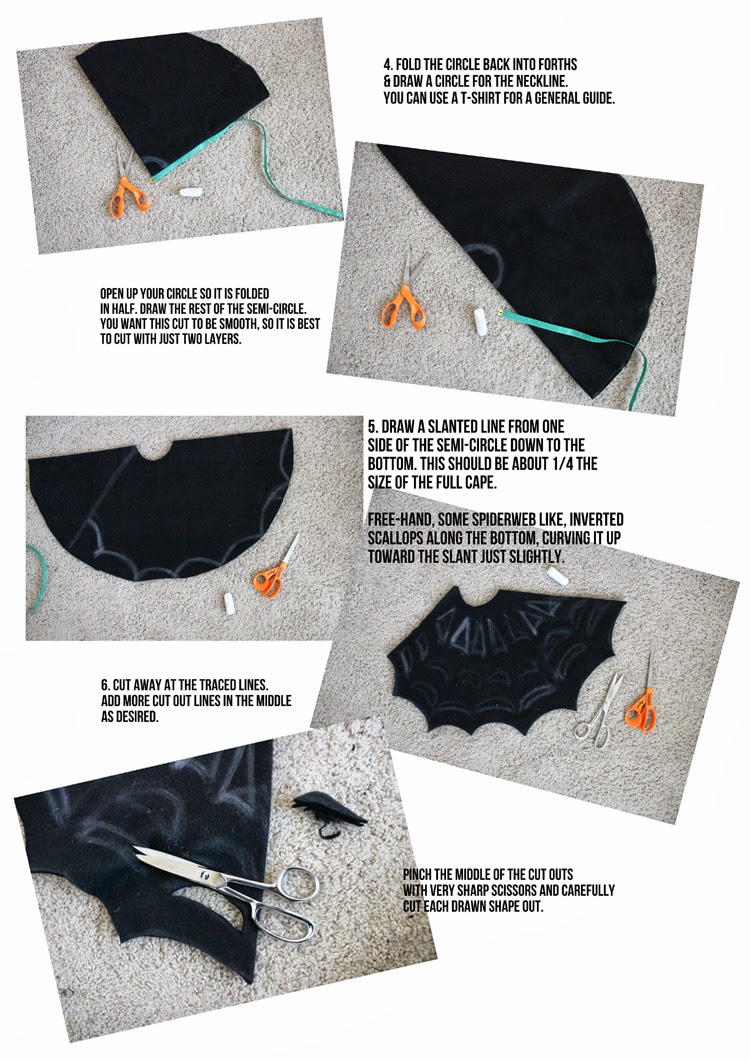
Edited to add: Make sure you cut through that slant you drew in Step 5!
Tip 3: As a general rule, a small child’s neckline radius is about 2 inches and an adult’s is about 3 inches.


So cute and easy! My type of project 😉 Thanks, Delia.
Sometimes it good going against your norm, those photos of you two together in your matching costumes are priceless!!
Sometimes it good going against your norm, those photos of you two together in your matching costumes are priceless!!
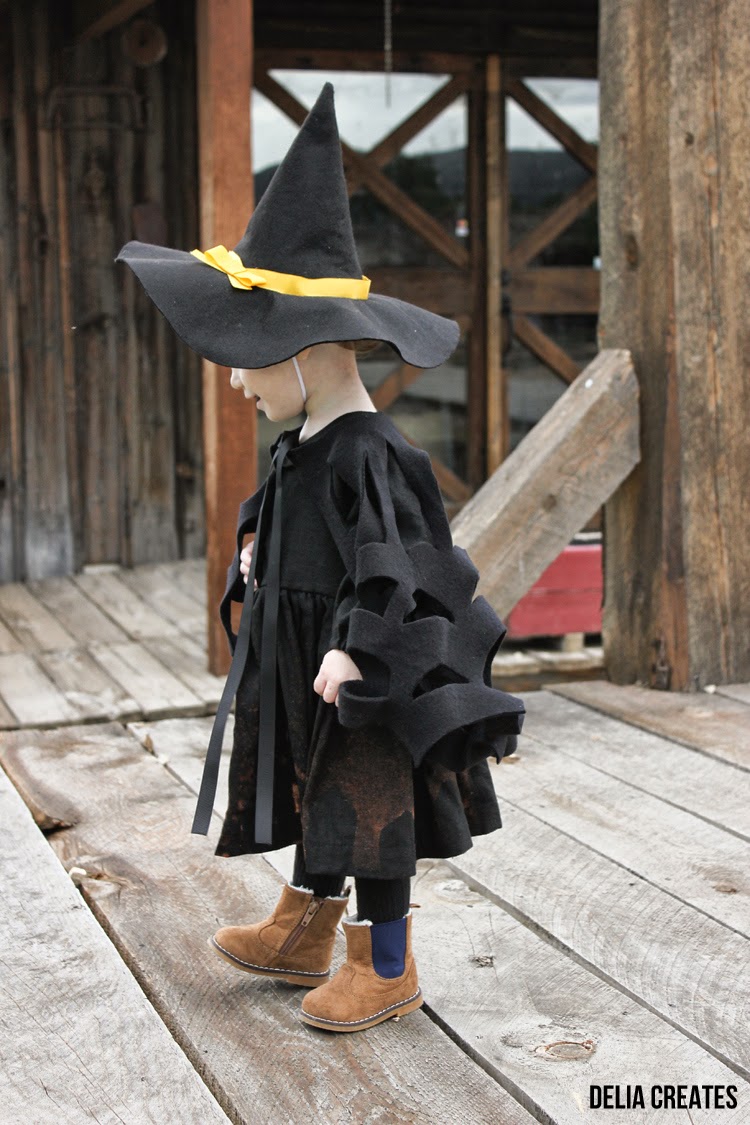
Thank you!! I have been a boring witch these last couple of years but NOW I will be an awesome, SPIDERY witch this year! I am so excited! This is great! What about the hat…did you make that? If so, please share the HOW-TO!! You're the best 😉
Thank you Mom23! 🙂 I did make the hat and I will share the tutorial next Monday actually…it's another guest post.
Wow, Delia you never disappoint! This is really a fantastic spin on the normal witch costume. I'm starting a weekly post on my blog where i want to feature great posts from the last week in sewing blogosphere. I'd like to include your post. Is it ok if I grab a pic from your post?
Holy Smoked Delia – this is AWWWWWWWESOME!!! I am so impressed, love love love love love it!
Of course Annika. Thank you!
I LOVE THIS! Totally didn't get your vision when you were describing it to me ahead of time, but this looks SO cool. You're awesome.
This is AMAZING! I am a HS teacher and NEVER dress up for Halloween but I would love to make this and wear it to school!
Oh I love that cape! I love how you dressed up, such an elegant witch you make! I totally would be rockin' it in jeans in real life too. 🙂
ridiculously adorable!!! love it 🙂
Love it! Will be making one for a party coming up… I think I will make a hole and tie on ribbons instead of hot gluing them… maybe a row of slits and weave a long ribbon through to make a gathered tie
That sounds like a great idea! I’m thinking of seeing what this costume looks like before cutting the interior webbing out– I’m hoping it will have a bat-like look.
Oooh yes! That is a great idea!
Love it! Will be making one for a party coming up… I think I will make a hole and tie on ribbons instead of hot gluing them… maybe a row of slits and weave a long ribbon through to make a gathered tie
Oh Delia, I love your brain so much! This is amazing, way to go!
THIS. IS. AWESOME.
Brilliant,as usual!
~Michelle
Very cool, Delia – I love it! What a great idea!
This is so awesome, Delia! Just my speed for Halloween. 🙂
oh I love it so much. I definitely want one! I'm almost never get a costume after spending so much time making everyone else's so this is perfect!
Now that is so cool!!! I just adore the pictures too. I love you Delia:).
Great project, very original.
Oh my gosh, Delia. You are cracking me up. Those pictures are awesome (as usual) and I just love this idea. I would so love to make one of these and wear it to school. My kindergarteners would go nuts.
This is so awesome!! Love it
What an adorable idea! Thanks for the tutorial.
Thanks so much for sharing… this is great!
This is so amazing! I saw it on Instagram and about died. You are so creative! 🙂
just too cute and looks pretty easy to do. Shared and pinned,
thanks
top! nice! great! thank's 😉
top! nice! great! thank's 😉
I love this so much. We go to a great party with the kids every year and I'm always itching to dress up without actually dressing up. I can just wear all black, pin a glittery purple spider to my shirt and call it done. Thank you so much! And I must say, I dig the matching costumes. She'll only be little for a short time, so take advantage. Those pictures are a fantastic memory. And she&#
I love this so much. We go to a great party with the kids every year and I'm always itching to dress up without actually dressing up. I can just wear all black, pin a glittery purple spider to my shirt and call it done. Thank you so much! And I must say, I dig the matching costumes. She'll only be little for a short time, so take advantage. Those pictures are a fantastic memory. And she&#
I am so un-handy but I think I can manage this. I love this idea. Can you tell me the yardage you used for the adult cape? Thanks!
Ooops — went back and re-read the directions. The yardage is very clearly there. Sorry — evidently I'm also lacking in reading skills.
Thanks again for a great idea!
Nice !!
wow! I love it!
I posted it on my blog, with a link to your blog, of course 🙂
http://vanillacreativedesign.blox.pl/2013/10/DIY-peleryna-pajeczyna.html
i absolutely love it and plan on making one for myself and my granddaughter. a small heads-up, in the first part i thought you might want to see ("the really awesome 2013…") has handmade spelled wrong. please don't take this as a criticism, just passing on info. again, thanks for this wonderful idea!
You made my day♥ ! I've looked for a very special idea for a black night party and here it is 😉
I have been thinking about this cape for weeks now. So I finally bit the bullet this afternoon and made one for my twins 9th birthday / halloween Party next month. OMG it turned out fantastic – even if I do say so myself. Absolutely love it. Thanks so much for sharing this tutorial Delia, I would never have thought of it myself. Can't wait for Halloween and then my kids party to wear it
Love, love, love this cape! And girl, you rock the witch look in that gorgeous dress and green stockings! Thanks so much for sharing.
Made it today for Family Fun Fest at my son's school tonight. I may have a small blister on my finger though – that was a LOT of cutting! Can't wait to wear it though! My son doesn't want me to be a witch because he says I'm ALWAYS a witch for Halloween so this will be a nice change. Adam thanks you!
I loved this when i found it on a google search. I had no idea what i was going to wear to work for halloween and almost just decided to give up but with this i can make about 7 or 8 different costumes with things i already have. i was also playing around with the extra fabric i cut off for the opening and made a "matching" cape for my weiner dog just for fun, he seems to love your
my granddaughter’ll love this ! thanks for sharing ! i posted the link here : http://www.pinterest.com/lemondedis/halloween-diy/
Love this cape! I will definitely be making it to wear for Halloween! Do you think it could also be made out of felt? Thanks for the tutorial!
Just found this- it is exactly what my daughter needs! WAY better than any trashy store bought outfit!
Thanks! I am so happy to help. 🙂
I read all the post and thought this was so cute. NOT I just sat on the floor for 2 hours cutting all the shapes out and what a BIG MESS. It was Really hard to make clean cuts and have the patterns layed out perfect. The fleece does not keep the shape when it hangs down. Little to say it is in the garbage and now looking for something else. NOT HAPPY WITH THIS AT ALL. Dont help I am sitting on the floor with a broken leg.( NOT KIDDING)
Julie,
I am so sorry that you struggled with this project. That must be so frustrating to have it not work out! The fleece should stretch a little bit as it hangs loose and down, but not too much. My guess is either your fleece is not very good quality, or the fleece between spaces may not be thick enough (i.e. the holes were cut too large). If you don’t want the cuts to stretch at all, I recommend a rain coat or vinyl type fabric. It is much more expensive but it can be easier to cut and will definitely hold it’s shape.
Cutting takes some time but it helps to have a nice sharp pair of scissors to help it go by faster and not hurt your hands as much. I am truly sorry it didn’t work out for you! I hope you find a Halloween costume or project that you enjoy more. 🙂
Best,
Delia
My daughter was going to be Dorothy for Halloween until she saw this as we were scrolling through Pinterest. Then she decided she would be a spider witch. I gave it a couple days of her saying that before I invested, but she was adamant that she would be a spider witch. Then at Kroger, I found a glittery spider witch hat ($5 and on sale) and knew it was meant to be. I just finished her spider cape and she LOVES it. Made it out of felt (I couldn’t remember at the store if it was felt or fleece) and it turned out great. Also, instead of ribbon, I found a big black and purple button with a spider on it, so I just cut a button hole in the fabric and sewed the button on it. Looks awesome, took 30 minutes or so to make, and cost $2.99 for the yard of felt. Thanks so much for the tutorial! I love your site. I never comment, but I thought you had to know that there will be one little girl wearing your design this halloween!
Oooh nice button find! I am so glad you liked the tutorial! …and I am so glad you commented to let me know. Made my day!
Hey Delia! So I was looking around online for good witch hats and capes for my costume this year and was so excited to discover my favorite pics were yours!! I haven’t been as good at following blogs in the last few years, but this was a fun excuse for me to catch up on old friends. Happy Halloween!
Hi Erin! So good to hear from you. I hope you guys are doing well!
This was so easy! Thank you for the great instructions. I used White Fleece and glued little plastic spiders on my web. You are a great inspiration. My hand was a little sore after cutting out all the holes. I think a rotary cutter on a cutting board may have made this a little easier, but I didn’t have one. Scissors do the trick in a pinch. I just plopped down watching the World Series (GO ROYALS!!) and started cutting. It took me about 2 hours to complete all the cuts. Attached the ribbon and spiders and voila!! Cutest part is I found a spider costume for my black lab and didn’t have any intentions on matching costumes, but then I found this cape tutorial. Thanks again.
That sounds so cute! The cutting can get tedious. I’m glad you were able to find a good distraction! How fun that you will be matching with your dog! Happy Halloween!
I just made this with felt instead of fleece since it is easier to work with, less stretchy and gives it a crisp look. It turned out great!! I am going to be a black widow spider for Halloween and my husband is an exterminator. Your instructions were excellent and easy to follow. Thanks!
And forgot to say, the felt is a bit itchy, so for others making this.. if you aren’t wearing long sleeves, I’d go with the fleece.
I think this idea and the results are stunning! I am making this to go along with my ‘spider queen’ costume this Halloween. One note that might be worth sharing: between steps 5 and 6, you mention drawing a line from the neck to the outer circle to mark off 1/4 of the cape, then drawing in the scallops and areas that will be cut out. The instructions never actually mention cutting off this 1/4 portion to leave you with an open cape that drapes over your shoulders and arms. I kept re-reading the post, trying to figure out how you went from an enclosed circle to an opening with ribbon. Perhaps those readers who are more adept at doing crafts have already figured this out, but it took me a minute (and practicing with a sheet of paper) to realize we need to cut this portion of the material out.
Thanks so much for the beautiful design – I can’t wait to show it off at our party this weekend!
Oh good point. Sorry about that. Thanks for letting me know! 🙂 So, glad you like your new spiderweb cape!
Hi there. This is an AWESOME cape. I tried to make this, but yours looks so much better than mine, lol. Here in S.A. we call the materiel, felt. We only had our Halloween party a week after Halloween because we had some bad weather. I’m going to list your site on my blog. Love your ideas! My blog is incrediblelearning.blogspot.com.
Thanks Julia! Can’t wait to see it!
I just made this for my 8 yr old. So does not look like how you made it. I need help! Please email me! Am I not cutting it right? I used a yard but it’s so small. And I’m not sure if I’m folding it correctly when cutting. Because my quarter circle did not look like yours.
Stacy,
Oh no! I’m so sorry it’s not working like you hoped. It could be the type of fleece you are using? Maybe it would be easiest if you email me a pic so I can help you troubleshoot.
Here’s my email: [email protected]
I had the same problem! I used a yard of fabric that was 60 inches wide and when I folded it into fourths I had this long narrow piece that I could not cut into the quarter circle. I was so excited to do this for my 6 year old (I don’t sew!!) but it is not looking pretty!
Hmm…Sorry about that. It can help to cut the fleece into a square first before folding it into fourths. Also…when you measure the quarter circle, you won’t be using the whole folded rectangle of fabric, just the part you marked out with your pen/string protractor. I hope that helps? Let me know if you have any more questions. I would love to help you trouble shoot.
Delia 🙂
I am a primary school teacher in a country where resources – especially for events like halloween – are hard to come by.
I could not get felt / fleece, but bought thick black material. I used white eyeshadow instead of chalk which worked very well.
It worked out really well and the kids loved it, thanks! Easy to make.
I am so happy you liked the tutorial and that you were able to make it work for you! Happy Halloween!
Hi, I’m sorry if I seem stupid but I cannot find the directions for making this 🙁 I also don’t see any photos of you and your daughter dressed alike (as was mentioned in a comment)? I’ve tried clicking all over this page to see if there’s a hidden link to the instructions but to no avail. Can you help me please? I ride a 3-wheeler called a Can-am Spyder (you have probably heard of them but they’re quite rare over here in the UK). We do charity rides and wearing a spider-web cape would be very eye-catching and fun 🙂
Hi Joanna. The instructions are included in all of the pictures. It is possible the photos are not loading for you properly. I suggest refreshing the page. I hope that helps!
Delia
Hi! Where are the steps? I see that step five is referenced but there are no steps for cutting this, only see the “tips” listed out. Help!
Hi Nicole! I tried something different with this tutorial and put all the steps in photos. So, if you cannot see a step, it is likely that a photo did not load properly. I suggest refreshing the page to get all the photos to load, so you can see them. I hope that helps. 🙂
FANTASTIC IDEAS!
GREAT PICTURES & DIRECTIONS!
HAPPY HALLOWEEN, INDEED!
MANY THANKS AND LOTS OF ADMIRATION!
Thank you Rebecca!