

It’s been getting brisk around here so I made a couple more ear warmers.

This is one {below} that was inspired by a church talk that’s been on my mind a lot lately…found here.
With little Forget Me Nots peppered up the side.
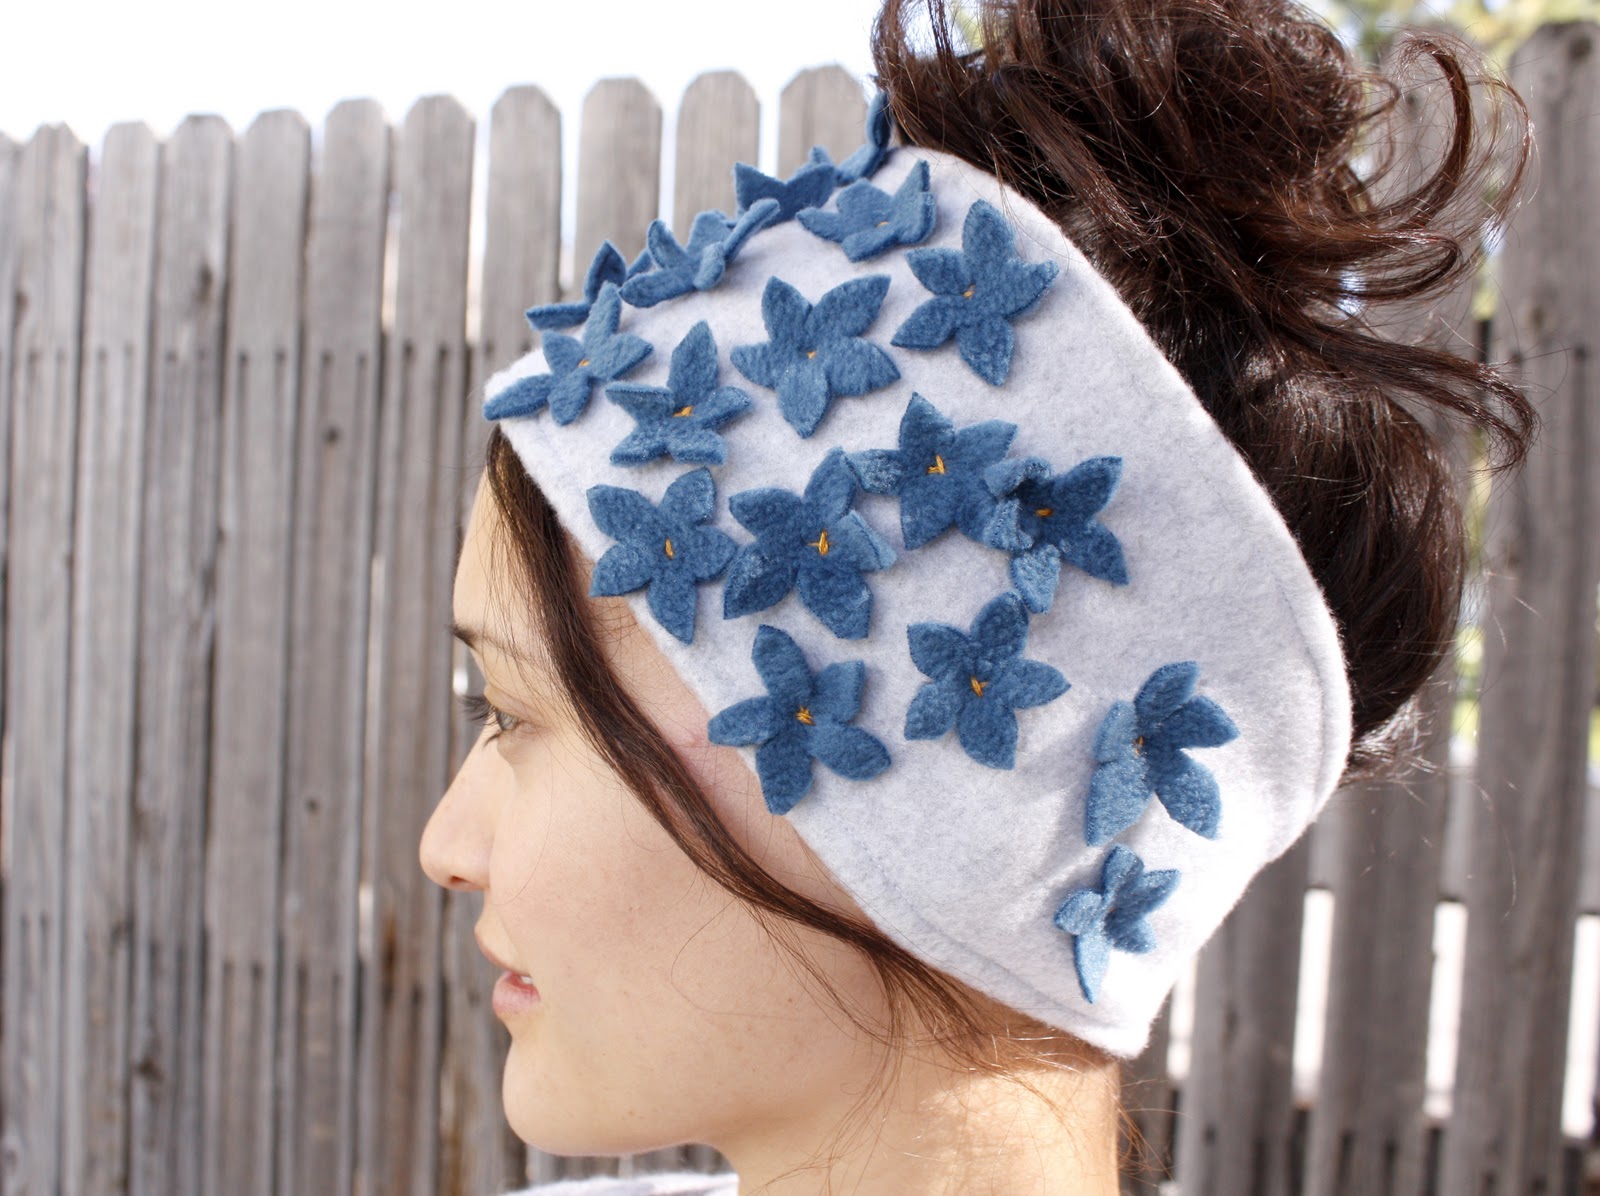
I’ll admit. I so badly wanted this one to turn out better than it did. I felt a bit limited by the fleece colors available at three different fabric stores. Still…I like that it reminds me of how loved I felt when I heard President Uchtdorf speak.

I also made this yellow one.
I know the bow is a bit – um – big and ostentatious, but I can’t help but like it. 🙂

These ear warmers are VERY simple and so cozy warm.
So, I figured now was a good time to share the tutorial again…simplified.
Here goes…
You can use an old wool sweater that has been shrunk a few too many times (felted) but fleece is inexpensive and cinch to use as well.

A quarter yard of fleece is enough to make two adult ear warmers depending on how much embellishing you want to do.

I finally got around to making a paper pattern as you see here. I don’t have it for free download, but you can see the measurements.
The length shown is for the full length of the ear warmer {not the half pattern}.
You can also measure around your head and then add about 2 inches to get your length.

Cut your ear warmer out in the shape you desire.
If you are making your own pattern with different measurements than mine, allow yourself an extra 1/4 inch on the long sides.
Fold the long sides under about 1/4 inch and sew.

Wrap it around your head and adjust the length if needed {depends on fabric stretch, how tight you want it}. Then hem the ends under.

Add a button and a button hole.
For fleece you don’t really need to sew a button hole.
Just cut a slit slightly smaller than your button.

Embellish as you please.
You can do this by machine, but I usually tack my embellishments on by hand.

And you’re done.
Told you it was simple. 🙂

You can wrap a nice knit fabric over the top like the one I made here

or double up the fleece to make it warmer.
Flowers also add a nice touch:


Or… you can add a huge double bow to the side. : )

This bow is SO huge I did a mixture of fabric gluing and hand tacking. Don’t let the glue do all the work though. Hand tack enough that if the glue starts to wear down, the stitches will still hold it in place.

The possibilities are endless!
P.S. Please note that this tutorial is to make ear warmers for personal use and not for sale. Thank you!
Thank you for reading. 🙂
Have a nice day!
Those are just soooo adorable. I just love the flowers and the big blossom one! Great tutorial.
These are really nice! I’m going to make one (or more!). Thanks for the directions.
Loulou @ Loulou Downtown
Hi! Do you have a great blog)
I really like the ear warmer) It is a pity fleece, we sold only in dark colors …
um can you just open an etsy shop already? You are so creative, I love looking at your blog every.single.day!
Cute! I love the double bow, but I’m pretty sure I could never pull it off like you!
I really like the bow! It is big, but I love it! 🙂
Those are SO cute and just easy enought that my uncrafty self might be able to make one!!
The bow ones are my favorite! Definitely making those.
I love this! I love the big bow, too, though I think you pull it off better than I could.
Gorgeous! The grey one with all the flowers looks vintagey! I was thinking that the white one with Forget Me Nots was my favorite, then I saw the blue one with striped bow, then I saw the grey one. My oh my. Which one? They are all so beautiful. You look fabulous in them too!
These look great! My fave is the blue one with the striped bow. <3!
I’d love for you to link up and share: http://tutusandteaparties.blogspot.com/2011/10/pinteresting-linky-party-week-eleven.html
LOVE! My favorite is the double bow one. So saving on pinterest for the coming rainy days… they always make me want to make stuff =]
Oh my gosh, I love the beige flower one!!! So freakin’ cute! I may have to make some of these for Christmas presents! Thanks for sharing, your blog is wonderful!
Coming over from: http://chasing2monkeys.blogspot.com
these are fantastic. i’m not a big sewer (is that how you spell it? cause it just looks like swere pronounced sue-er), but i might have to pull out the machine for these. i love the mustard bow one!
I absolutely LOVE your giant yellow bow ear warmers! So cute!
Have a good one.
-Natalie
http://www.hintboutique.com/
http://www.biggerclosetplease.com/
They look great!! But here in Malaga, where I live, never snows!! It is soo warm!!
These are great! One question though–if I’m using fleece, do I really need to hem it all the way around? I know it looks more polished, but since fleece doesn’t ravel, it isn’t an absolute necessity, right?
That’s so pretty.^^It reminds me of
the totem of Taiwan Hakka people.
This is the offical site. http://www.hakka.gov.tw/mp.asp?mp=11
Welcome to Taiwan!
freakin adorbz!!!! love the mustard and huge bow!!!!
your fleece ear warmers are amazing, love them all! would love to see you at my international weekly crafty linky party, Craft Schooling Sunday, please drop by!
tell us when you open your etsy shop!
I bet these would make nice maternity belts too….
to keep that little one chic and cozy.
pve
So clever! I am always looking for unique gift items for my nine grandchildren. Since they live in Minnesota, this would be perfect for all the girls!
Glad I found your blog. I just realized I am signed in on my dog’s blog …. oh, well.
The winter headbands are a great idea, and I’m thinking that even if I don’t get to sew an entire one (though it seems simple), I could always embellish an ear band for a different (and better) look. I do like the button closure though, and while you said one button could do, I like the idea of two in case you want to adjust it (e.g., to have a friend try it).
This is such a cute pattern, thank you for sharing! I would really like to see the pattern for what you call the Lucy Flower. I think you said you got the pattern from another blog, would you mind posting a link to that blog? I would GREATLY appreciate that!
I am so ready to make these! Thanks for the fun and inspiring tutorials.
Also, thanks for reminding me of Elder Uchtdorf's talk, too! I'm so glad I've stumbled upon your blog – I love it and plan to return. 🙂
(littlemrsw.blogspot.com)
Those are so cute! I'll have to try making some!
Oh, Delia! How I am coveting that mustard yellow one! But the navy with stripes is pretty awesome too. I'm afraid to try it, because I'm fairly certain I'd be disappointed with the outcome after seeing the inspiration! They are gorgeous!
These are so beautiful! Great work… I'm going to have to make one for myself this winter 🙂
Ok, so I know you've said how EASY these are to make. And even shared the pattern with us. However, I am completely inept at creating anything from fabric and sewing and the like. If I sent you my address, how much would you charge if I asked you to make a few of these and send them to me? I'm serious. I would pay for shipping, too. If your at all interested, let me know 🙂
Delia,
You have been inspiring the creativity inside of me lately! I went out and bought a couple of old sweaters and a remnant of fleece to make mittens for the Mitten cause…and then ended up making several head warmers out of the fleece…so incredibly cute! One question — when I first made the ear warmers 5 3/4", it just kind of ruffled around the top of my head since it
Thanks for this tutorial! I blogged about it here: http://www.falafelandthebee.com/?p=8131
~Michelle
http://www.falafelandthebee.com
So cute! I really love it!
These are so awesome and fun! I am totally going to make some for me and for my girls for Christmas. I too LOVED Pres. Uchtdorfs talk. Tears were shed! 🙂
These are super cute!!! I am a person who needs every single step of a process. Can you post how exactly you did the bow step by step? I want to make one…or just buy one from you! Let me know if you are selling any, or please please post a how to with the bow on the ear warmer.
Thanks!
I love the huge bow! The sprinkling of blue flowers on the grey one is very pretty too.
I love them all! I'm going to have to make me a few.
Thanks so much for posting these.
Jen
Eatingmycandy.blogspot.com
So cute! Thanks for posting! I can't wait to make one! I am training for a half-marathon and it is cold outside! Now I can look super cute while I run! 🙂
These are so cute! I pinned the tutorial to my Pinterest site. Hope that was okay!
I just made one of these and I am hoping to make even more. ADORABLE!! Thank you for sharing. I love all the variations you made too. Beautiful
Just want to let you know, I made some of these and linked back to you: http://justafriddlebit.blogspot.com/2011/12/happy-hearts-and-warm-ears.html
I also have some in the works for a charity project I am working on: http://justafriddlebit.blogspot.com/2011/12/kerringtons-christmas.html
Thank you SO much for such an easy and cute ear warmer project!!!
I posted this to my pinterest 🙂 hope that is alright.
So pretty project! The big bow emphasized attitude love it!
Can you post some directions of how to do the double bow? I can't figure it out.
Very cute! I actually think the one with the big yellow bow looks very retro, 1940s style.
Çok sevdim.Teşekkürler.
Wow!!! that’s absolutely beautiful!!!! <3
Could you please tell me how you made the big bow and flower, I have tried and mine were so sad looking I put it away. you are so creative and thoughtful for sharing with us…..thank you
Can you do a tutorial on the big bow on please?! (:
Thank you for the "free"
directions and for sharing!
These are beautiful!
can you show how to do one using an old sweater? Thanks
I love the gray flowered one and the one with the big bow. This will be my first year living in winter again and I think I'm going to have make a LOT of these to keep me warm and happy.
Hello,
I've just found this ear warmer idea, which is just brilliant, and I'd love to introduce some of these pictures on my blog and cafe. I will definitely link and introduce your blog. Thank you for this wonderful ideas and pictures!
oh! I forgot to let you know my blog address to help you check your pictures and whether it's linked.
Here is the page where your pictures are linked.
http://kittypowder.blog.me/100172925742
Oh my god, these are so cute! Thank you so much for sharing 😀
Thanks a lot for that tutorial. I made one for myself (very simple as I use it for running), but as soon as I have a few minutes ahead, I'll sew some more using your ideas. You can see picture here : http://sewingpot.blogspot.fr/2012/12/c.html.
See you !
These are the cutest!! I found your blog through your guest post on Prudent Baby, thanks for sharing your work! I made my own and linked back to your post on my blog, here: http://www.twotendesigns.com/2012/12/ear-warmers-layered-flower-tutorial.html#
Thanks again!
Kim @ Two Ten Designs
Thank you so much for the lovely tutorial! I love these headbands–so warm and pretty! I wrote about them on my blog and shared your post. Thanks again!
http://triedandtwisted.blogspot.com/2013/01/diy-fleece-ear-warmers.html
I know u said in your post that the now on the yellow headband is a bit big but out of all the DIY headbands I found I liked yours the best because it was so big and cute! I am making this today for my 10 yr old daughter and her cheerleader buddies since it is freezing here and they have to be in a parade tomorrow with their hair in pony tails! Love it!!! Thanks again for such am amazingly easy post. 😉
Oh my goodness. They are going to look so cute! I was a cheerleader in HS and remember doing many a parade. I hope they have a blast!
I love these! I come back here often and visit every time I get a hankering to make an ear warmer (which is usually around this time of year). Thank you so much for sharing and inspiring us to make pretty things. I just looked this up again to share it with my sister who is in Alaska.
Have a great day!
Thank you Andrea for your super kind comment! 🙂 Have a great day as well!
Thank you! This was my very first sewing project, it turned out great. I made the bow one in purple.
Ooh! I bet purple is so lovely. Thanks Danielle!
these are so cute and clever. Love them and am going to try.
Thank you for sharing.
Karen
Thanks Karen! Happy sewing!
So cute! I really love it! I will have a try.Thanks Danielle!
Thank you for this tutorial. I am teaching a fashion arts course in my high school and this is a perfect tutorial for those students working from home who don’t have machines. Did you end up making a pattern template that is available for purchase? Also, do you have any tips for how to make the big bow? Thanks!
Hi! Sorry for seeing this so delayed. I never did make a template. I’m sorry. As for the bow, I recommend using fleece and cutting a rectangle taller than the ear warmer. Fold the ends under and wrap the center with a smaller scrap of fleece. When you cinch it, it will create a nice, full bow. Let me know if you have any more questions.