• Skip to primary navigation
  • Skip to main content
  • Skip to primary sidebar
  • Skip to footer
delia creates
  • FREE TUTORIALS & PATTERNS
  • SHOP
    • SHOP
    • Cart
    • ACCOUNT
    • Refund, Returns, and Shipping Policies
  • CONTACT
  • ABOUT
    • ABOUT
    • Privacy Policy
    • TERMS OF USE
    • PRESS
    • Featured
  • HOME
  • Instagram
  • Pinterest
  • YouTube
X
delia creates
  • FREE TUTORIALS & PATTERNS
  • SHOP
    • SHOP
    • Cart
    • ACCOUNT
    • Refund, Returns, and Shipping Policies
  • CONTACT
  • ABOUT
    • ABOUT
    • Privacy Policy
    • TERMS OF USE
    • PRESS
    • Featured
  • HOME
  • Instagram
  • Pinterest
  • YouTube
delia creates

delia creates

  • FREE TUTORIALS & PATTERNS
  • SHOP
    • SHOP
    • Cart
    • ACCOUNT
    • Refund, Returns, and Shipping Policies
  • CONTACT
  • ABOUT
    • ABOUT
    • Privacy Policy
    • TERMS OF USE
    • PRESS
    • Featured
  • HOME
  • Instagram
  • Pinterest
  • YouTube

Guest Post from this heArt of mine

October 13, 2011 · Delia 6 Comments

Hi friends! Today you are in for a treat.
Amy from this heArt of mine is sharing a Halloween project with us. She’s witty, she takes great pictures, and she’s very creative. I think you’re going to like her. : ) Here she is…
 Hey Delia Creates readers!


I’m Amy Christie and I blog over at this heArt of mine.

I am so excited to be here today! I found Delia’s blog soon after I started mine and immediately became an avid reader. She just does the neatest projects, don’t you think? And I’m not sure anyone takes better self-portrait pictures than her. I know I always look ridiculous in mine. : )

Anyway, glad to be here to share a little Halloween project with you. I love decorating with sticks, much to my husband, MJ’s, chagrin. I have them in vases, I use them for other holiday trees and I want to use them in a bunch of other projects but MJ just rolls his eyes. He just doesn’t get it. Oh well. I think they are fantastic. Especially paired with paper roses.

Here’s what you need:

  • Sticks
  • Box, tub, container
  • Spray Paint
  • Flower foam
  • Paper
  • Toothpicks
  • Hot glue

1. Find sticks. I found mine on the ground in the park near our house. I loved the gnarly, nubbie-ness of them.

2. Spray the sticks. I used two different dark tones, black and a hammered metal. Now spraying sticks ranks right below watching paint dry on the fun scale because in addition to watching paint dry, you have to rotate and inspect each and every stick to make sure all sides are being coated. Alas, these are the afflictions of stick-lovers.

3. Spray the box. My base is a cheap find in an after-the-holidays sale.

First, I primed it using my favorite gray primer. Then I coated that with 2-3 thin, even coats of the hammered metal paint, not pictured.

4. To add some interest to the box, I used a paper cut-out as a stencil and some silver spray paint. After laying the stencil on the box, I sprayed a couple spurts of silver paint. Not too thick or opaque.

I continued this around the box.

5. When everything was good and dry 24 hours later, it was time to put it together. With a block of floral foam in the box, I started placing the sticks. The curves and kinks really add to the eeriness.

6. Now to hide the foam base. Using the paper I spray painted the sticks on, I made a whole slew of ghoulish-looking roses and it was just perfect. And so simple.

  1. Cut circles, any size. Bigger circles = bigger roses, smaller = smaller roses. I used both big and small ones. And the circles don’t need to be perfect.
  2. Cut a spiral within the circle.
  3. Start tightly rolling the spiral
  4. Continue until the whole thing is rolled up.
  5. Once it’s all rolled, work to loosen it a bit to make it look more rose like.
  6. Drop some hot glue at the bottom to keep things in place.
  7. Curl the center of the spiral under as the base.
  8. And you have yourself a paper rose.

Then I glued in a toothpick so I could stick them into the floral foam as well.

7. Cover the floral foam with paper roses.

8. Add a mini-bunting. And you have a ‘spook’-tacular centerpiece with a Little Monster pumpkin.

 Happy Halloween to Delia and her readers!
Thanks for having me over!
Take care.
-amy c
_________________________________________________________


Thanks for being here Amy! This is such a lovely, inexpensive Halloween centerpiece.
I love how you reused the paper you spray painted your sticks and box on. Way to ‘waste not.’ 
And I’m a bit of a stick lover too. They’re free, can be used for many occasions…what’s not to like?
 
Amy has more fun projects, at her blog. 
I have to say I’m totally loving this car art lap desk she just barely blogged about.

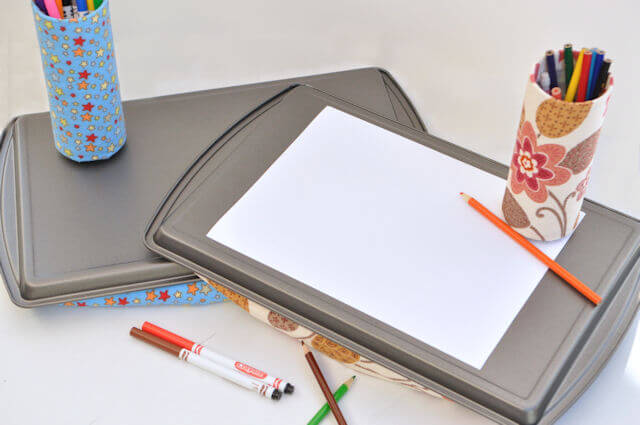
I had a travel desk like this as a kid, but definitely not as cute and not handmade! I’m adding this to my to make list.

Go check her out.

Uncategorized

Previous Post: « Guest Post at Family Ever After
Next Post: Little Abbee Crochet Winners! »

Reader Interactions

Leave a Reply to Elba Pessanha Cancel reply

Your email address will not be published. Required fields are marked *

Recipe Rating


This site uses Akismet to reduce spam. Learn how your comment data is processed.

Comments

  1. Anna says

    October 13, 2011 at 3:04 PM

    this is so cool! love it. and your blog looks so spiffy delia. 🙂

    Reply
  2. pickmepam says

    October 15, 2011 at 2:01 PM

    this is so cute! thank you for your ideas!

    Reply
  3. McKenna says

    October 15, 2011 at 10:37 PM

    You are so CREATIVE! This is my first time taking a look at your blog and I love i repeat LOVE what you post!
    Keep it up

    Reply
  4. Mirane Mcleslie, Canada, Ontario says

    October 19, 2011 at 6:57 PM

    It is so cute! I love this centerpiece! Thank you

    Reply
  5. Javed_Afridi says

    October 20, 2011 at 6:43 AM

    Wow, Amazing… thanks for sharing that, it was very educational! 🙂

    Reply
  6. Elba Pessanha says

    November 27, 2011 at 11:35 PM

    Seu blog é lindo demais!!!
    Essa ideia is so cute…
    Beijinho! 🙂

    Reply

Primary Sidebar

FEATURED POSTS

Granny Square Tote - free crochet pattern and video tutorial // www.deliacreates.com

Granny Square Tote – free crochet pattern

Summer Mesh Sweater - Free Crochet Pattern SIZES XXS-XXL // www.deliacreates.com

Summer Mesh Sweater – Free Crochet Pattern Sizes XXS-XXL

Jute Mesh Tote – Free Crochet Pattern

Basic Easter Basket - Free Crochet Pattern and Tutorial // www.deliacreates.com

Basic Crochet Easter Basket – Free Pattern

Footer

  • Instagram
  • Pinterest
  • YouTube

© Delia Creates, LLC 2010-2025. All Rights Reserved.

All content on this website is copyrighted. Please contact the copyright owner for permission to use any photos, templates, patterns, tutorials and content at [email protected].

Categories

  • FREE TUTORIALS & PATTERNS
  • SHOP
  • CONTACT
  • ABOUT
  • HOME

Copyright © 2025 · Recipe Blogger Theme · Genesis Framework · Privacy Policy · WordPress · Log in