• Skip to primary navigation
  • Skip to main content
  • Skip to primary sidebar
  • Skip to footer
delia creates
  • FREE TUTORIALS & PATTERNS
  • SHOP
    • SHOP
    • Cart
    • ACCOUNT
    • Refund, Returns, and Shipping Policies
  • CONTACT
  • ABOUT
    • ABOUT
    • Privacy Policy
    • TERMS OF USE
    • PRESS
    • Featured
  • HOME
  • Instagram
  • Pinterest
  • YouTube
X
delia creates
  • FREE TUTORIALS & PATTERNS
  • SHOP
    • SHOP
    • Cart
    • ACCOUNT
    • Refund, Returns, and Shipping Policies
  • CONTACT
  • ABOUT
    • ABOUT
    • Privacy Policy
    • TERMS OF USE
    • PRESS
    • Featured
  • HOME
  • Instagram
  • Pinterest
  • YouTube
delia creates

delia creates

  • FREE TUTORIALS & PATTERNS
  • SHOP
    • SHOP
    • Cart
    • ACCOUNT
    • Refund, Returns, and Shipping Policies
  • CONTACT
  • ABOUT
    • ABOUT
    • Privacy Policy
    • TERMS OF USE
    • PRESS
    • Featured
  • HOME
  • Instagram
  • Pinterest
  • YouTube

Mamarazzi: Exposure

May 8, 2012 · Delia 8 Comments

Today we get to get on with the good stuff.

First up…

Exposure

…or I guess I should say over-exposure. But I’ll get to that in a minute.

That ruler or set of numbers circled in the picture is the exposure meter. When you get ready to take a picture there will be a little blinking block under the numbers. If the block slides to the left (or toward the negative side) of the zero the image is underexposed, if it is to the right (or the positive side) of the zero it is over exposed, and if it is at zero it is perfectly exposed.

In general you want your image to be at or very close to zero. When you adjust your settings, the blinking block will tell you how well your image will be exposed. Smart camera right?

Now here’s where I break the rules. I tend to do that a lot in photography. 馃檪

As for me. Many of my pictures are over exposed. A lot of photographers will tell you that blown highlights and over exposure is bad, bad, bad. And it can be. But if you do it right…

It can be a great thing.

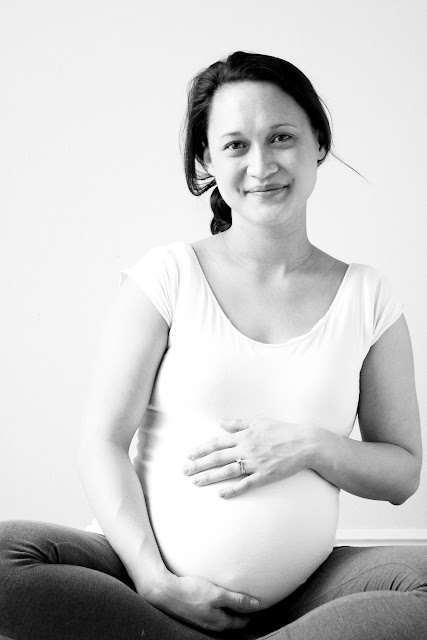
*Blown highlights are when lighted areas completely turn white and lose all detail. When an image is over-exposed it appears lighter/brighter than it does in real life and again, loses detail and shadowing.

*Blown highlights and an overexposed background can give a ethereal look to your pictures.

聽Picture from Picnic on a Stick post from Bugaboo, Mini, Mr. & Me
Do you see how the back two skewers lose dimension because of the blown highlights around the sides?
Picture from Seamless Scarf tutorial.
It can also give a grainy quality to your pictures. But sometimes that adds desired character.
聽Picture showing off Natalie’s awesome mullet. 馃檪

Even though blown highlights and over exposure gives you a lighter image than what it is in reality, I think it can give a better representation of the memory you’re capturing. The infusion of light is dream-like, joyful, hopeful…just how I want to remember the moment.

*Over exposure is also flattering to complexions. I’ve noticed that some wrinkle cream ads on TV are over-exposed. Why? Because it minimizes flaws.

This picture from my pink lip balm post, is a good example. My skin does not look this good up close, but when it’s over-exposed you can’t see that…and it’s not really edited as much as you might think, hence why you can see still some obvious blemishes. I minimally edit most of my pictures…but I’ll cover that more in another post.

So how do you achieve a good over exposed image?

* You can set up a white background near a bright sunny window. Be sure that the light is soft and not harsh. If the morning sun is streaming directly at/through your window that can create a harsh light. Slightly close your blinds if needed.

聽DYI maternity photo shoot.

Adjust your settings to be slightly over exposed. And snap.

聽
聽How much you over expose it should depend on the your subject. For this chocolate drizzles recipe I wanted to maintain more detail, than for this picture of my camera:
See how the blown highlights obscure details of the camera? But it looks cool right? Much more interesting for this particular shot, in my opinion.
But both images are at least slightly over exposed.
* You can also set your subject in front of a bright sunny window. Not next to one, but right smack in front of it.
I took this wheat grass picture right in front our kitchen window.
The pictures from the beginning of this post are also taken right in front of a window.
Now you have to be careful. This does not always work well. It needs to be bright enough in your house to light the front of your subject somewhat. Or be sure to use a reflector to help add fill light to your subject. Also be aware that these pictures almost always need some slight editing which I will cover in another post.
Now of course, you can over-expose your images outdoors as well. I find that I don’t have to/want to as much, to achieve the look I desire. Open shade usually more evenly lights my subjects all around.

Of course it’s not ideal to always over-expose your images, but don’t limit yourself from using it as creative technique in capturing your images.

Any questions? I will try to answer them the best I can in the comments section.

tutorial

Previous Post: « Mamarazzi: Camera Essentials
Next Post: What We Wore Sunday »

Reader Interactions

Leave a Reply to Sam Adams Cancel reply

Your email address will not be published. Required fields are marked *

Recipe Rating


This site uses Akismet to reduce spam. Learn how your comment data is processed.

Comments

  1. clara says

    May 8, 2012 at 4:52 PM

    Good good good! Thanks thanks thanks!!! 馃槈

    Reply
  2. Anonymous says

    May 8, 2012 at 5:07 PM

    It might be helpful for people to know their exposure meter may be flipped. Nikon & Canon have opposite exposure meters. Recently, Nikon (I think) has changed theirs so newer cameras are the same for both brands. But, I have a Nikon D60 and a Canon 5D Mark II, and they have opposite meters. So, your over exposure may be indicated by the left side instead of the right. Just look for the

    Reply
  3. Barrett Family says

    May 8, 2012 at 5:43 PM

    Thanks for the great tips! I'm new to photography but learning as I go with my Canon Rebel. I love your posts…keep'em coming!

    xo,
    Allison
    http://barretts1234.blogspot.com/

    Reply
  4. Kari says

    May 9, 2012 at 2:34 AM

    These posts have been so helpful! I am just venturing out of auto (with the inspiration of a new little baby girl) and this has been a great resource!

    Reply
  5. kat.e says

    May 9, 2012 at 8:46 AM

    Thank you for this advice! This one is new for me, it will help me improving my blog photos.

    Reply
  6. Natalie Webb says

    May 11, 2012 at 12:52 AM

    Love this! I’m going to have to dig into my little Powershot and see how much I can play with exposures. I promptly lost the manual for it after I got it, but every time I use it now, I discover new tools and settings. Discovery ahoy!

    Reply
  7. Sam Adams says

    May 12, 2012 at 9:39 PM

    Just gave it a try, we have the Rebel t1i, it takes me 10 seconds to finish adjusting, will you go over the general tips for shooting the kidlets?

    Reply
  8. Sew Much Ado says

    May 18, 2012 at 6:26 PM

    I really love this series, Delia! And great tips on over exposure, so helpful :).

    Reply

Primary Sidebar

FEATURED POSTS

Granny Square Tote - free crochet pattern and video tutorial // www.deliacreates.com

Granny Square Tote – free crochet pattern

Summer Mesh Sweater - Free Crochet Pattern SIZES XXS-XXL // www.deliacreates.com

Summer Mesh Sweater – Free Crochet Pattern Sizes XXS-XXL

Jute Mesh Tote – Free Crochet Pattern

Basic Easter Basket - Free Crochet Pattern and Tutorial // www.deliacreates.com

Basic Crochet Easter Basket – Free Pattern

Footer

  • Instagram
  • Pinterest
  • YouTube

漏 Delia Creates, LLC 2010-2025. All Rights Reserved.

All content on this website is copyrighted. Please contact the copyright owner for permission to use any photos, templates, patterns, tutorials and content at [email protected].

Categories

  • FREE TUTORIALS & PATTERNS
  • SHOP
  • CONTACT
  • ABOUT
  • HOME

Copyright © 2025 路 Recipe Blogger Theme 路 Genesis Framework 路 Privacy Policy 路 WordPress 路 Log in