


The summer sun is not a friend to our little Natalie’s snow white skin. Since summer is the time to be out and about, I knew I needed something to protect her head that would be easy to lay her down on as well.

The obvious solution was a bonnet.
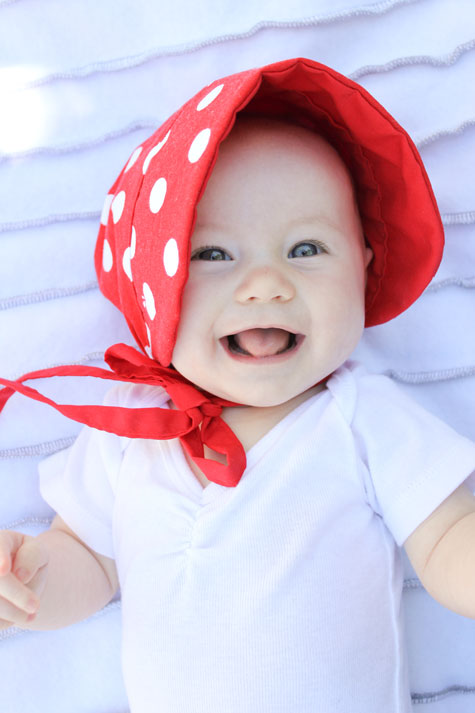
Doesn’t she look so sweet in it?
It is quite easy to make and takes just a little time and a little fabric.

Materials:
1/3 yard of fabric (you can mix and match with other patterns or solids or just use the same fabric throughout) this should be enough fabric for a bonnet up to about 9-12 months…I’m estimating.
1/8 yard of very thick, stiff interfacing
1/4 yard of 1/2 inch elastic
STEP ONE: Make a pattern.

Trace a hood from a jacket to get the size and shape you want. Then trace another line around that line about 1/4 inch larger.

Draw a brim. Make sure to make it about 1/2 inch wider than you want it to be for seam allowance.
Ta da…you have a pattern.

Now cut your pieces.
You’ll need:
2 each for each type of fabric in the main hat piece
2 strips for ties (about 1 1/2 inches by 18 inches which you’ll shorten later)
1 each for each type of fabric and the interfacing for the brim
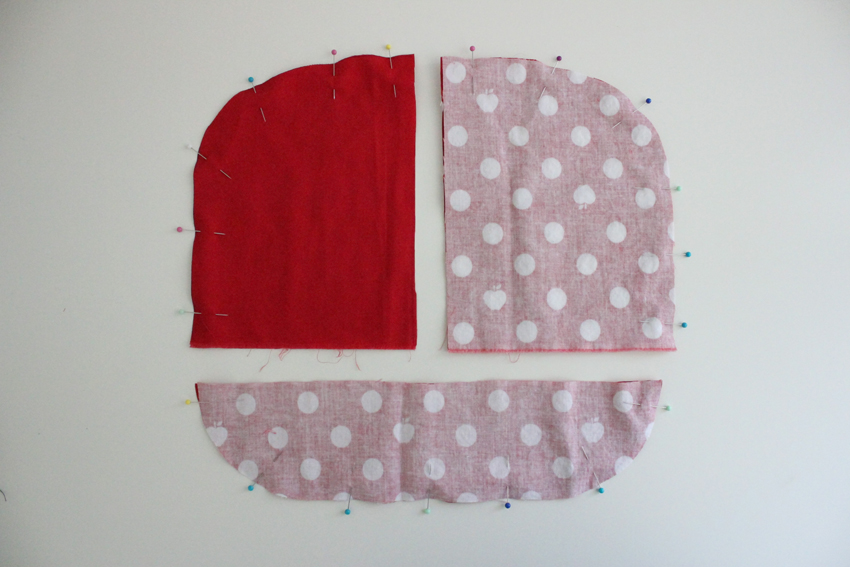
Pin and sew the main hat pieces together and the brim piece…right sides facing.

Cut notches around the curved edges, being careful not to snip through any sewn lines.

Cut down the seam allowance for one of the hat pieces to reduce bulk.

Turn brim piece right side out and press. Cut interfacing down a bit to fit inside.

Take your main hat/bonnet pieces and fold it down so seams match up like in the picture. Measure in about an inch and draw a straight line. Sew on that line.
Then trim off the excess. I use pinking shears but this isn’t necessary.

Turn one of the hat pieces right side out. It should look like this at the back of the hat.

Iron the raw edges of the hat pieces inward. Stack them into each other.

Mark the center of the brim with a pin. Match the pin up with the seam of the main hat/bonnet pieces.

Sandwich the brim into the main bonnet pieces and pin.

Sew slow and careful along the folded edge of the main hat pieces. Be conscious that the under layer catches. Leave the folded edges not attached to the brim un-sewn.

You my have some shifting. I did.

Simply cut of some of the excess to even things out.

Now iron in in the bottom raw edges.

Sew all the way around twice, leaving about 5/8 of an inch between each sewn line. This creates a casing.
As you can see, there was more shifting, so I did some creative folding. I’ll make another and get it even yet! 🙂

Attach a safety pin or diaper pin to the elastic and thread it through the casing.

Stop about a half inch before you reach the other side. Sew two lines 1 inch from the other end.

Pull the elastic until you get the amount of gathering you desire. Then sew two lines about an inch in from the other side. Snip off the excess elastic.

Create the ties. You can sew a tube, turn it right side out, press and sew again. I chose to iron in the raw edges and sew.
Insert the ties into the one inch little nooks at the ends of the casing.

Sew them in matching the sewn lines from when you sewed the brim in.

Find the length you want your ties to be, knot the ends and trim off the excess.

And your sun bonnet is complete!

It’s even reversible if you decide it’s not a day for polka dots.


I am still trying to get the hang of using patterned fabric more intelligently.
Whenever I look at how poorly the dots are lined up I think of that Project Runway episode when Michael Kors remarks to one of the designers that the woman he was sewing for should be able to afford to have her dots lined up. 🙂 haha

I plan to make another bonnet soon, but with a fabric that has smaller dots, so you can’t tell. 🙂


The back view.

Now our baby Natalie is all set for the summer sun!

Thanks for reading! Have a sun-shiny day.
And swing by Kojodesigns today for more delicious red.

So cute! Thanks for sharing!
So very cute, Delia!
so adorable!!!Thanks!I enjoyed watching even though I don’t have kids.
soooo cute, i want to hug the baby 🙂
Love the bonnet!
That bonnet it so supercute! I did not notice the dots not lining up before you mentioned it. I am wondering if I could make one for my dog… and if she would wear it.
Natalie looks so adorable in her new bonnet. I need to make one for my pale baby girl ASAP. She loves to rip he4 hat off her head the moment I put it on, so I think a fitted bonnet with ties might be just what she needs. Thanks so much for the tutorial.
So adorable! Natalie and this bonnet are perfect together. 🙂
Natalie is such a sweetie in her new bonnet!
How ridiculously cute is she!?? Love this bonnet!!
Absolutely adorable! Natalie is such a gorgeous baby 🙂
It’s beautiful! I love the sneaky little apples in your polka dot fabric.
I'd like to buy the bonnet. Could you send it along with what's in it? :0)
So adorable!
So cute! Yet another one of your projects added to my list!
Adorable! I think it's even cuter when the dots don't line up.
darling! the hat, but especially natalie. what a sweetie! love her whole body smile. 🙂
I love this! It's so beautiful, such a fun and modern take on an item of clothing that sounds so 19th century. And Natalie is so beautiful and starting to look very distinct, not that kind of generic newborn baby look. (Not that she's a newborn anymore so that makes sense…anyway…)
Great job! 🙂
If the dots really bother you, you could cover up the seam between the hat and brim with ribbon… but it doesn’t bother me, personally. Cute!!
Any guidelines for how much elastic to use?
Too many thanks for the pattern and guideline!! I made this for a quick spring-day costume for my 9 month old baby girl Emilia and add it 4 big flowers https://dl.dropbox.com/u/16610156/bonnet.jpeg . BTW your girl is PRECIOSA!!
I can’t believe I have been too intimidated to attempt a bonnet yet! Tracing a hood is BRILLIANT!
what a cute babayyyyyyy and bonnet wonderful combination :):):):)
This bonnet is almost as cute as the baby. I featured it here:
http://sewprettysewfree.blogspot.com/2013/06/reversible-baby-bonnet-tutorial.html
Thank you so much for this tutorial! I am a beginner when it comes to sewing but I was able to make this bonnet and it is perfect! You’re step by step details was very helpful! Thanks again!
I whole-heartedly agree with the earlier comments, as the bonnet is CUTE- AS-CAN-BE! A darling SUN bonnet in red cotton with white polka dots and a white apple here & there. THANKS for the detailed tutorial, noting that your own design for a pattern. Wish I had a little one to make one as a gift! Photo shoot is FAB! Sarah Helene, Minneapolis
Thanks for the tutorial. The bonnet is SO cute that I made one even though I don’t know if my baby is a boy or a girl yet:)
Thank you. we have a 6 mo old great niece who needs a sunbonnet for this summer and none to be found in loyal stores so I’m making a couple for the baby. My sister, the Great Grandmother, doesn’t sew and is going through stage 4 cancer and although we are a 1000 miles apart, I had to help out and told her I make a couple and get them in the mail by the weekend. Your tutorial is a real life saver for me, again thank you.
Just made this for a friend… it’s so cute! Took two attempts as the first was a little small, but that’s now a dolls hat for my daughter to play with 🙂
Thanks for a great tutorial!
Vicky
Fun! Thanks Vicky! I am so glad you liked the tutorial. One can never have too many doll clothes. 😉
thank you so much for sharing. I’m going to give this a try for my new little niece.
What a lucky niece! Happy sewing!
Love this pattern! I made a lavender one for my friends baby, super cute, thanks for the easy to follow instructions!
Thank you Virginia! A lavender version sounds lovely!
Thanks for the tutorial. I made one for my daughter for school’s pilgrim costume! Love it!!!
That’s wonderful! So glad the tutorial helped!
Love this bonnet. Does there happen to be a pattern for this one?
Thanks Melanie! So sorry. No pattern, just a tutorial.