

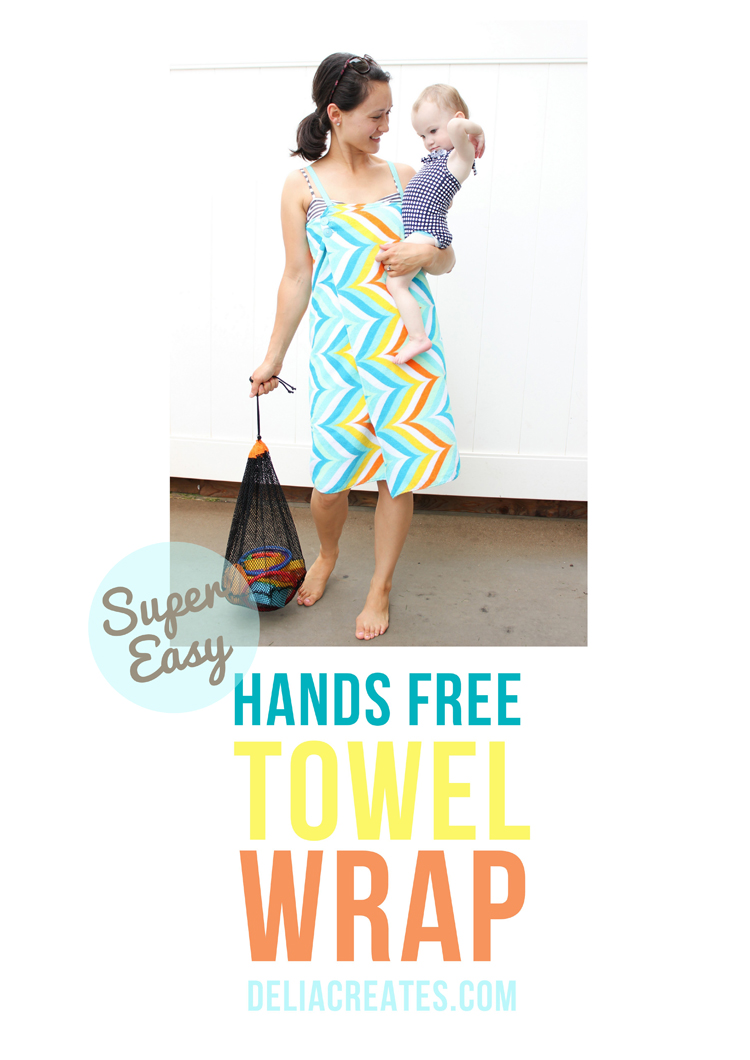
So…you know when you get out of the pool and you are trying to dry off while juggling a million other things and bags, and pool noodles and possibly kids?…

and…that towel just won’t..stay…put?
I had that problem. I sometimes wish I would grow a new arm with the birth of every child! 🙂
So, I didn’t figure out how to grow a new arm, but I did come up with a solution!
I didn’t want to make a swim suit cover up per say. Just a towel that would stay on while I dried off, before I was ready for the swim cover. You know what I mean?
So, for

I came up with this:
Sewing saves the day again!
It’s a super quick sew too. Just three steps!
Since we are using an existing towel, there is no hemming and the sewing minimal.
*Psst…the tutorial for the mesh pool toy duffle picture above can be found HERE and the tutorial for the swim suit my baby is wearing is found HERE.
First, you need:
A towel (mine is from Old Navy)
a yard of fold over elastic (FOE)
2 buttons
matching thread
pins and clothes pins
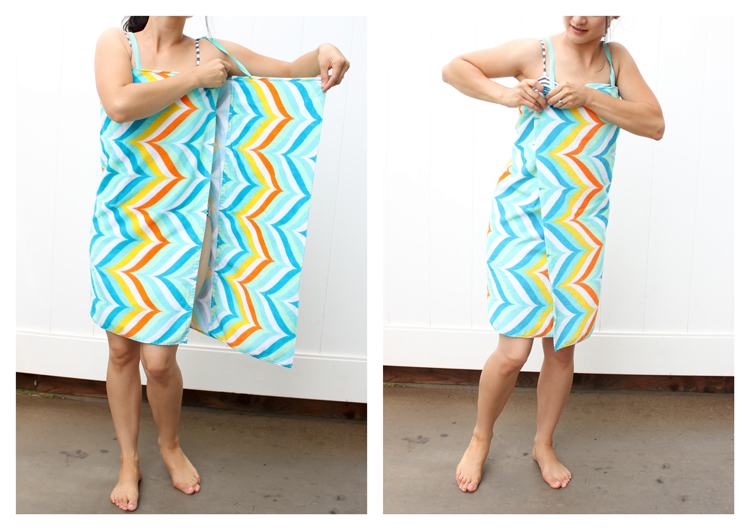
1. MEASURE YOUR TOWEL
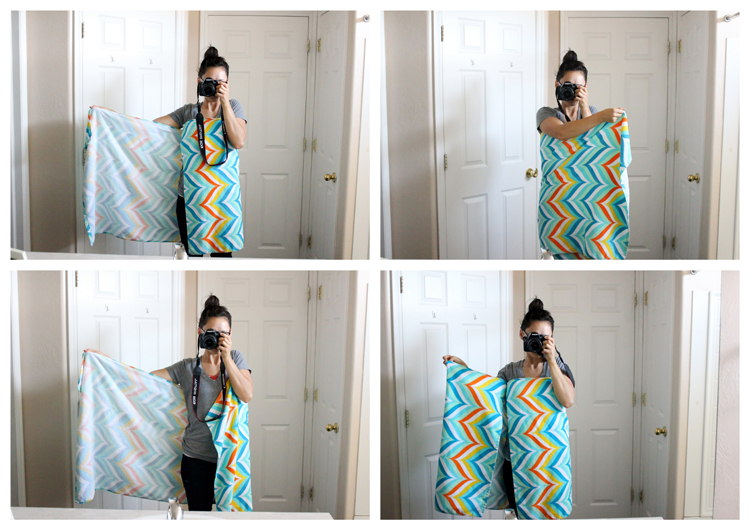
Wrap it around you like you normally would wear it and tuck it in.
This time, instead of tucking it in, fold the excess at the end over so it fits your body width.

Take your pins and pin the folded towel in place.
Then take your clothes pins and mark where you would like your straps, in the front and the back.
Make sure the clothes pins only go over one layer of towel (with the exception of the folded portion of course).

When you open it up, this is what you should have.
Lay it down on a large work space.
2. SEW ON STRAPS
But, juuust before you do that. Sew that towel fold in place.
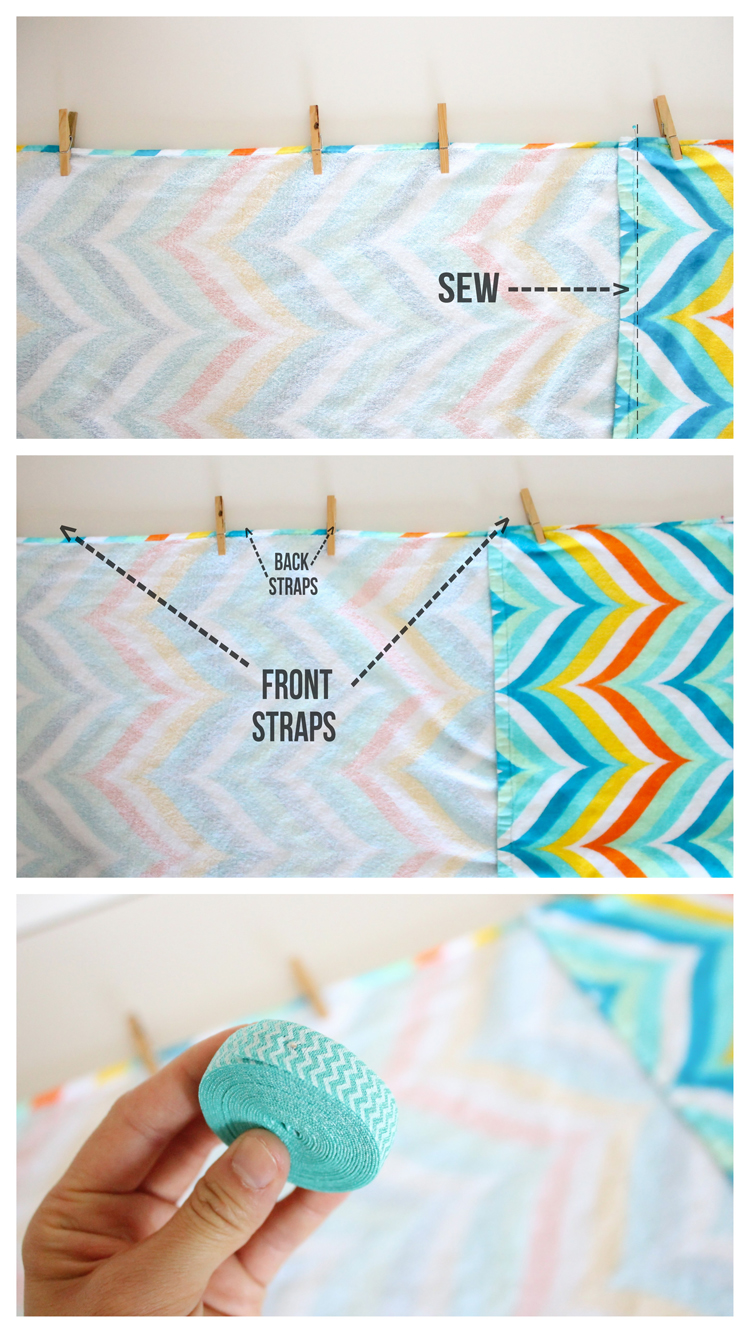
Okay…now do you see where you put your clothes pins? Chances are they are spaced almost evenly but not quite. Measure with a ruler to make sure they are evenly distributed and then bring out your fold over elastic.
Fold Over Elastic is called FOE for short, and is a super soft elastic that is traditionally used for sewing underwear and dance wear. Recently, it has become popular for it’s use in hair ties and headbands. Just in case you were wondering. 😉
I got this cute chevron FOE from Ribbon Retreat HERE (sponsor). They even have houndstooth! Fun stuff.

Measure over your shoulder with measuring tape or even with the FOE to guess how much you think you will need for each strap. Round down if needed.
I used 12 inches but shortened it to 9 (after wearing the towel a couple of times…which was after these pictures as well).
FOE stretches quite a bit. I would take your shoulder measurement and subtract about 2 inches. You can always bring it in some more depending on your comfort level.
Sew it in place with a dense zig zag stitch. You do this by shortening your stitch length.
Back stitch at the beginning and end.
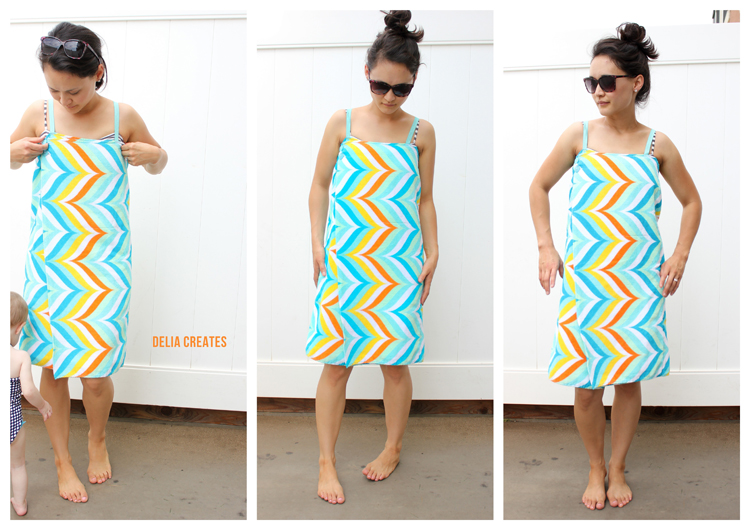
3. ADD BUTTONS

Sew two button holes horizontally at the top corner of the folded edge of the towel. You can use one, but two seems to hold the towel up better.
**Not sure how to sew a button hole? This is a great project to start on! You can surf YouTube or just consult your sewing machine manual – which is how I learned. Many machines come with a buttonhole foot. Just look that up and try it on scrap fabric once or twice.
Cut the buttonholes open.
Match the buttonholes up to where it wraps around you and mark where the buttons need to go through the button holes. Hand stitch your buttons on….and you’re done!
P.S. I got my buttons from the Ribbon Retreat as well. HERE is the listing (sponsor). I got the Mint Cooler pack which has been lasting me fooorever! I really do love it.
Oh, and if you decide you want extra security or if you want to wear it more like a swim cover up, you can sew an additional button and buttonhole at the other side.
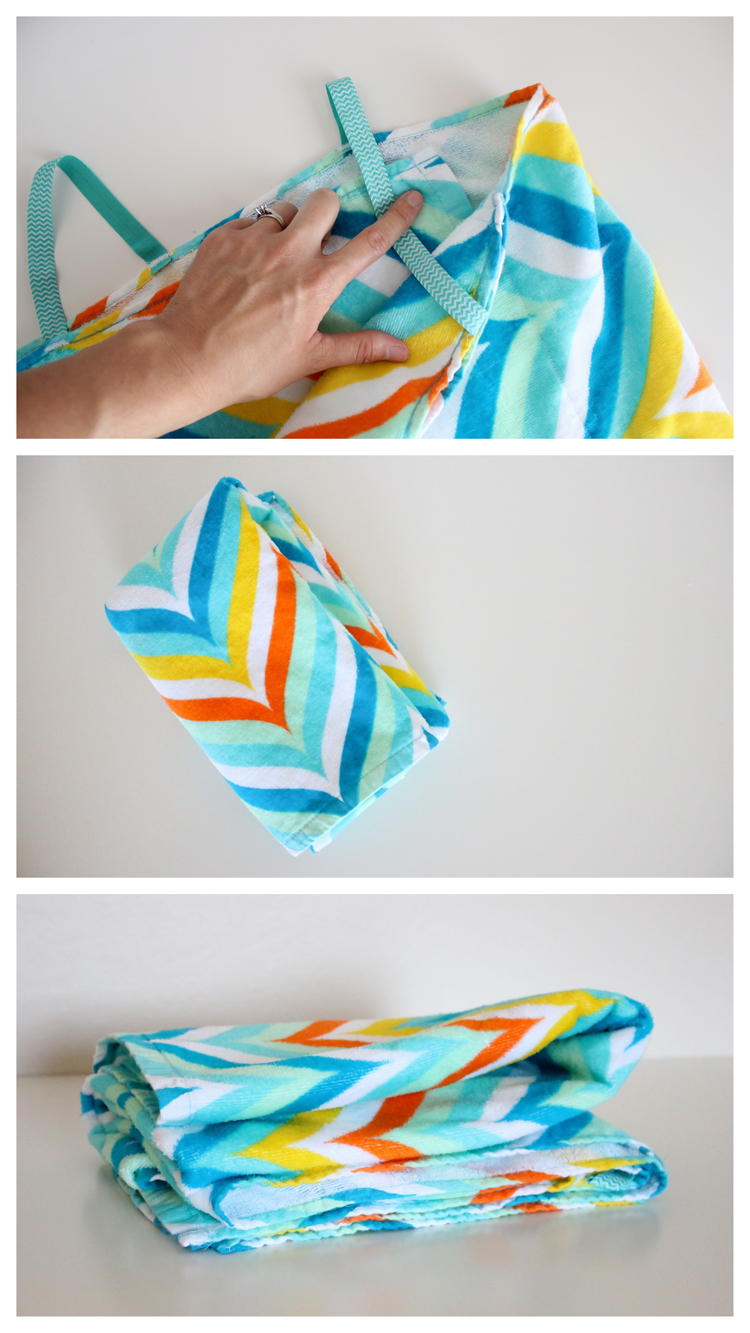
That’s it! 10 minute project coooomplete!
You’re all set to take it to the pool..or beach…or lake… or the slip’nslide…. 🙂
The great thing, is that it still lies flat if you need to wrap your child up in it, or if you just want to slide it around your shoulders…or if you have to clean up a mess… stuff like that.
Thanks for stopping in!
Be sure to check out the awesome rainbow of fun being sewn up at Kojodesigns today as well!
Oh and…here’s a sneak peek of what’s coming post color our summer, next week! Can’t wait to tell you more. 😉

super cute Delia (and I love that towel!)
that is just about the best idea ever! I remember as a kid trying to hold the silly towel on, and walk to the car with my kick board or whatever from swimming lessons. Everything would be falling everyplace! I will totally be making one of these for me and maybe even my son (he might think it looks like a dress though…so maybe not! 🙂
Love this! So creative and a great solution for a hand-free towel!
is there ever an end to your awesomeness?
Not only does this look super cute but I LOVE the way you photographed this!
~Heather
What a great idea!
Sounds like you have some interesting stuff coming up! I look forward to following you having found you this summer through the Color Your Summer Series.
What a great idea Delia! I love it and it looks pretty simple to make (I'm a beginner!). Thanks!
very clever! The FOE is adorable! I've only seen any at joanns, and the colors made me feel a bit ill. But this is great!
Looks so good,and comfy!
I don't have kids but i'd make one for myself anyway ^^
I love your blog,so i decided to give you the Versatile blogger award:come see what it is down here 😉
http://unamelaalgustopesce.blogspot.it/2013/07/thank-you-very-much-to-okashi-lau.html
BRILLIANT!
And I love the DIY pictures =)
This towel tutorial is fabulous! You go girl! I might just have to make one for our vacation next week…. 🙂
hugs x Crystelle
Crystelle Boutique
This is great! Definitely on my to do list while the snow is on the ground and I’m dreaming of summer sun. 🙂 I’m wondering if you found the folded over extra too heavy? I can’t decide if it’s worth the extra step to cut it and re-hem the side. I’d love to hear your thoughts! Thanks for the tutorial!
Thanks Sarah! I don’t feel like the fold over part is too heavy, but I think that’s due to it being a thin beach towel. If I used a thicker one or a regular towel, I would definitely consider cutting and re-hemming. Good question!