

I’ve been doing a little spring cleaning, but not in my house (I wish!)… Just on my computer. I found this little tutorial that I made when I sewed a bunch of throw pillow covers for my couches at the end of last summer.

It’s very basic, very easy…

It’s a great first sewing project, because it’s all just straight lines yet gives you a nice, functional end result which you can enjoy instantly and often.
If you are brand new to sewing, I recommend using a solid fabric first. A bold print like this stripe is a little trickier because you have to match the stripes up from the cutting stage through the sewing stage (and a couple of my seams are still slightly off – the lazy perfectionist in me feels the need to mention it but not take the time to unpick and resew. ;))

What you need:
For the purposes of this tutorial, I am using measurements for a 20 inch IKEA pillow form and 5/8 of a yard of fabric.
FIRST, cut your fabric. You can either:
a. cut one piece 20 inches wide and 52 inches long
b. cut three pieces – one 20×20 inches, two 20×17 inches
OPTION A
I will show pictures for option “a” and explain more about “b” at the end.
You may be wondering why I cut my fabric to the exact width of the pillow form, rather than adding extra for seam allowance. The pillow form is 20 inches, but you want to sew it slightly tighter than 20 inches so that your pillow will look clean and snug rather than loose and floppy.

SECOND, press your fabric with a hot iron. Fold the short ends under about an inch and then again another inch. Sew the double folded hem down with a top stitch close to the folded open edge. (oh and you pre-washed your fabric right? :))

THIRD, fold the ends of the fabric over with right sides together (or on the inside) and overlap them about 4.5 inches.

FOURTH, sew or serge up the sides. Use 1/4 inch seam allowance. If you serge, leave the tails. That way you won’t have to worry about the seam coming undone and no one except your laundry fairy will see it. 😉

FIFTH, turn it right sides out and don’t forget those corners! I have a point turner tool, but a semi blunt pencil works great. If your pencil is too sharp you may puncture a hole into the corner of your pillow case. Not that I know anything about that. 🙂
And that’s it! Now make 10 more. 🙂 You can certainly dress your pillowcases up. I kept it simple for a fast sewing project and comfier results.
Option B:
*If you decide to use a stripe fabric or want to match up your prints, you may need to follow option “b” when cutting your fabric (see the first step).
**You will also need to use option “b” if the fabric you use doesn’t come wide enough (it needs to be at least 52 inches for a 20 inch pillow form)
 Option “b” requires a couple more steps, but is still super easy to do.
 I actually made so many pillow cases because our new couches (older model West Elm) are not super cushy. They are firm, sturdy and great for kids (other than being white) but definitely needed some pillow love.
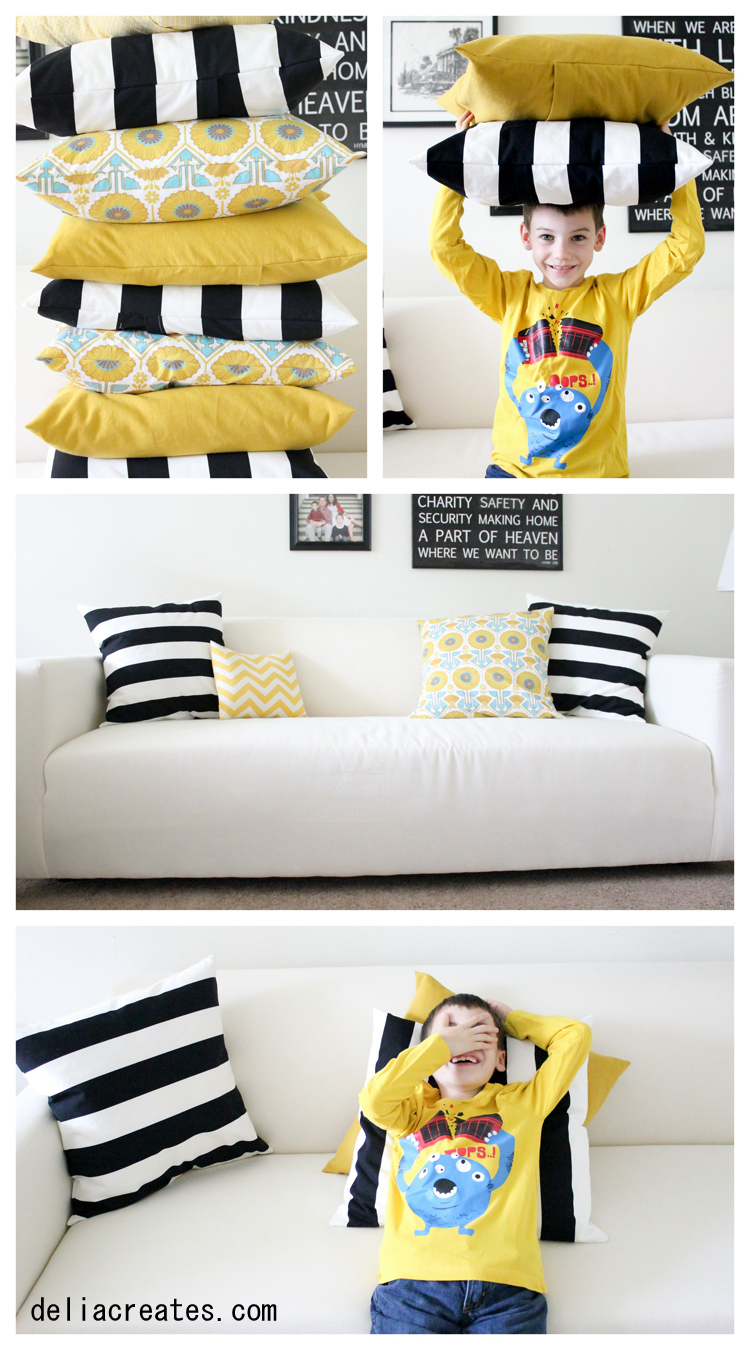 We have since gotten covers for the larger couches and I have been pleasantly surprised at how well the scotch-guarded white armchair has stayed clean. Our pillow covers however have been washed more than a few times. They are my boys’ favorite “weapon”/makeshift bag/squirrel stash/fort building block/ TOY!
.jpg)
Fabrics I used –
– Black and white stripe is from IKEA.
– Mustard yellow solid is a linen look fabric from Jo-Ann.
– Joel Dewberry Sunflower in Sunglow (my favorite) can be found here from my sponsor Lily Bella.
*For my post about slip-covering this chair (below) go HERE.
*For my post about the hymn wall art you see in the background (above) go HERE.
 I hope you have bright happy weekend!
I love your site! You will be in our prayers and thoughts! Nice and informative post
on this topic thanks for sharing with us.Thank you
epoxy coatings
glue removal
floor levelling
Polished concrete sydney
concrete repairs
concrete coatings
great tut pics!! I have a similar envelop pillow case tut myself a year ago, with a 2-pg printable 🙂
http://mejiamamma.blogspot.com/2012/02/diy-envelope-pillow-ase-tutorial.html
Happy Birthday Natalie! I love the pillows– yay for more comfy reading!
This tutorial came at the perfect time, I am getting ready to recover some old pillows. Thank you!
Mejia – Thanks for sharing the link!
Palak – Thank you! 🙂
Jessica – Awesome. Happy pillow case making!
I love the colors all together. You have such great style. And I don’t know if I told you this but I really love the new look on your blog!
Great tutorial! I love those pillows – amazing color and design! Thanks for sharing!
Love the pops of color your pillows bring to your living room! And this looks easy enough that I think I just found my next sewing project. (I think Halloween burned me out- I haven’t sewed any since then!)
Every time you post pictures of your living room, I want to completely redecorate mine. It’s so open and airy with the white couches! And I love the fabric you chose for the pillows. The whole room looks fantastic.
You appear to know so much about this, like you wrote the book in it or something.http://www.ycdress.com http://www.dressesforbest.co.uk
This is a very good post! I admire the way you shared this topic! Keep it up a good job! credit report and score.
Architectural Walkthrough
Architectural Visualization
Architectural Rendering
What is it with men hating on cushions so much!? I’ll admit, I am a little cushion obsessed but there aren’t any on our bed (yet!)
I cant wait to get our new sofa, these cushions would look GORGEOUS on it, so thank you so much for the inspiration!
http://merryatseven.blogspot.co.uk/
how did you figure out the length in a? I have an 18in pillow and trying to figure out the best measurements for it
Merri, good question. So I would take 18 divide by 2 = 9. 9+4 inches for overlap + 2 inches for double rolled wide hem allowance = 15 inches. Take 15 multiply by 2 and then add 18 inches = 48 inches should do you about right. I might go with 50 inches by 18 inches and wrap it around the pillow and make a wider hem if I need less length. Some pillows are super full and are flatter. If your pillow is very full I might go with 18.5 inches wide as well. Ikea pillows are flatter than pillow forms I have found at say…Joann.I hope this helps! 🙂
Hi Delia!
Thank you for posting this – it’s great and exactly what I was looking for.
I just bought a green sofa and have had the hardest time trying to find interesting pillows to decorate it with. Then I thought, well, why not buy reasonable fabric from Ikea and do it myself?
Now I can 🙂
Best,
Cristy
I loved your tutorial so much I shared it with my blog readers for my DIY Weekend weekly feature!
mrandmrswinslett.blogspot.com/2013/08/diy-weekend.html
This was a good suggestion that you put up here 🙂
Coloured Envelope
Hi delia. Thank you for sharing this, which made it easy to sew my First pillow case. And now, ı will be blogging about that project and I would like to let you know that ı'm gonna link you up for your fantastic tutorial.
KissesFromHome
Thank you so much for this tutorial! I just finished two pillowcases and I'm officially addicted. They look so professional and I love not having to hand sew up a few inches of seam at the end.
I just found this tutorial after googling for a simple pillow cover pattern. Your instructions are very easy to follow. I was also happy to see the question in the comments about an 18″ pillow because that’s what I’ll be working with. I look forward to making one as a gift for my son, who asked for an extra smaller pillow for his bed for Christmas. I found a great deal on flannel and pillow forms on JoAnn’s website so this will make a nice, inexpensive handmade gift! Thanks!
I’ve read it four times.
I just wanted to say this was the best tutorial! I just finished my first and I am working on my second! I wish I had bought more fabric now! These are so easy! Thank you! I will blog about this and reference you for sure! This has been a HUGE help!
It makes me so happy to hear that! 🙂 Happy pillow case making!
Hi – I wanted to let you know we have linked back to your fantastic tutorial in our latest post 🙂
Thank you!
Thank you for the step-by-step! Was a fun project.
Thanks Lana! Glad you enjoyed it. 🙂
I used this tutorial. I’m no seamstress, so it was REALLY difficult for me but I am success. Thanks for sharing.
I am so glad you had success! Cheers!
nice pillows and wonderful blog post thanks for sharing with us