

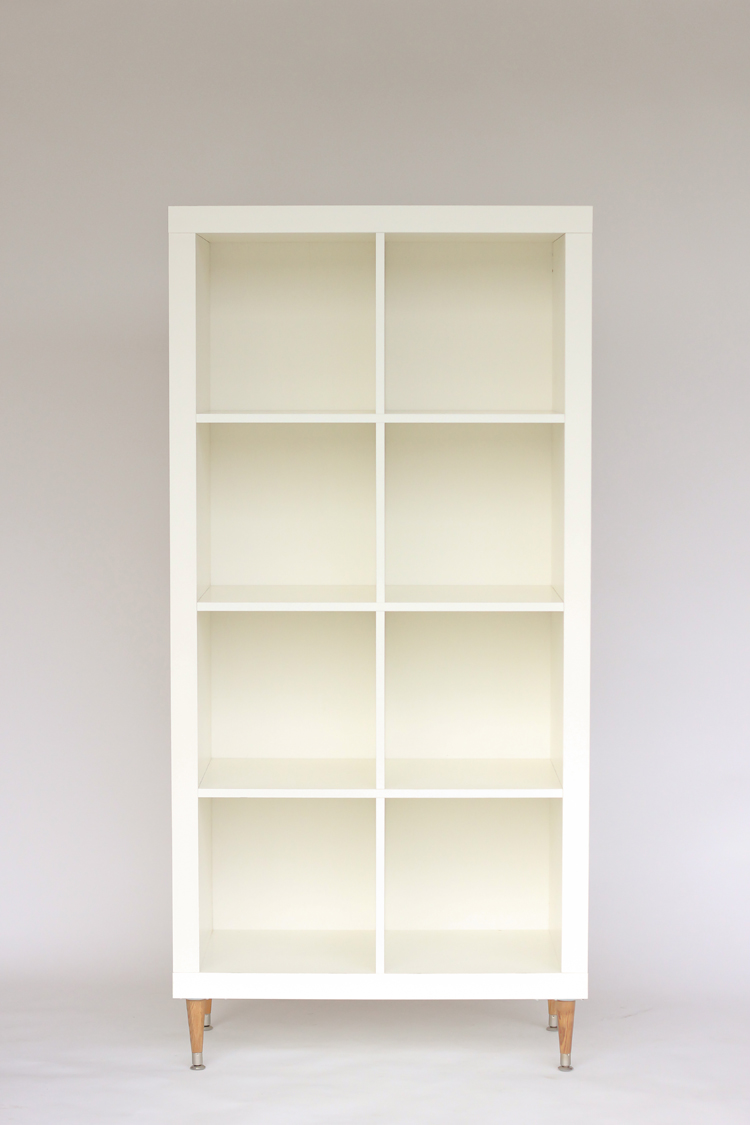
Back before IKEA replaced their Expedit line with the slimmer Kallax versions, we bought a bunch of them for our apartment.

They make the perfect apartment furniture because they are SO flexible. Turn them on their ends or their sides for whatever you need… bookcases, fabric storage, kitchen storage, toy storage, night stands, TV stands…anything!
Since we bought our first home, we’ve slowly been collecting more permanent pieces and phasing the expedits out, but I’ve hung onto a few to work some DIY magic on.
This hack is really simple, but with just a couple changes you can transform it from ho-hum apartment staple, to mid-century modern marvelous!
MATERIALS
1/4″ plywood sheets (4 x 8 feet size – from Home Depot or Lowe’s)
20-30 1″ nails (best if they have a wide, flat nail head)
heavy duty top plates (I used these plates from Home Depot)
furniture feet (I used these feet from Lowe’s)
hammer
power drill (screwdriver)
optional: wood stain for the legs (I used Miniwax Golden Oak) and white paint for plywood backing (I used Behr brand in Dove from Home Depot)
STEP ONE: Get your plywood cut at the hardware store.
It is totally worth it to have them cut the wood for you, even if it’s just so that it’s easier to put in your car. Most places will do it for free. Some will charge you 25 cents per cut.
Measure out the size of your bookcase and cut a piece about 1/8 – 1/4″ smaller on all sides from the 4 x 8 foot plywood sheet.
STEP TWO: Paint and stain.
Paint one side of the plywood backing with the white paint or an accent color. It doesn’t take much. A sample can is plenty.
Dove white is the color IKEA used to use for all it’s white furniture, but it has since started using a brighter white. So, if you are using an older Expedit, you will likely need Dove white like I used. If you using a newer Kallax, you’ll have get some paint chips to help you find a match.
If desired, paint or stain the furniture feet according to manufacturer’s instructions. Let dry.
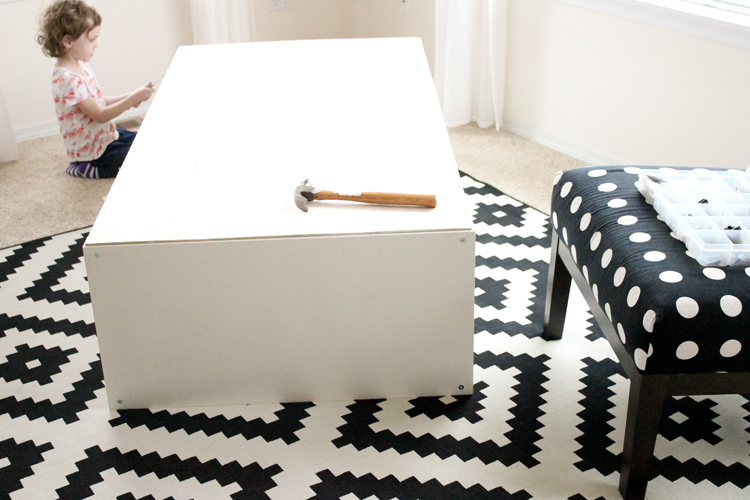
STEP THREE: Attach plywood backing.
Lay the expedit/kallax face down on the ground. Lay the painted plywood backing face down onto the back of the bookcase and make sure it’s centered.
Nail the backing to the bookcase every few inches around the perimeter, until it is entirely secured.
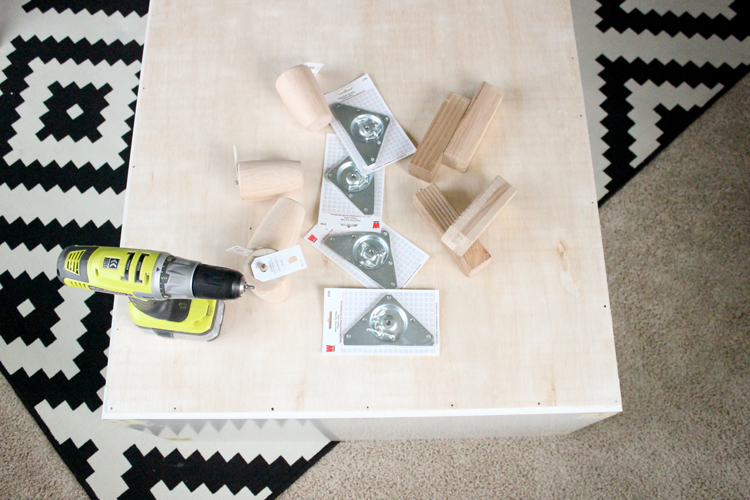
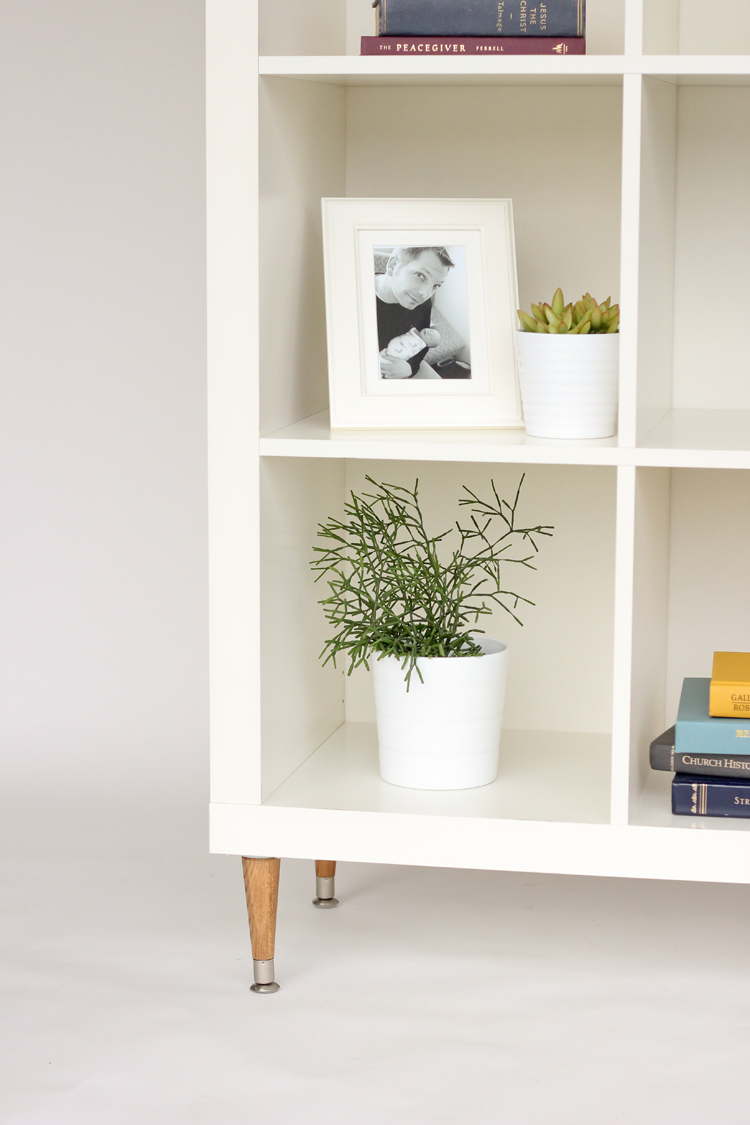
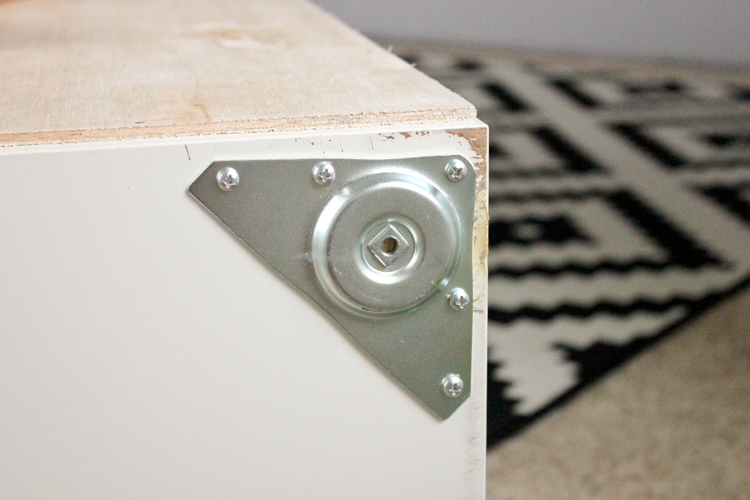
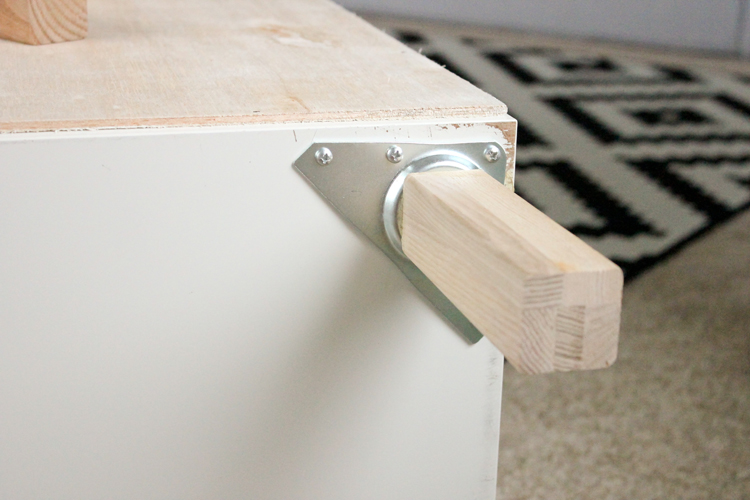
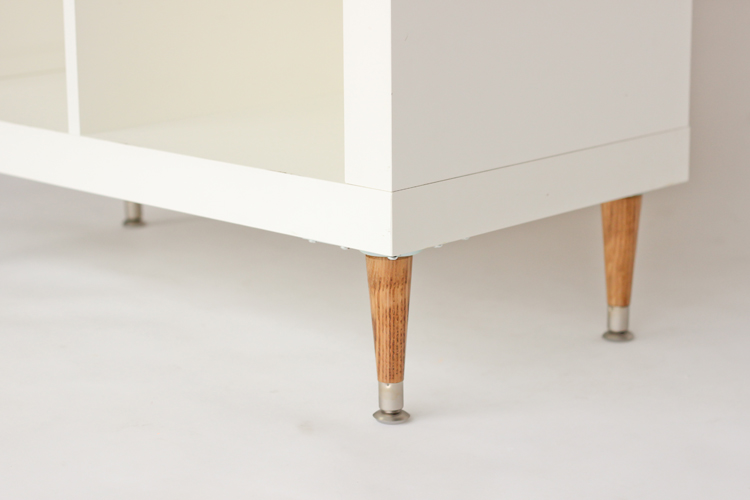
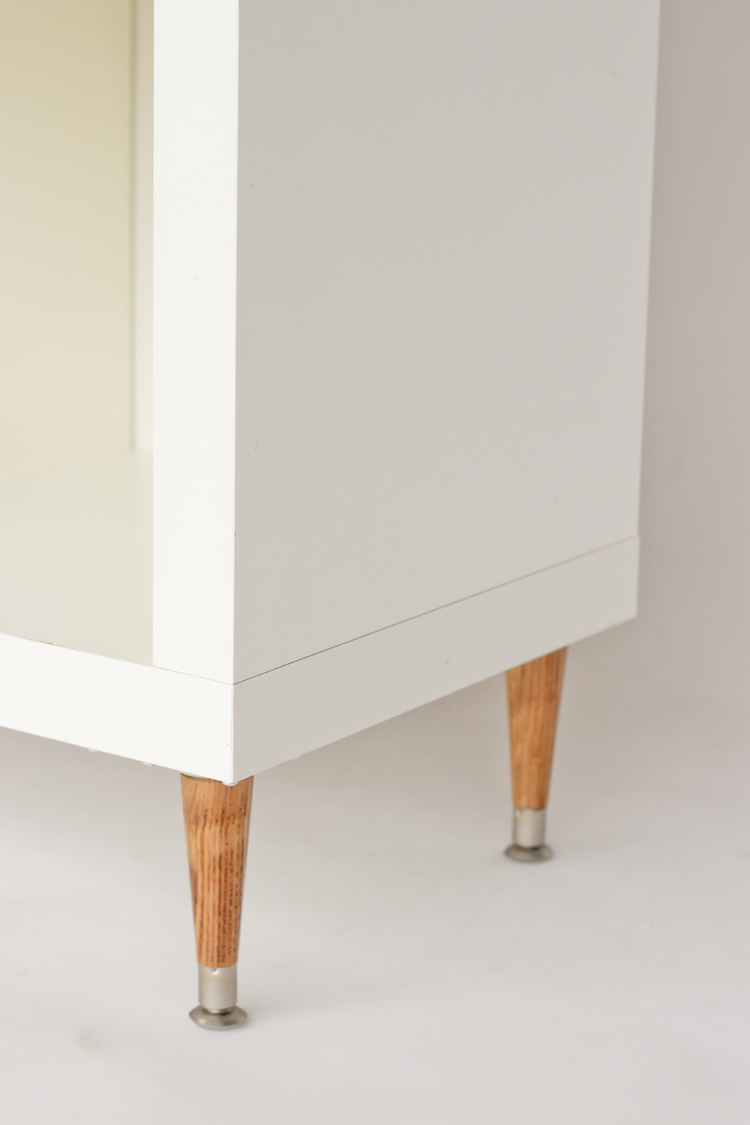
STEP FOUR: Attach furniture feet.
With the bookcase still face down, screw in top plates to the four corners of the bottom of the bookcase.
Once all top plates are secured, screw in furniture feet by hand.
As you can see, I went through a few options before deciding on the tapered feet. And actuallllllly…I even tried to skip the top plates altogether and just use wood glue to help secure the feet straight into the bottom (you can see my gluey mess peeking out behind the top plate). That was dumb. Don’t try that because it doesn’t work well. Trust me…use the top plates! 🙂
That’s all there is to it!
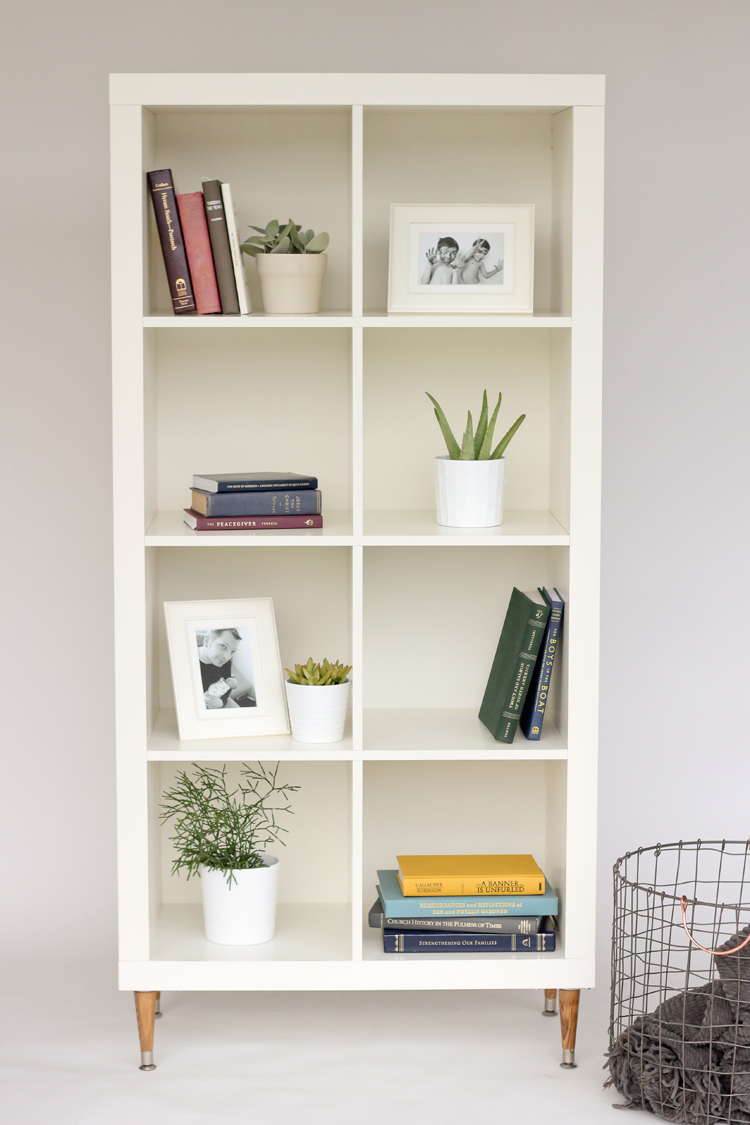
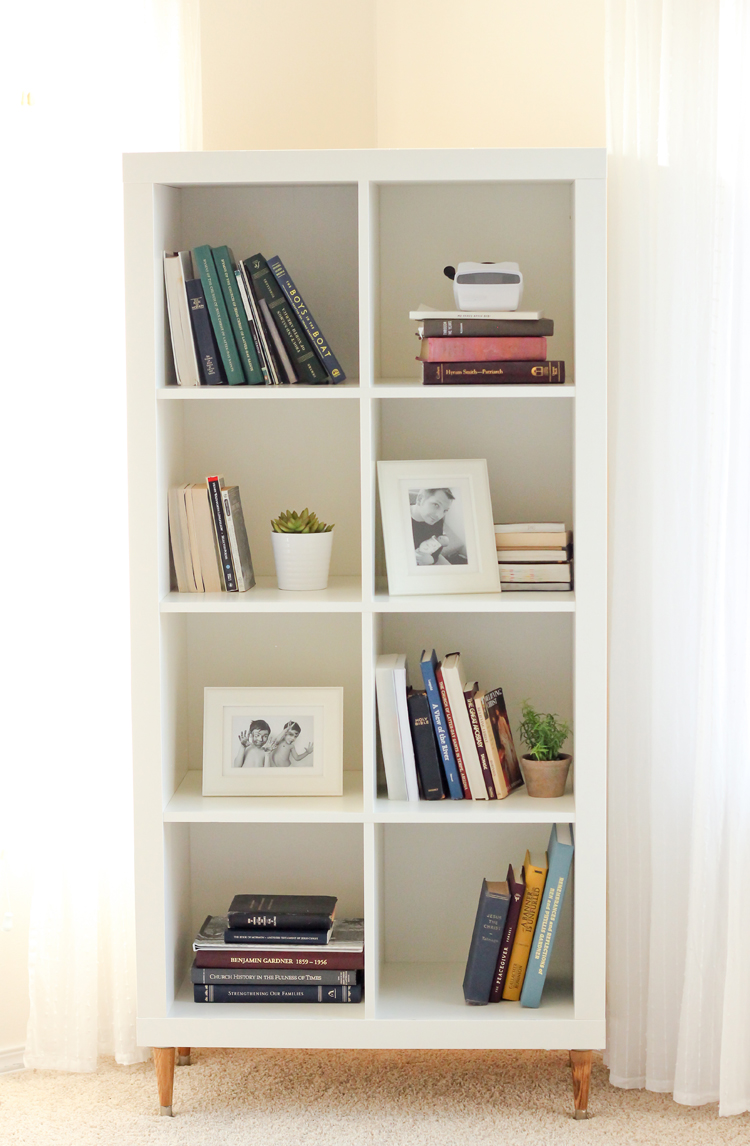
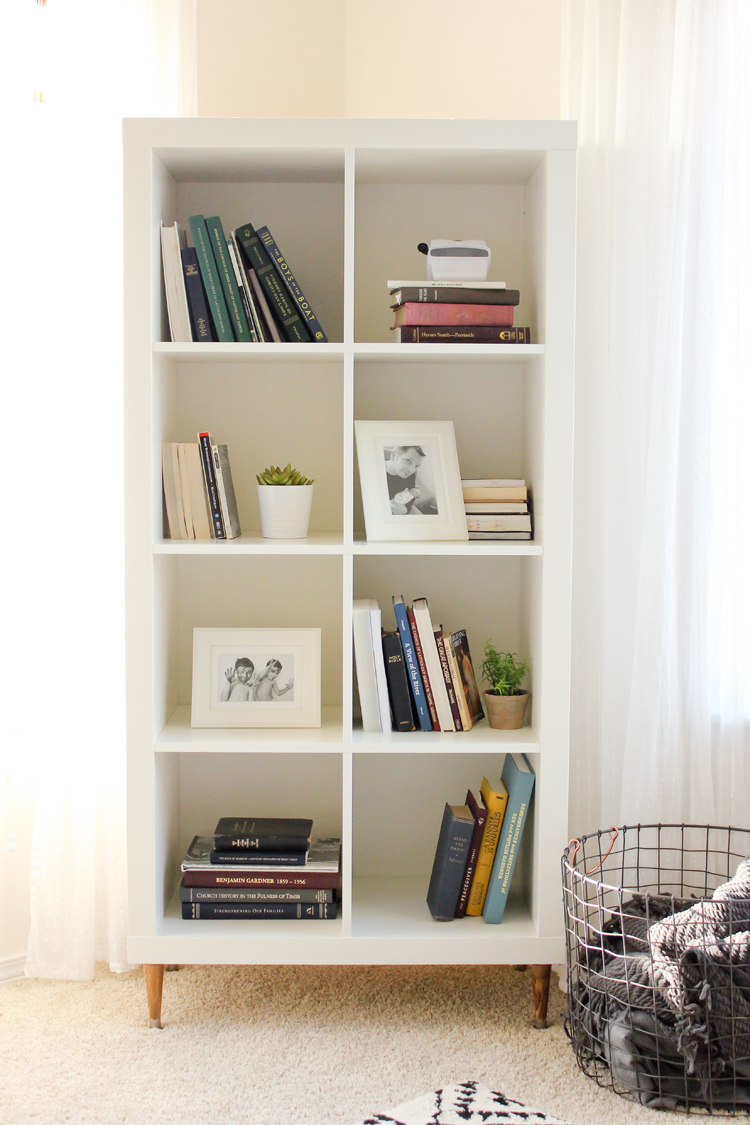
I’m still messing around with shelf styling, so I brought it into my photo studio for a few “clean” shots. I’m so torn with how minimal I want it to be, and how much stuff we actually have that we need to put somewhere…ha! #notrealproblems
NOTES: For good measure, I thought I would throw in a few more tips and things I learned along the way.
– If you want to attach feet to the long side of the expedit/kallax get a fifth foot to put toward the center back. We added feet to an expedit for our daughter’s room. Without the fifth foot, there was some noticeable bowing after a few weeks.
– Lowe’s sells top plates that work fine (I’m actually using some for an upcoming project!), but the heavy duty Home Depot ones are noticeably sturdier. I knew this bookcase was going to bear a lot of weight, so I sprung for the heavy duty plates.
– The expedit/kallax will become much harder to move around. The backing and feet add a little bit of weight and you lose the ease of carrying it from both sides. I only mention this, because it kind of surprised me. It went from being easy enough to move on my own, to being a two person job.
 I wish real plants could survive in this thing, but they won’t get enough sun, so I’m replacing a few of these plants with fake ones soon. I think a real plant could survive on top though, so I’m on the hunt for a good vine plant if you have any good recommendations!
Awesome idea–simple is best.
Where did you get your large wire basket?
Thank you Rachel! It’s actually from Michaels!
Ah, this is just perfect! My hubby and I have this cubby from Ikea, and I have thought about doing something to make it look more expensive. Will definitely be checking out Lowes for the hardware and feet..They look like just the right thing! I also love how you put the backing on it.. Thank you for sharing this!! Xx
Thank you Crystal! Have fun fancying up your expedit! <3
Looks beautiful! I came across your blog while google’ing “kallax with legs” hehe 🙂 Been wondering if that cubby would get wobbly with feet under it. Did you have to attach it to the wall also? I would so love to put some fancy feet under mine 😀
Thank you! It’s actually quite sturdy. I don’t think it would be if it was on it’s side, but upright, it’s perfectly stable. It probably helps that I also used heavy duty top plates. I hope that helps!
Delia, do you have a suggestion for putting a backing on a larger kallax that is 5squares across by x 5 squares down? With your smaller one, nailing around the perimeter was sufficient but with my larger ones, I think it needs more. Is it ok to nail into the kallax? What type of nails would you suggest? Thanks for your help.
My kallax units are the black/brown. I was thinking of painting the backing a fun color. These are going in a new craft room:)
Oooh good question Donna. You would need to seam together two 4’x 8′ plywood pieces to get the right size…I imagine. I bet you could nail it into the middle shelves if you’re careful. I would use smaller finishing nails for that. Or you could lay a very thin bead of construction adhesive on the back of the shelves before you lay the backing on….?
I hope that helps! A pop of color on the back sounds lovely!
I have a sizeable vinyl record collection and am curious as to how much weight these legs will support. Any recommendations on sureing up a fully loaded Kallax, or am I overthinking it? Thanks!
That’s a good question. If you are keeping it horizontal, you will really need a fifth leg in the middle, or even six legs. If you are keeping it vertical like I have mine, then you might be okay. I would recommend securing it to the wall though. Putting a back and legs on it makes it a lot heavier than I thought it would. If you fully load it up, it might get a little top heavy, but securing it would help. I hope that helps!
This is great. I threw away an ikea TV unit (movers broke it) but I kept the legs. (one pice 2 legs each x3) I’ve thought about doing what you did but thought I’d mess up my pice (2×4). I want to put it horizontally in my master closet with ikea bins. Storage for my linens, towels, etc. I love ikea!!!
I really like how the simple legs completely change the look. Do you have any recommendations for adjustable feet? My apartment floors are *charmingly* uneven. Thanks!
Thanks Andrea! These legs can be adjusted, but only a little bit. I am not really sure where to get legs that have more height flexibility, but I assume online shops that only carry furniture legs, might have more options. Good luck!
You may have already gotten some answers, but a good “viney” hard-to-kill indoor plant is a Wandering Jew – another option is an ivy plant.
Thank you Mardee! Great suggestion. I took some cuttings of that from my father-in-law. I put some outside and some inside. The ones outside didn’t survive the winter, but my inside ones are thriving. They really are very hardy!
Another option for the back is mat board as used in picture frames. Just nail it on with big headed nails. It’s much thinner than plywood, so will work better if you want the unit right against the wall. I have a gray-turquoise Kallax that I used off-white mat board that matched my living room walls as a back for, and added Omlopp cabinet lights as well. It’s a vertical 2×4 unit, with doors on the bottom two cubes, drawers in the next two (all in white). And now I will be adding feet, because this is just the touch it needs! What a fantastic, cheap and easy idea!
Great idea! It’s sounds like it’s lighter too! Thanks for sharing. 🙂
Do you have any pictures of the horizontal one in your daughter’s room? We’re going to add some feet to ours to make a tv stand and are trying to decide between 6 feet or 4 withe the support. Looking online it doesn’t look like many people use a support, but we think we would definitely want it!
I do have some pictures but they really don’t adequately show the leg in the middle. So sorry! We have since switched out the bookshelf for other furniture otherwise I would take a picture now. We can’t make up our minds about how to decorate her room. ha!
I know what you’re talking about though. When I researched it, it seemed like nobody was putting a leg in the middle of their shelves, but that’s not sustainable. The shelf will sag over time without it. I think if you put an extra board across the bottom, with some i-beam construction, that may be enough to get away with not putting a leg in the middle, but that is just as much or more work. I know IKEA sells a middle leg that kind of hides in the back. We used one for our Besta TV stand. It’s more money…like $15 but you just need one and you really can’t see it from most angles, if that is your concern. I hope that helps!
I’m going to try this with one for my daughters room
Were you able to still attach this to the wall somehow? She’s only 18 months old and I have a 3.5 year old, so it tipping over on one of them is a huge concern of mine!
Thanks
Hi Anna!
Because it is in a corner I just have never attached it. I think it would be easy to do if you need to though. I recently attached a tall dresser with legs from IKEA using one of their kits. It came with our dresser, but I think they also give them out for free if you ask.
I hope that helps!
Delia
Do you think this could be done less the backing? I like the open shelf look. Or would it not be sturdy enough to stand on its’ own?
That’s a great question. I think it could totally be done without the backing. The backing actually just makes it heavier.
Hi Dalia! Love your shelves. The last comment addressed my question. Could this work without the backing with the Kallax horizontally? Is it absolutely necessary? Also, how many inches are you pegs? Thanks!
Thanks! It can definitely work without the backing and it can work horizontally. I do recommend adding a supporting piece of wood that extends along the whole underneath of the shelf if you do that. This will help prevent sagging. You will also need at least one leg in the middle. My legs are 4-5 inches tall depending on if you are including the metal foot. I hope that helps. Best of luck with your project!
Did you put the plywood on the back and the bottom? Or just the back?
I just put it on the back. The feet held up great with the plate installed. If I were using it length-wise, I would have probably put plywood on the bottom with extra feet.
This looks great! Do you screw the legs directly onto the Kallax (planing to use a Flysta, actually), or to a wooden base?
Thanks! I screwed the leg plate directly into the Expedit bottom and then I screwed the legs into that. I hope that helps!
I need to touch up some spots on my white Malm desk. Do you think Behr brand in Dove would be best? I’m talking a few tiny specks of missing paint but it still bugs me 🙂
I think so! For small spots especially, I think it would probably work.
Did you remove the screw in the bottom of the shelf, and then use that hole for the top plate?
I didn’t. I just worked around it. I also used an Expedit rather than a Kallax. I am unsure if the placement of the screws vary from the Expedit to the Kallax.