

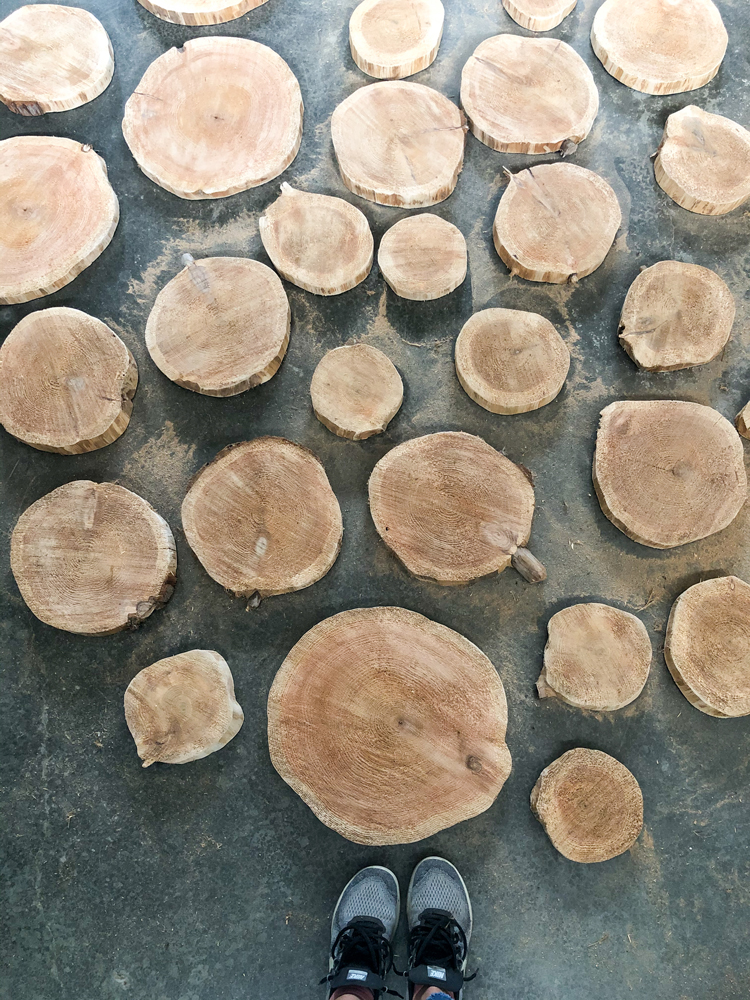
What do you call them? Wood rounds? Cedar slices? Wood cookies? That last one just makes hungry. Ha!
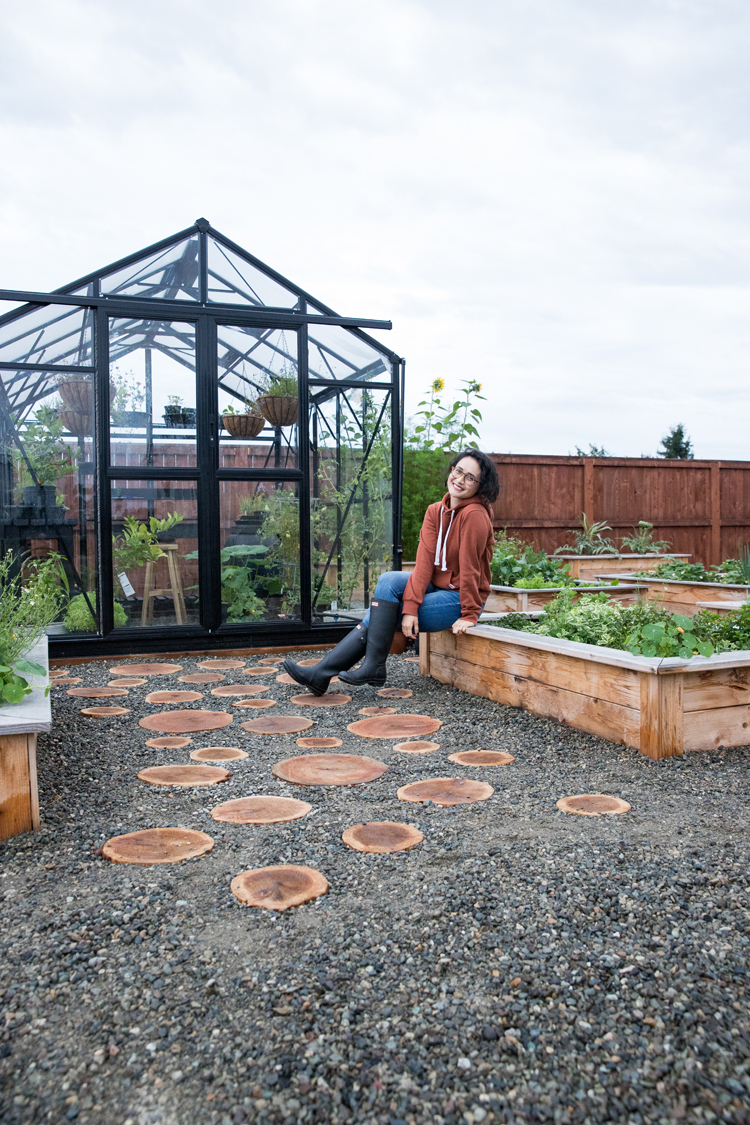
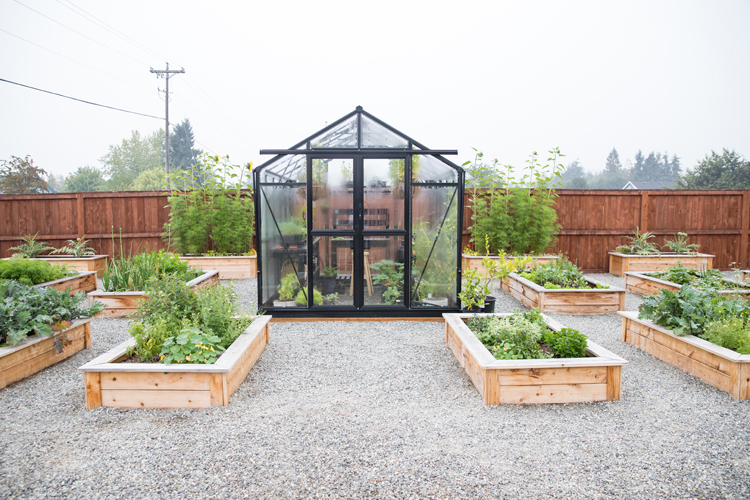
I have been dreaming about this project since we put in our greenhouse earlier this year. (Scroll to the bottom for info on the greenhouse.)
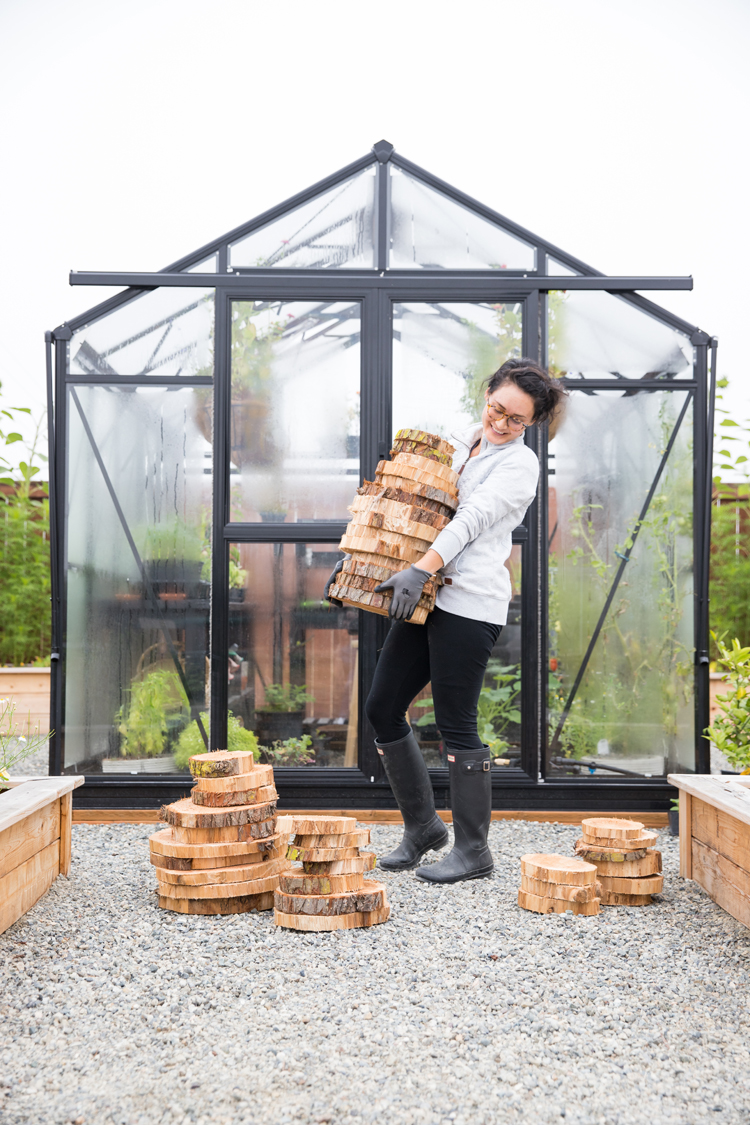
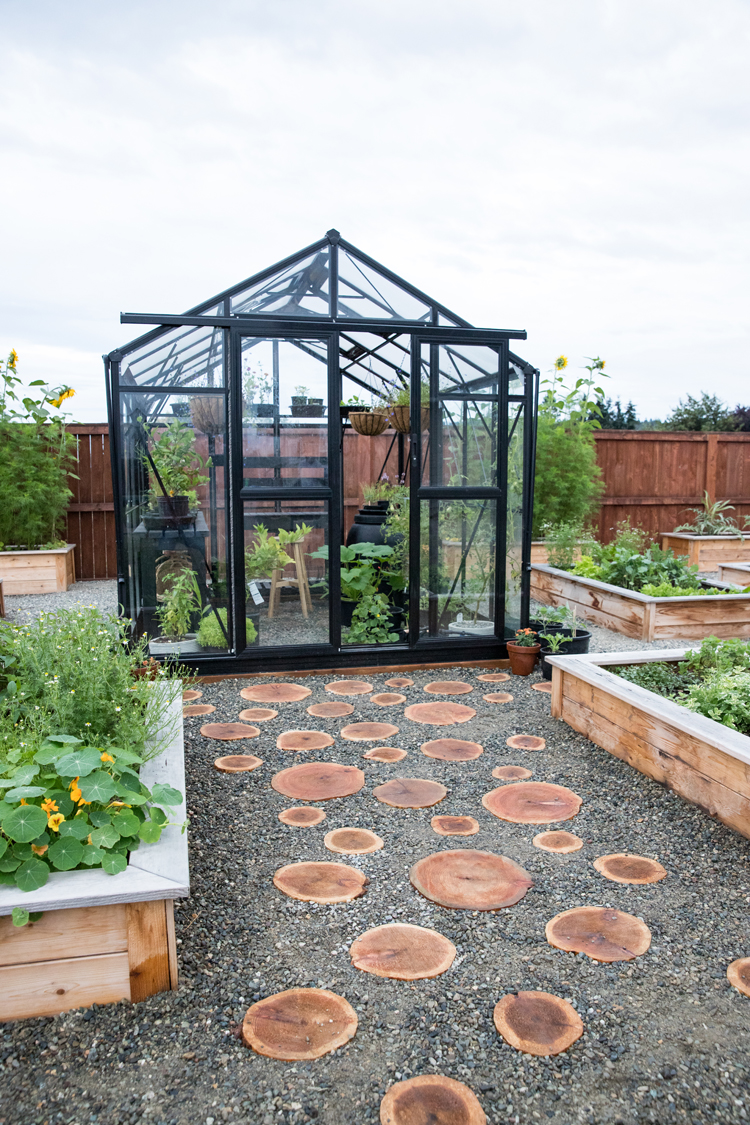
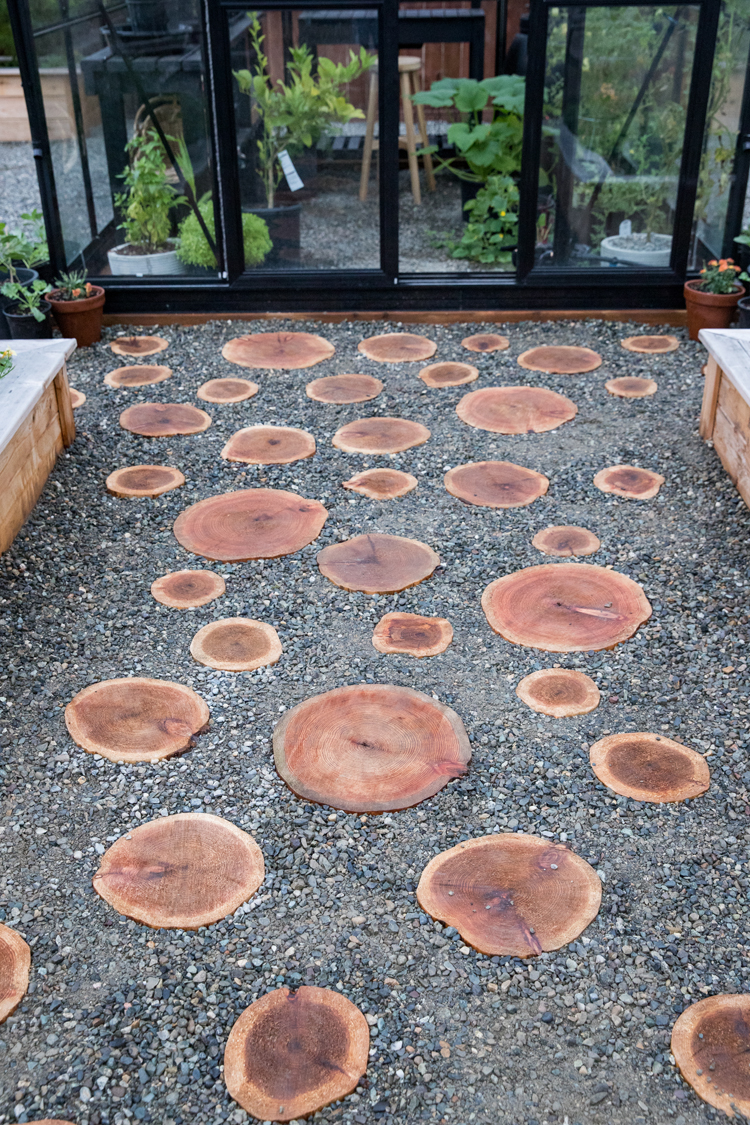
I had a local lumber yard cut 40 wood rounds, we’ll go with that, about 1-1.5 inches thick and I made a path out of them.
End of tutorial. Just kiddddingggg…
Let’s walk through my process:
First, a disclaimer. This is somewhat of an experiment. I don’t know how this project will hold up over time. Is my choice of stain the right one? Should have I gotten thicker rounds? We shall see.
UPDATE. After going through fall, winter, and most of spring I’ve made some observations:
- The smaller wood rounds float up out of the gravel and have to be nestled back into place from time to time. I think the heavier it is, the better it stays in the gravel. So don’t skimp on thickness.
- The wood held up well through winter, but our spring weather has been harder on it. The wet weather combined with spurts of dry, warm weather have caused it to expand and contract a lot and some of them have cracked. I think the sun has been harder on it than the cold or wet.
- VERDICT: It’s so dang pretty, I hate to give up on it. I think thicker rounds are a good idea. I think this would work better on a path that sees less foot traffic and ideally is in some sort of shade. I also wonder if it would do better in dirt/sand/mulch rather than gravel. We are going to move ours into some in ground beds and either refresh this spot with gravel or stone pavers.
For that reason, I won’t be sharing this in my typical tutorial formula.
Wood Choice
Type: I chose cedar rounds because they are the most resistant to rot. It’s what they make fences, siding shakes, and garden beds out of for a reason. They will eventually break down, but not for a long time.
Thickness: I went for 1-1.5 inch thickness based on price. The lumber yard was charging me just $1 per round at this thickness. Should I have gone thicker for more stability?…maybe. I’m going to see how it plays out.
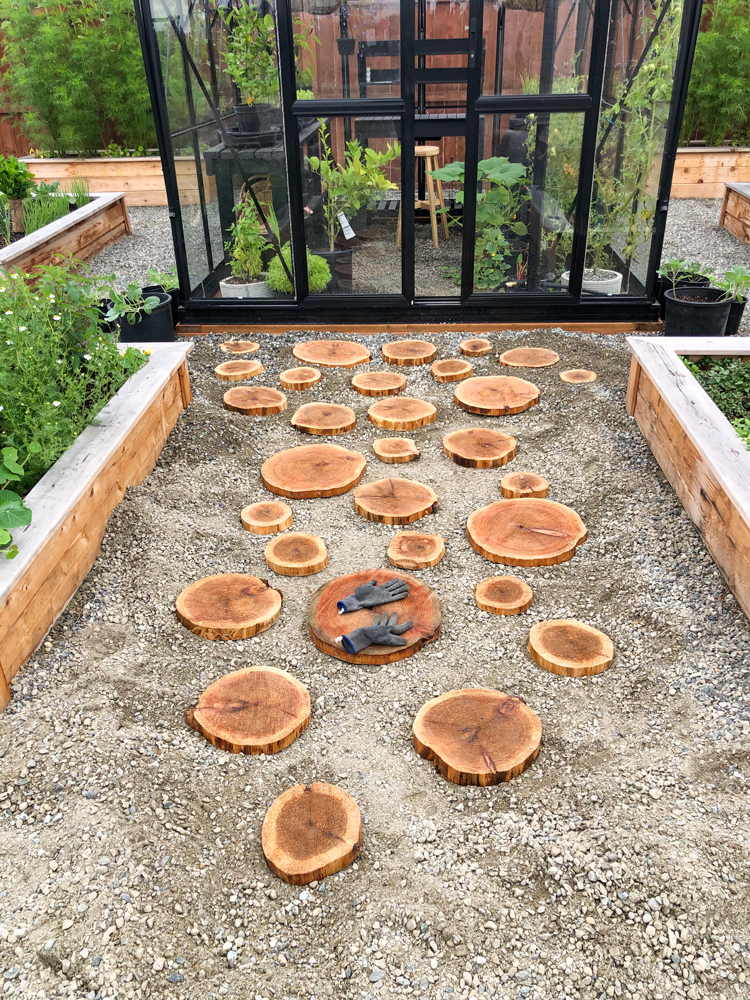
Size: I went for a variety of sizes because I like the organic, imperfect look it creates. It also makes spacing so much easier, because it’s not supposed to be lined up perfectly.
TIP: Just be sure that your wood is dry. If it is not, then you will either have to wait up to a year for it to dry, or buy a costly green wood solution to help it dry out.
Not sure if it’s dry? Drop some water on it. If it soaks in, it’s likely dry enough. If it beads up and stays on the surface of the wood, it’s still pretty wet.
Preparation
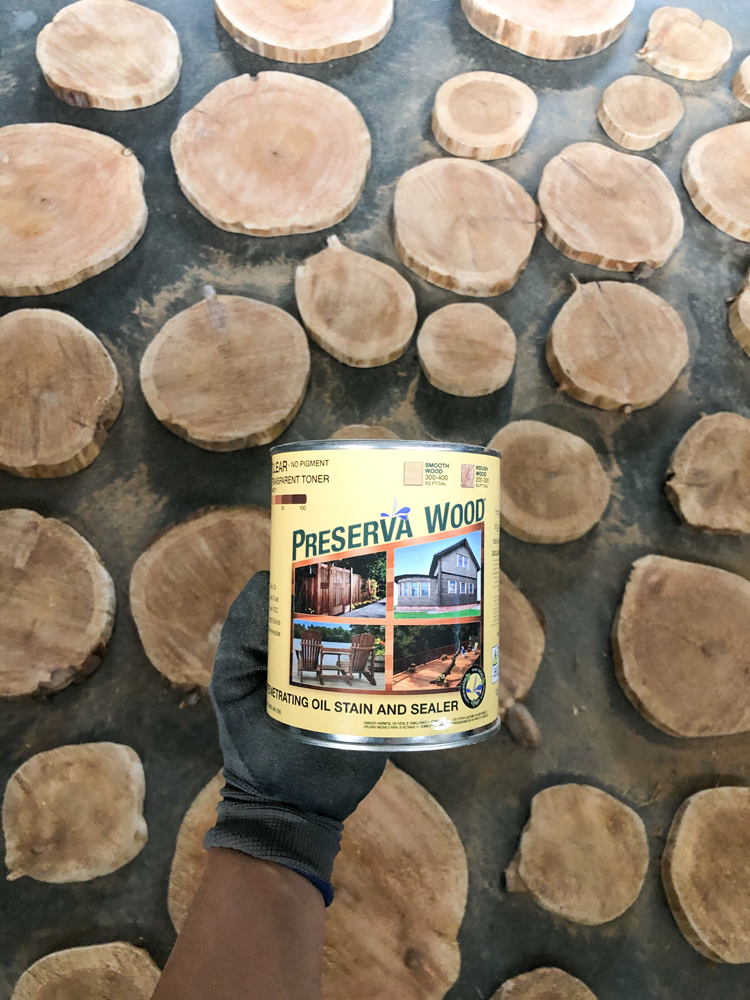
You could just drop the wood rounds into the gravel unfinished and they would last a couple years….probably. I’m just guessing. I wanted to give my wood rounds a fighting chance to last longer, so I decided to sand and stain my rounds.
I also live in a rainy climate and I’ve heard that wood rounds can get slimy if left untreated. Having a slimy, slippery walkway doesn’t seem wise, so I stained them.
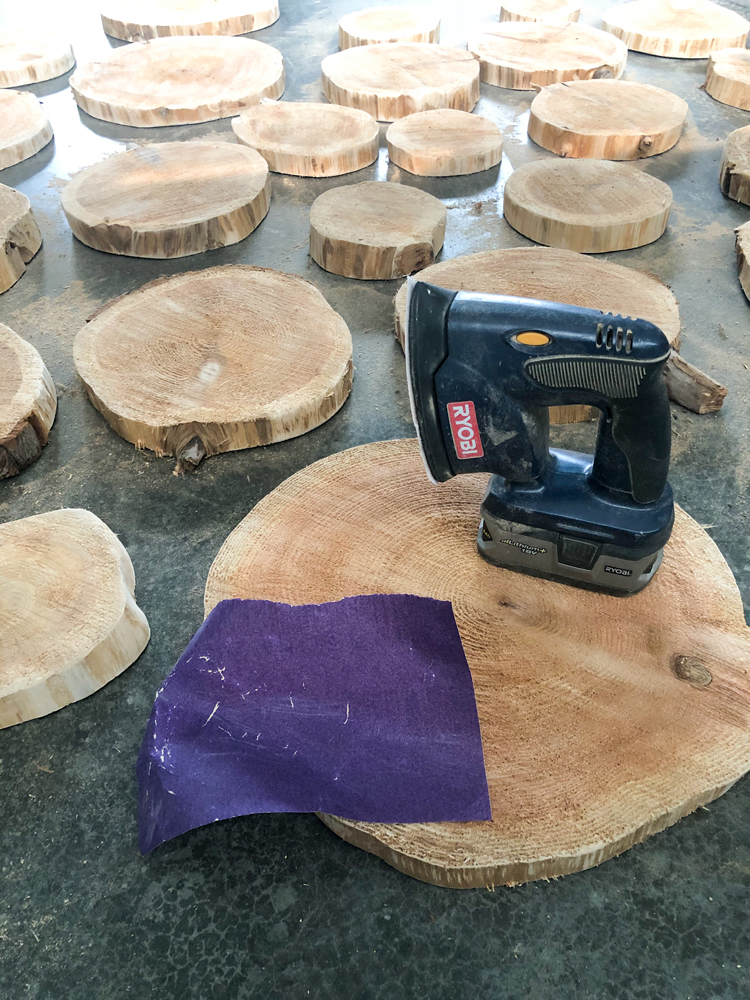
Sanding
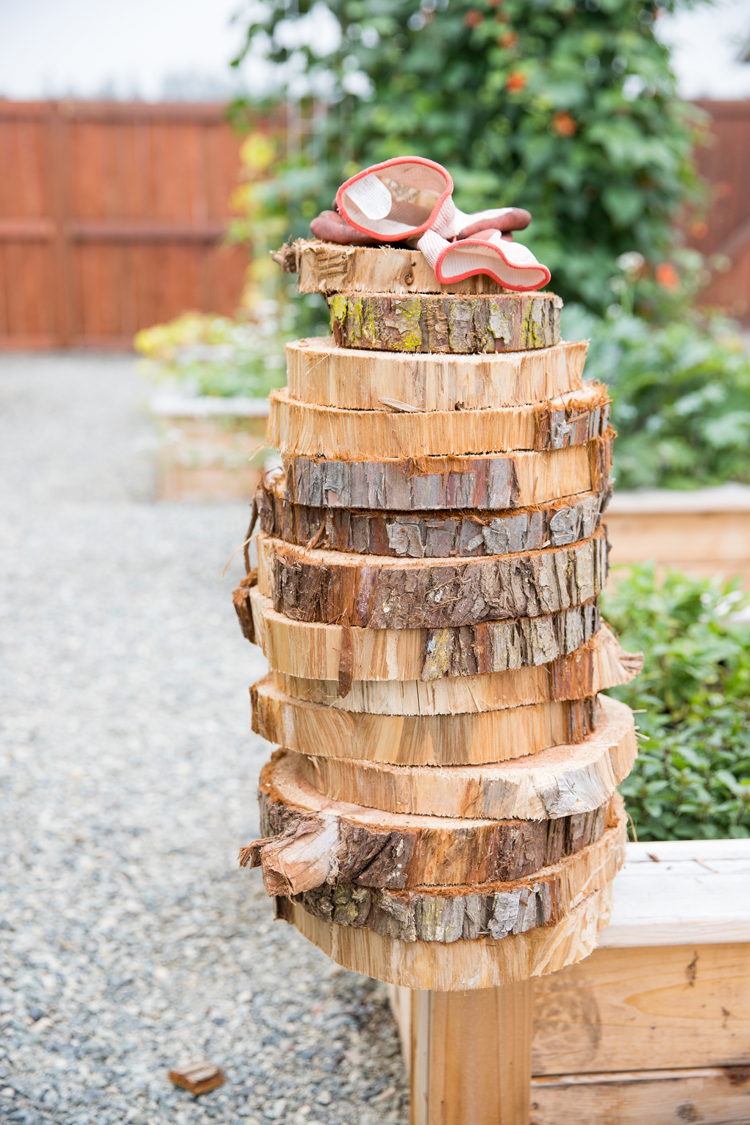
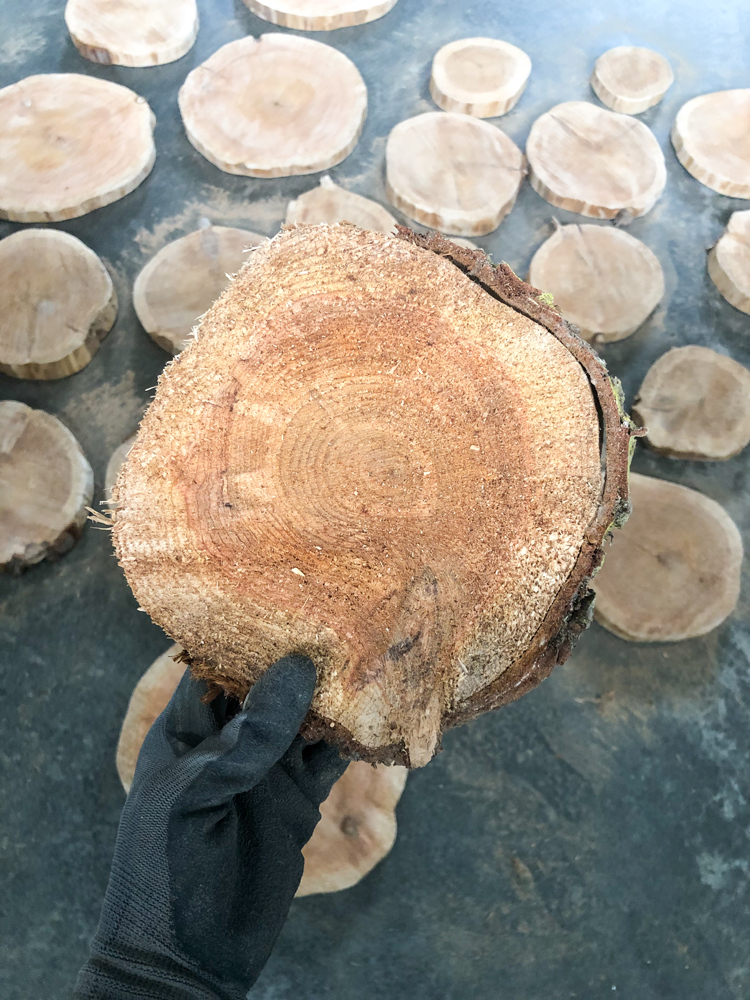
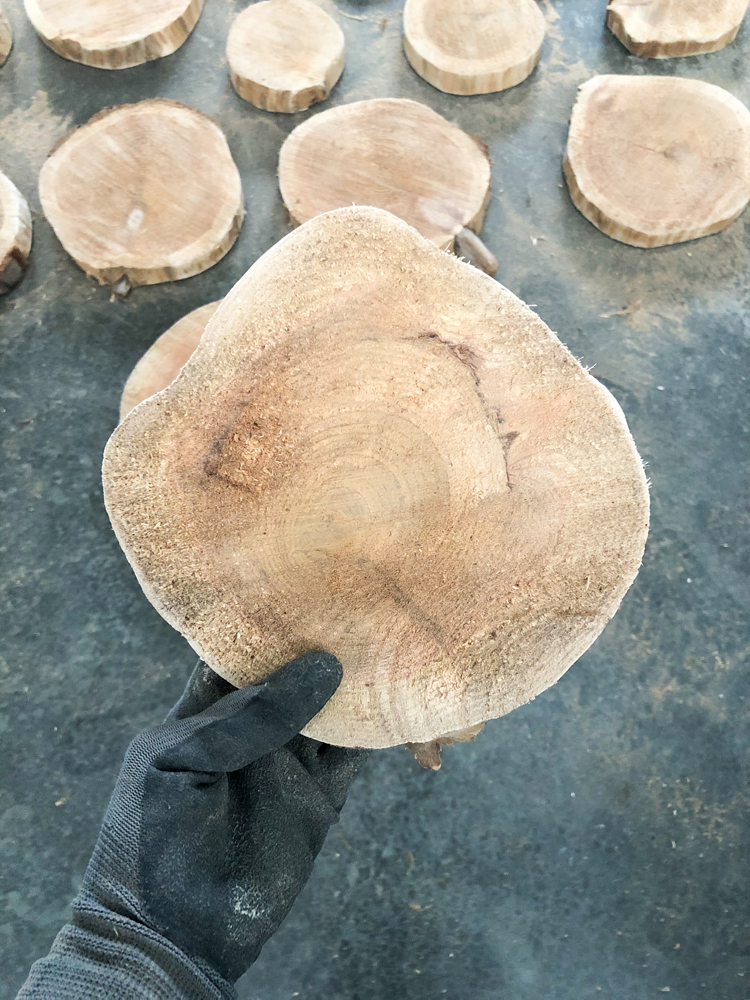
To prepare my wood rounds for staining, I knocked off the bark and inspected it for critters. Yuck…I know. Because wood rounds come with the bark intact, you’ll likely get some surprises just below the bark or around the perimeter.
Then I sanded it with 80-100 grit sand paper. I found that using a combination of my mouse sander and just sanding by hand helped me quickly smooth the flat surfaces and get into the nooks and crannies on the sides. I didn’t sand the top and bottom too much though! I didn’t want them to be too slick. I just buffed out the fuzziness.
Stain
I chose this Perserva Wood Stain in transparent. I love the look of the natural wood, so I didn’t want change it. It did darken the wood, but it basically just made it look permanently wet. It looked really dark on application, but lightened some as it dried.
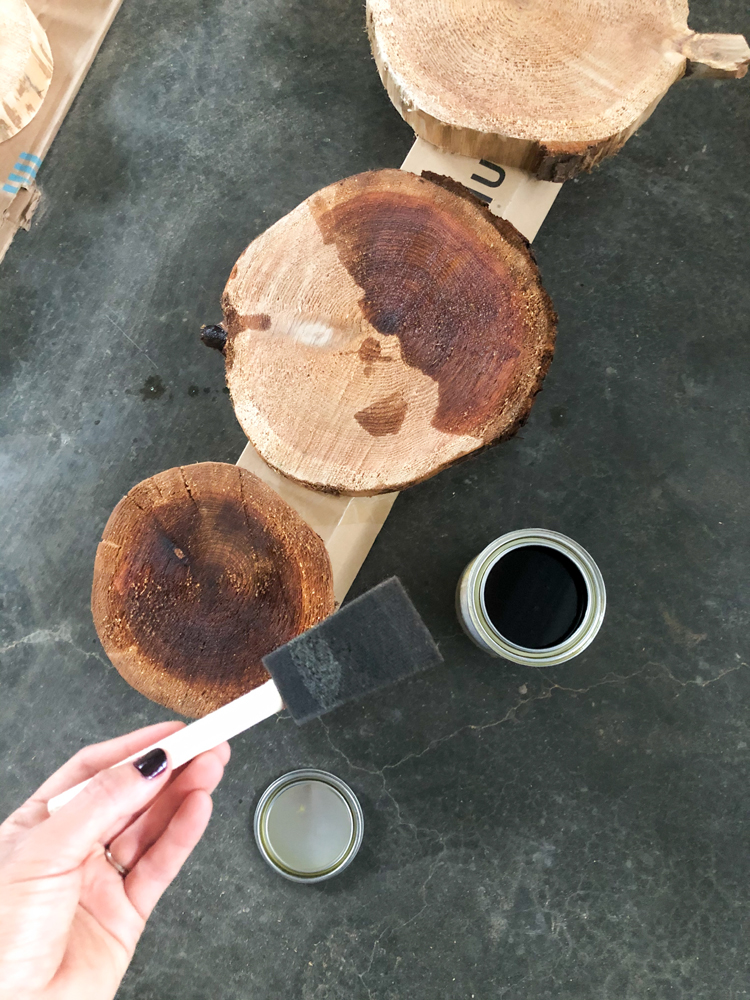
I used a disposable foam brush to coat the tops, sides, and bottoms. Then I let it cure for three days. The can said 24 hours, but life got busy so I “let it” cure for longer. 😉 ha.
Install
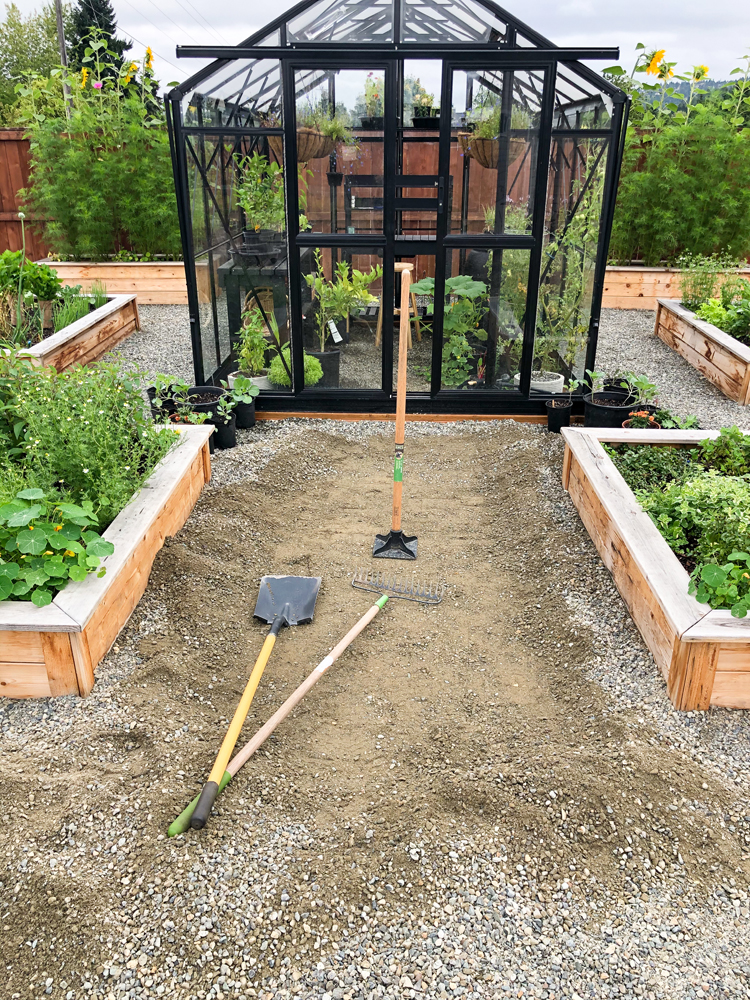
(before)
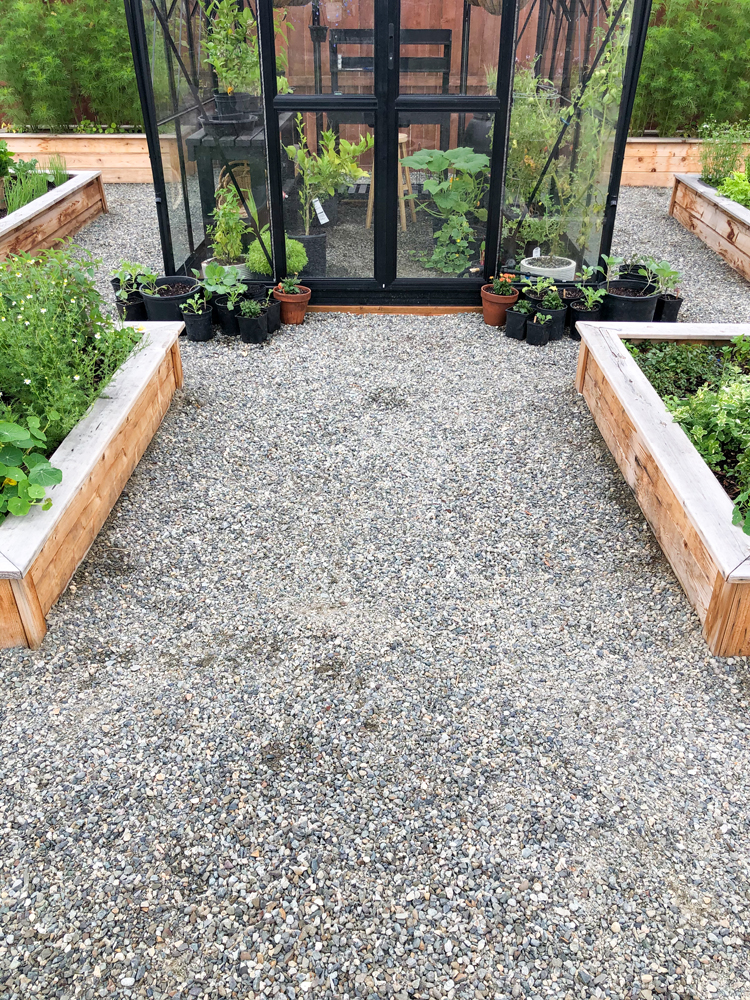
We laid professional grade weed fabric and 3 inches of gravel down under our entire raised garden bed area. To install the wood rounds, I simply pulled back an inch or so of gravel in the area that I wanted the wood path.
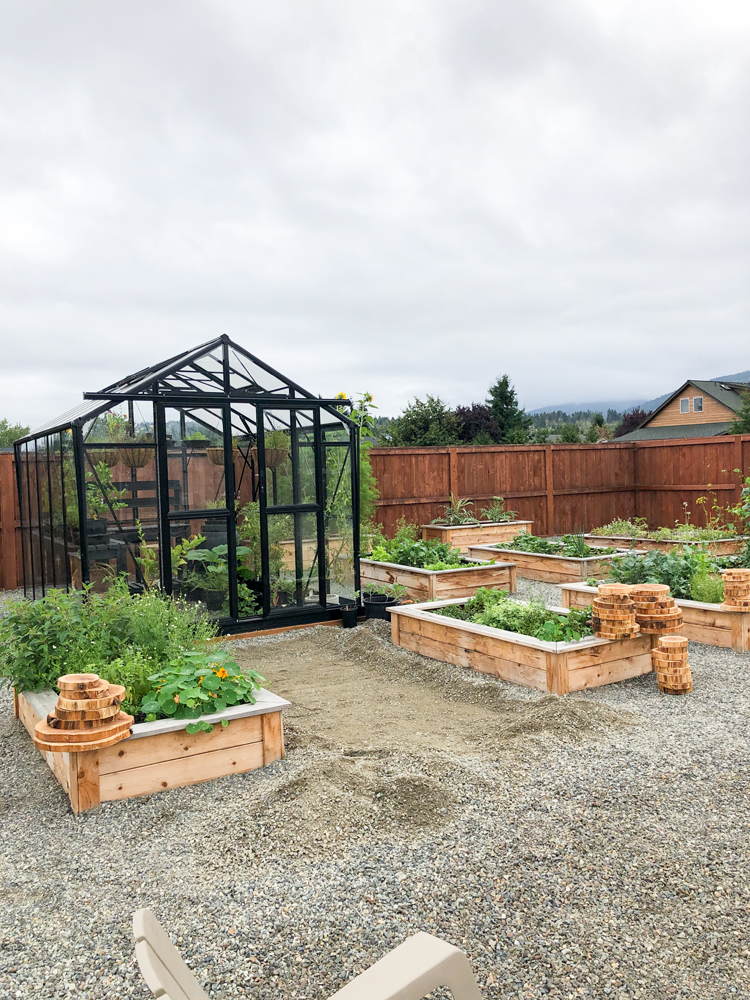
I compacted the gravel a little with my hand compacter, but honestly, this was not very necessary. We used granite gravel with minus in it (smaller bits) that helps it lock together enough naturally as you walk on it.
I placed the wood rounds in the configuration I liked, then I adjusted each wood round by hand by adding and subtracting gravel underneath them, until they were mostly level. I didn’t use an actual level for this, I just winged it and leveled it by eye and feel. I wouldn’t necessarily do this with stone or flagstone (we are actually installing a flagstone patio elsewhere in our yard), but for wood rounds this worked very well.
On that note, with pavers, you usually want to put sand underneath them to help with leveling and security. I read that sand actually promotes rotting with wood rounds. Putting gravel underneath promotes drainage and reduce rotting. So I charged on ahead with just nestling them right into the gravel.
The wood rounds were not secure at this point. It wasn’t until I filled in the gravel around the wood rounds that they felt locked into place. And even then, I had to do some stamping with my feet around them to get them to really lock in. I made sure I got some of the gravel “minus” into the cracks of the larger pieces as well.
The stability of the wood rounds feels fairly dependent on the margins of gravel around them, so I wouldn’t space them too closely to each other.
After I got my main pathway in place, I was able to add in supplemental pieces simply by scooping out gravel from a specific spot, placing the round, and then reallocating the displaced gravel somewhere else. Could I have done this with all the rounds? Maybe.
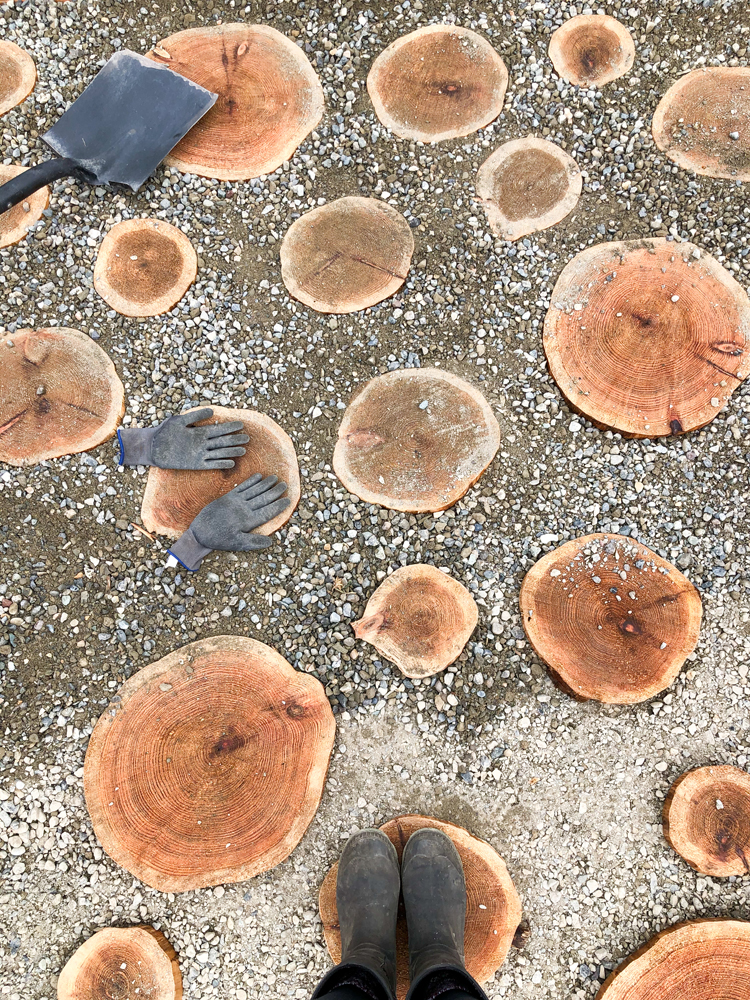
FYI: This was taken in the evening with wet gravel.
Done! Well…for now… 😉 finishing this one area has made me want to add more!
I’m going to see how well these rounds hold up over our rainy winter first. I’ll come back and add an update in about a year.
But for now, let’s do one more before and after:
BEFORE
AFTER
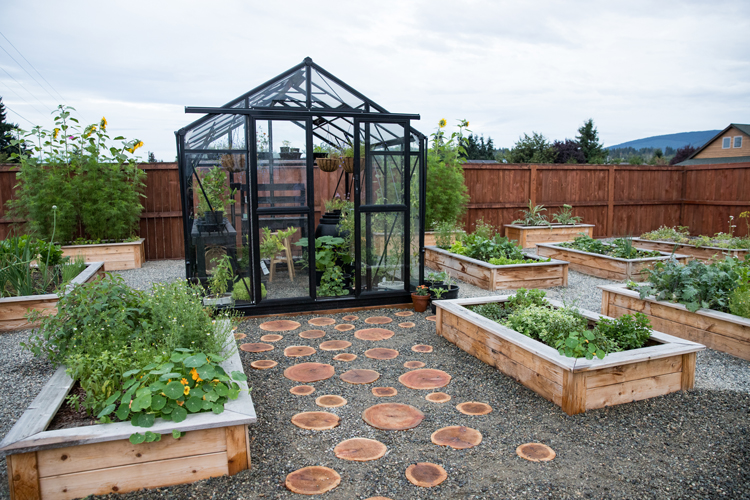
Yep… I’m in love.
*Note about our greenhouse: We bought this greenhouse from a local dealer that only ships within Western Washington. The glory line from Palram has a similar greenhouse. I personally recommend staying away from their hobby line unless you have mild weather or it’s well protected from wind and extreme weather.
How did they hold up over winter? I did this with my garden pathway and I found that the wood rounds “floated” up as the gravel settled down. Did this happen for you?
They held up okay over winter but our spring rains have been hard on them. Getting wet and drying out a bunch has been hard on them. And yes, I have noticed that a few of the smaller ones have floated. It’s easy to nestle them back down but it is a bit annoying. I think it looks good and would probably hold up better in an area that sees less foot traffic. We will probably move our wood cookies to an in-ground bed with wood mulch. I pinned so many images with these wood cookie paths. It’s nice that we can talk about how it’s played out in real life. I’ll update my post with results. Thanks for the reminder to do that.
Thanks for the update! They always look so cool initially, but it’s hard to find anyone who has talked about how they hold up over time. The wood mulch would be a good idea. I was going to try nestling them in more with other brick pavers and larger rock and see if that helps “lock” them into the walkway more.
Love…love(!) your black green house!!! What is the Brand name…please…THANKS SO MUCH.
Thank you! Unfortunately it’s from a local dealer but Palram has a very similar one in their Glory Line (not hobby line). I hope that helps!
Delia, I also tried to build a path but instead of using slabs I used sliced fence posts and rails to build a 3ft wide walk edged with rubber edges. I went through several revisions before I got it right, I think! .
Rev 1. The ground sloped but I dug down ~4 inches to accommodate 2 inches
of sand, weed cloth and 2 inch slices of rails and posts and filled with a
plastic cement product. Looked good and was stable…until the rains
came and the slices expanded pushing the cement into hills. On to
Rev 2. I used the same base but filled in between the slices with pea gravel
the slices floated up, the gravel went underneath and I had a mess.
Rev 3. Switched up the base, dug down ~5 1/2 inches, 2 inches of sand, weed
cloth, and 4 inch slices ~1 to 1/2 inches apart. To prevent the slices
from rising I put some water glue (not water resistant) in the center
of the slices about 1 1/2 inches wide and glued them to the weed cloth
and filled the spaces with pea gravel.
Rain came and voila, it worked, no more floating.
I think I will place another piece of weed cloth on the ground below the sand. The original walk weathered well but I may seal or stain the tops. Not sure yet if I will do both.m
Bob Dembinski
This is brilliant Bob! Thank you for sharing what worked for you. I am going to have to look into that water glue!
Love this idea, have a lot of old posts we replaced, think I will try this in my garden, but in the dirt, and maybe just rough as they get are cut. will try 2 to 2.5 inch depths
Sounds like a good plan! I would love love to know how they hold up over time. If you think of it, could I get an update?
Did you provide the logs or did the lumber yard have logs ready to cut? I am in So Cal, so I’m not sure where the logs could be sourced.
I bought them from a local backyard mill. He supplied the logs and then cut them for me. That is more common here thing here in WA. I’m sorry. I wish I could give you a more helpful answer.