

I am so excited to share this tutorial with you.

I saw these “bomber” hats in Walmart and thought they looked way cute. So I challenged myself to make my own version, took my $2.50 to shop at Joann’s, and got to work. Yep…that is all it took me to make two hats like this. But only because their fleece was on major sale and I used a coupon on the sherpa stuff {don’t really know what it is called and I am pretty sure it isn’t sherpa but I will call it that anyway! :)}.
I first messed around with some old fleece, adjusting there, cutting there and then held my breath while I cut into the good fabric. Now…ta da. Now if I could just get my son to look at the camera…. 🙂

I think it looks more Lumber Jack and less “bomber” so I dubbed it the Lumber Jack Hat.
Do you want to make one too?
Here we go:
Materials:
1/3 of a yard of fleece {you might be able to go to 1/4 of a yard but with just a bit more you will have enough to make two and you can be sure it will be wide enough for the ear flaps}
1/4 – 1/3 yard sherpa/fake fur {I made the mistake of getting I think 1/8 of a yard and had to piece my ear flaps…you can do that too but it doesn’t look as nice and adds a step}
Sewing machine, coordinating/matching thread, scissors, paper and pencil for cutting pattern pieces, and hand needle
Time: About 1 1/2 hours for the first hat and 45 minutes for every hat after that.

***These are the measurements for a child with a head circumference of about 18 1/2 – 19 1/2 inches. I actually intended to make this for my five year old whose head is 20 1/2 inches around but I found you need 1-2 inches leeway even with the fleece which does have some stretch. This was totally trial and error for me since I was making it up. Luckily my 2 year old’s head is 18 1/2 inches around so it became his hat. If you want instructions on how to size it to your child’s head scroll to the end of the post.
1. Cut your pieces:
-These are the pieces for the cap. You will be doubling up two caps so cut in duplicate.

-These are the cuts for the ear flap and bill. I didn’t buy wide enough sherpa material…
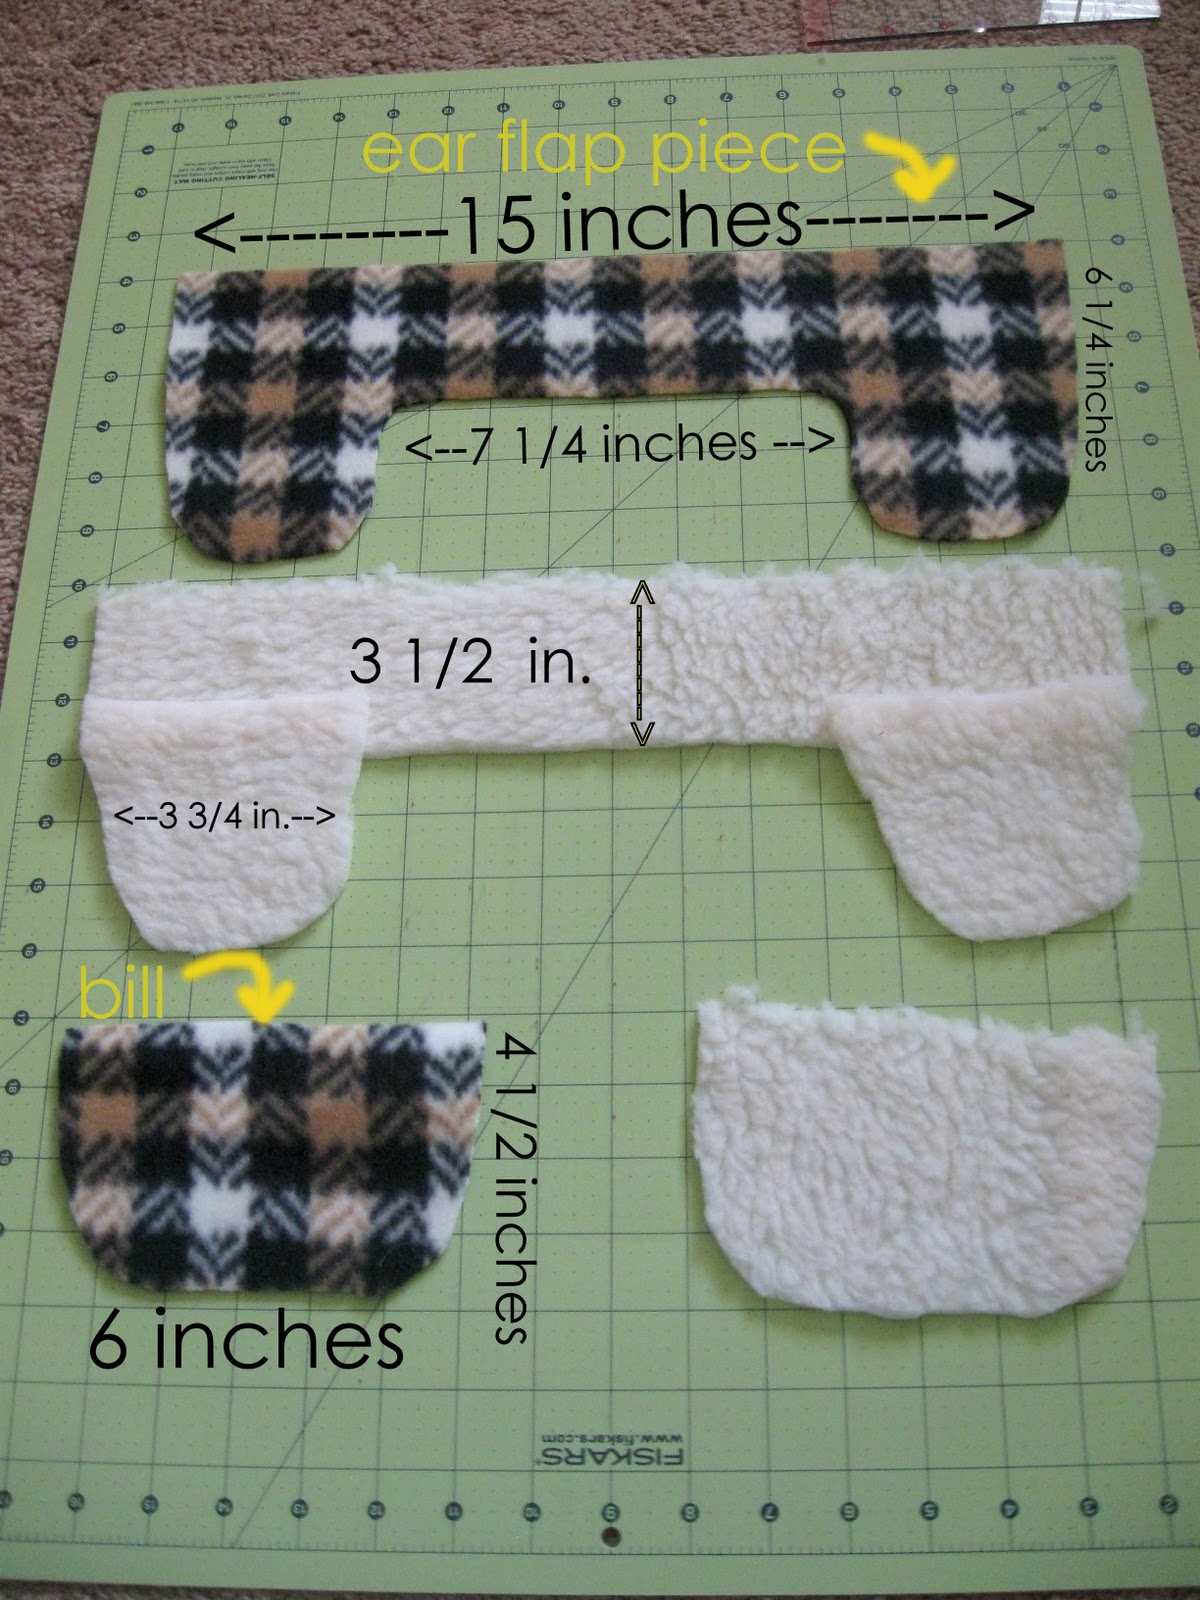
so I had to piece it together.

-You also need two tie pieces that will hang from your ear flaps.

2. Sew your cap pieces:

– Pin a side piece to the top strip piece and sew.

– Trim off any excess fabric from the strip after the you sew the first side piece on. Out of the three hats I made, 2 out of 3 had 1/4-1/2 inch extra.

– Pin the second side piece on and sew just like the first side.
-Now repeat and make a second cap.
-You should now have:


3. Sew your ties:

4. Sew your ear flap piece and your bill piece:

-Sew and leave the flat long side open.

-Sew the bill with right sides together. Leave the flat side open.

-Turn it all right side out.
5. Put it all together:
-Prepare the cap pieces.

-Now insert ear flap piece and bill piece in between the two cap layers. Pin carefully, being sure to catch all layers. I bent a few pins doing this. 🙂

-Take care to fold the right side out cap layer under so it looks nice. The pinning takes a while but it is worth it to get it right so that sewing is easier.

-Don’t worry about the inside layer. It can help to leave it un-tucked so that you can be sure you are catching all layers. It is fleece so it won’t fray and it is on the inside that no one sees.


-I went around twice on my first hat but only once on subsequent hats. Once is a enough if you pin and sew carefully and catch all layers evenly.
6. Secure bill:
– You are almost done! Yay.

-Whip stitch the bill into place catching only the top cap layer and the fleece side of the bill so it doesn’t show through to the front. I made two stitches, one on each top rounded corner of the bill.

Done!

You can tie the ear flaps on the top of their head.

They may or may not like this.
Ha ha. I love Reid’s “Mom…this looks stupid” look on his face. It doesn’t help that his brother laughed at him when I tied the ear flaps. I think it’s dang cute. But what do I know?

I shoved the hat onto Owen’s head – shoved because it was tiiiight. He thought it was funny for like 2 seconds and then complained that it hurt his head.
I experimented and made him another one out of ribbed sweater jersey and gray thermal knit fabric. I don’t really recommend it. Maybe two sweaters would have worked better. At least this hat was free made out of old clothes and extra fabric.
Trial and error. 🙂
 SIZING INSTRUCTIONS:
To size it to your child’s head measure around the widest part of their head at their forehead. Add 1-2 inches depending on how stretchy your fabric is, how tight you want the hat, etc.
Now, when you cut your cap pieces {top strip and side pieces} you want the finished circumference of the bottom of the cap to equal this number. So top strip width is 4.5 inches. Side piece width is 6.5 inches. The strips is at the front and the back {2 times}. There are two side pieces.
(4.5 in. x 2) + (6.5 x 2)= 22 inches
Subtract the seam allowances which should always be 2 inches if you always sew quarter inch seam allowances. Here is the breakdown:
Subtract a quarter inch at each seam for each piece of fabric. There are four seams and two pieces of fabric losing a quarter inch at each seam.
.25 x 4 x 2 = 2 inches
you get a finished circumference of 20 inches. Yes…I didn’t do my math correctly for my son’s 20 1/2 inch head…at least you have the benefit of learning from my trial and error.

Okay…now for the ear flap pieces and the bill. The bill doesn’t really need to be adjusted that much. Just cut slightly smaller for a baby cap and larger for a larger cap. It doesn’t affect sizing so you have more flexibility. I made sure my bill was always wide enough to fit the gap between the ear flaps in the front.

The ear flaps should cover the back and side pieces of the cap almost completely. The edge of the ear flaps should come just short of the cap seams in the front. See my illustrations from step #5 if you need to. When I was making the pattern for my ear flaps I took measuring tape around my boys’ heads from temple to temple to help me get the right measurement. You may want to do the same.

Phew…with all the figuring out and work that went into this I really should have just made a pattern! Ha! If only I had ever made a pattern and knew how to make one. 🙂

Nothing like sitting on the muddy lawn with a super warm hat and no socks and shoes on a warm Fall day eating fruit snacks and getting sick of Mom and her camera.
So cute! Almost makes me want to live in Utah again. But we have been feeling the chill with 65 and cloudy! You are so creative and an inspiration to me!
Love it!! You’re amazing! Yes! I say go for it! I would enter. 🙂
first, your bread is gorgeous.
second, so are these hats!!!! burke’s totally getting one!
love this! I want one!
of course you should do a giveaway…I love giveaways!
love this…but do you wonder what your boys are going to say one day? LOL! i think it's great!
Wow! I am impressed… I love the hats. I just tried the upcycled hats Cheri made and am thinking about winter… I will have to give this one a try. Thanks.
Love this! I want to make one for myself 🙂
personally – I vote YES to the giveaway!!! I really love your tutorials!!
You are so awesome. This is a great tutorial. Thank you!
Love the Lumberjack hats. what a cute idea! You did a great job with the tutorial as well.
So cute!! I was on a major hat kick a couple of weeks ago – hats for boys are so much fun! And one of the few accessories they have that are so versatile 🙂
These are the cutest things I have ever seen and I am going to make some for my girls. Thanks for the idea!!!
I want that hat! SO cute! what an excellent tutorial!
You make THE.CUTEST.HATS!!
Well this is fabulous! I am totally going to try it! Thanks for the great tutorial.
you did such a great job! mine would end up looking like a lumberjack diaper though:(
:)gina
AWESOME! Those are so great Delia!
Aww this is so cute and makes me miss Russia 🙂
These are really cool! Thanks for doing all of the hard work and putting together this tutorial.
What a cute hat and a fabulous tutorial! Thanks so much for this, I'll be linking.
This is so awesome!! I linked to your tutorial on Craft Gossip Sewing:
http://sewing.craftgossip.com/tutorial-lumberjack-hat/2010/10/24/
I used one of your pictures, but blurred your son's facial features.
–Anne
These look great! They'll be perfect for winter, even if your boys feel a little bit silly modeling them now.
Great tutorial! So happy you shared how to size it! I want to make one for myself! 🙂
those are great! i think a give away would be awesome…i have a baby who would love a hat!
Thank you for this wonderfull tutorial. I linked you on my blog!
Greetings from Serbia!
http://www.skrabalica.com/2010/10/25/lagana-kapa-i-super-topla-kapa/
Amazing tutorial for what could be the cutest hat ever!! 🙂
These are adorable! I can hardly wait to hit Joanns and knock some out for my little guys! Thanks for a great tutorial 🙂
Hi,
I was going through some random blogs and came across this one. Is there any way you can email this to me? I am not able to print it and would also like to share it with my sister. This is the perfect idea for my nephews and sons! ([email protected])
Thanks
Billie jo
This is the cutest hat! I went and bought the fleece and sherpa today, and I cut out my pieces. I must have done something wrong somewhere because there is no way the side pieces will fit the top strips. It's impossible to pin them together, let alone even think about sewing them 🙁 I'm so frustrated…I did my measurements to fit my 2 yr olds head, which is 21 inches. I think I'm
Lovely! Lovely!
Thank you for sharing it with us on FineCraftGuild at our DIY CRAFT TUTORIALS linky party. It appears to be a very good tutorial (although I havent tested it).
A new party opened today, and we welcome all creative tutorials to join in this time
:0) = http://www.finecraftguild.com/diy-linky-party-19/
Have a creative day!
Rose
I just want to start of by saying this is an awesome tutorial! I am in the works of wanting to make this hat for my son, who also happens to have the same measurement of your son (20.5 inches). I have question, How do I figure out the length needed? Or would I go by the length you have (12.5)?
THanks for your time,
Shannan
Thank you! I LOVE how mine turned out…all thanks to you! Check it out…
http://thecraftycopycat.blogspot.com/2010/11/oh-boy-oh-boy-hat.html
Love this! Adorable!! Thanks so much for posting this! I blogged it here:
http://makealong.blogspot.com/2010/10/for-boys.html
This is so so so cute!! I wish I could show you the picture of my version. I had some really cute Dino flannel that I decided to use for the outside. Since it was dinos, where you sew the top three pieces together, to make two seams, I added dinosaur horns from the back to the front. It's adorable!! Thanks so much for the tutorial, it's one of my favorites 🙂 🙂 🙂
– Auntie-Mommy
This was absolutely balloon and absurdity for me back I was authoritative it up. Luckily my 2 year old’s arch is 18 1/2 inches about so it became his hat.
Visors
I featured this on my blog today!
seemesew.blogspot.com
His is so adorable! I featured it on So Very Creative!
http://soverycreative.blogspot.com/2011/10/lumber-jack-hat.html
SO cute! I may have to make one of these…. I just accidentally ruined on of boyfriend's old flannel shirts in the dryer, but I can't get myself to throw it away, so this would be a perfect way to give it new life 🙂
Just stumbled on this tutorial while looking for another one that I was going to make. Well forget that one, I love this hat! Thank you for sharing. I am excited to whip these out for my boys and my nephews for Christmas!
How can I get this Lumber Jack hat?
Good question! I created a free pattern in this post: https://www.deliacreates.com/toddler-ear-flap-hat-free-pattern/
Soo cute! Thank you! http://www.strategchen.com/blog/2011/11/23/lumber-jack-hat/
I've been looking forever for a pattern like this! Thank you!
Hi there…I've blogged around and here I am! I've had fun reading about your creativity.
I adore this hat. The fabric is great too and it must be very warm too. How clever to be able to make this up and your tutorial is great!
I read all through and then giggled to myself when I saw the bare little tootsies..*s*..and then read what you'd written the fruit snacks.
This is Lovely! I have some brown fur left over from a coat and some red plaid fabric that will be great for this! Love the lumberjack look! Might just try it out of pleather one day to get the bomber look too! 🙂
Hey! I just wanted to let you know that I loved your tutorial so much that I am using it to make hats for kids with Cancer through a Craft Hope project. Thanks SO much!
I used your pattern to make a bomber hat out of sherpa fleece. I love how it turned out! I posted the result on my blog, with a link back to your pattern. Thanks!
http://afamilythatbirdstogether.blogspot.com/2012/02/sherpa-bomber-hat-and-gloves.html
Thank you for posting this tutorial! I wanted to let you know that I have now used it to make 4 different sizes of bomber hats- for my husband, his two younger brothers, and now our baby on the way. They all turned out great and have been very warm for Iowa winters. I've even worn it a few times myself. I appreciate all the work you put into making them and sharing 🙂
I loooove your lumber jack hat. It looks indeed adorable. Thank you for sharing it on our blog also:
http://www.finecraftguild.com/
Hope to see you there again tomorrow with a new 'generally creative' linky up party
My daughter sent me the link to this tutorial so I could make this hat for my grandson. I made it yesterday using a red plaid fleece to match the red winter coat I bought. It was so easy and I made it in no time. It looks wonderful and I can't wait to see my grandson wearing it. Thanks for posting your tutorial.
these hats are absolutely cool!
I linked to your tutorial on my blog – thanks for sharing!
doro K.
Hello!
A very cool tutorial, i liked it at my List of free Beanie-Tutorials, hope its okay?
You will find it here:
http://mymucki.blogspot.de/2012/02/kostenlose-mutzenanleitung-gesucht.html
Greetings from Germany!
Sonja
I just wanted to thank you for this awesome tutorial! From the first day I started sewing (april this year) the tutorial was on my wishlist. Didn't had the currage and the believe in my own skills to start it untill last weak. I took an old coat and recycled it into a Lumberjackhat with your tutorial!
On my site you can see the results, I am quit proud of it. Ofcourse I linked
Hi there, I just wanted to say Thank You so much for sharing your pattern on this hat! I made one today for my lil 8 month old son and it’s so darling! Is there a way I can show you a picture of it if I don’t have a blog?
Wonderful! Yes. You can share it in my flickr pool here: http://www.flickr.com/groups/youcreate/ I would love to see the finished hat!
SuperCool Hat! Thanks for sharing your techniques for making Jack hat. I’d recommend this handmade quality to all my friends and relatives. Oh, yes one more thing I’m also running a Hat retail online store i.e http://www.HatHunter.com where all kinds of stylish & branded hats available for all seasons. I’d really like to invite you to display your products on our online portal. If this interests you then you just drop us an email at hathunter1[at]gmail[dot]com.
Thanks a lot.
I love the hats. Great directions. Just finished three for my grandson’s. Thanks for the tutorial.
Hi, I can’t find the pattern to print. Could you please help me? Thanks, Katrin
Katrin,
My apologies but this is just a tutorial, not a free pattern. I actually do have plans to make it a free pattern in one size this coming fall/winter but that post won’t be ready for some time. The measurements should help in the mean time. Again, sorry about that! 🙂
Delia
Got it, thanks for letting me know! Looking forward to the hat pattern!
Just finished the hat and it was just so cute. I want to try and make a bigger one, I hope I can figure it out. I actually like this one better than the pilots hat. The only thing I did different is I did a short hem on the lining then basted on the bill and ear pieces then I pinned it to the top of the hat. That way I didn’t have to keep up with so much. It worked for me. Thanks for pattern and the pictures. Chris
I am so glad you like it! I am just about to post an updated version of this project this Friday with a free pattern. 🙂 I made a few construction changes that should helps as well.
I just read that you updated and made a pattern. I love this hat for my Great Grandson. Can you tell me where I can find it. thank you so much. Mary
Hi Mary! Yes I did. Here is the link to the post: http://www.deliacreates.com/toddler-ear-flap-hat-free-pattern/
A friendly tip…the strip for the middle part of the hat is listed as a measurement on one of the pattern pieces. I didn’t include a pattern piece for it because it’s just a rectangle.
Happy sewing! Your great grandson is one lucky kid!
Hi, love this pattern! Have a 2 year old cousin who I am going to make this hat for Christmas, and also due a baby boy in January so am going to *attempt* one for him too!!
Does the pattern printout include the seam allowances on the pieces? Or should they be added on when cutting out?
Thank you, Adele x
Thanks Adele! Great question! The seam allowance is included in the pattern. Best wishes to you and your baby boy! <3
Hi there, thanks for this awesome pattern! Making two for each of my littles before we head north for Christmas. Quick question: Is there a reason you didn’t make the inner hat with sherpa? You do two of the felt hats, but I’d love it to be SO warm and think without the full hat being lined with sherpa it wont be as warm as it could be. Any tips/tricks for making the inner cap sherpa? Thank you!
Good question Kelsey! The fluffiness of the sherpa just makes the hat fit tighter/smaller. If you want to keep the same size and line it with sherpa, you’ll want to enlarge the pattern just a little bit. I hope that helps?
Delia
Thank you, so much!! Just what I was looking for! Merry Christmas!!
Merry Christmas to you too!
This may be the best tutorial for a children’s hat that I have ever read, and I have been doing a lot of research to figure out how to make a hat like this (my husband calls it a Canadian Hat) for my baby and husband. This makes so much sense and your explaining how to scale it up or down is amazing. Thank you so much.
I may also try to alter things to keep the cap part and change the brim and ear flaps to make a summer version, in much cooler fabric.
The ideas!
Thanks again!
Thank you Katrina! You are so kind. I am so glad this tutorial is helpful to you. A summer version sounds fun!
Great hat and great directions. Just made one for my grandson and turned out pretty cute on my first try!! Front bill was a bit off center but the next one won’t be ?. Thanks again.
I am so glad to hear you like the pattern! <3
Do you not need to legthen the top strip for adults? And make the side parts taller?
Hi Sara,
This pattern is for a toddler. If you are planning on scaling it to a larger size, I recommend working up a few muslins and changing the dimensions as you mentioned. Good luck!
Really wished there was a pattern for size differences however I just finished making this hat with red buffalo plaid fleece and brown cheshire faux fur. It took a bit longer working with the fur and I took my time .. (about 3 hours), but it turned out great! It’s on my daughters teddy right now but cant wait to try it on my 6 month old son 🙂
Sounds adorable!
Here it is 2022 and your Lumber Jack Hat is still going strong! Your boys must be so big by now! I am so going to make one for Me!
I’m honestly amazed that this post is still doing well. It’s one of my early tutorials so it’s not my best. And yes! My boys are now 16 and 13. It’s wild. I’d love to see yours! If you can dm me on instagram, I check there most often: @deliacreates.
Wow! great tutorial. I want to stop putting polyester on my head, so I’m planning to make cotton/wool hats. I love this design and plan to make them for everyone in my family! Had to laugh when you said you took $2.50 to Joanns. It wouldn’t buy a candy bar now LOL Fortunately I just bought a TON of cotton flannel during their $2.99 sale. Not quite $2.50, but almost.
Thanks! Inflation is wild isn’t it? We can’t use coupons like we used to either.