

There has been a bit of a cold snap around here with all the rain we’ve been having, which means…
 …it’s time to break out the hats!
When digging in our hat bin, I found THIS Lumber Jack Hat I made for Reid almost four years ago. He was two! (feels like yesterday!)
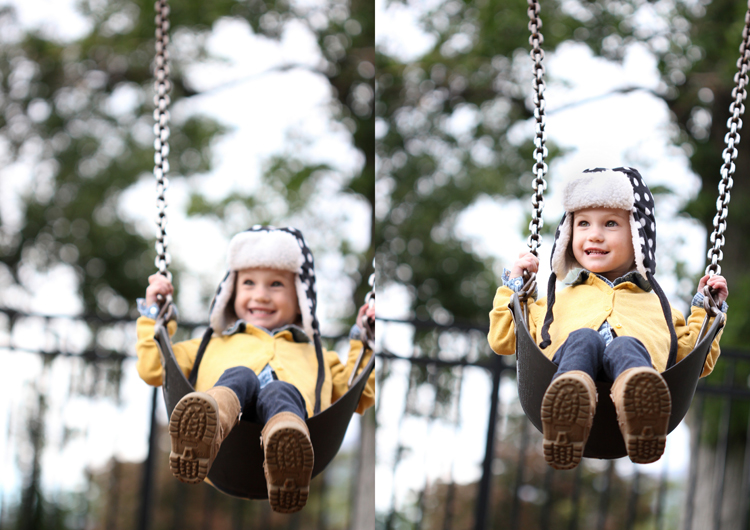
It hasn’t been worn in a few winters, because there has been no one to fit in it, but now that Natalie is two it’s seeing some wear again! I totally let her wear the boy version, but I thought it would be fun to whip up some more hat, in more feminine prints.
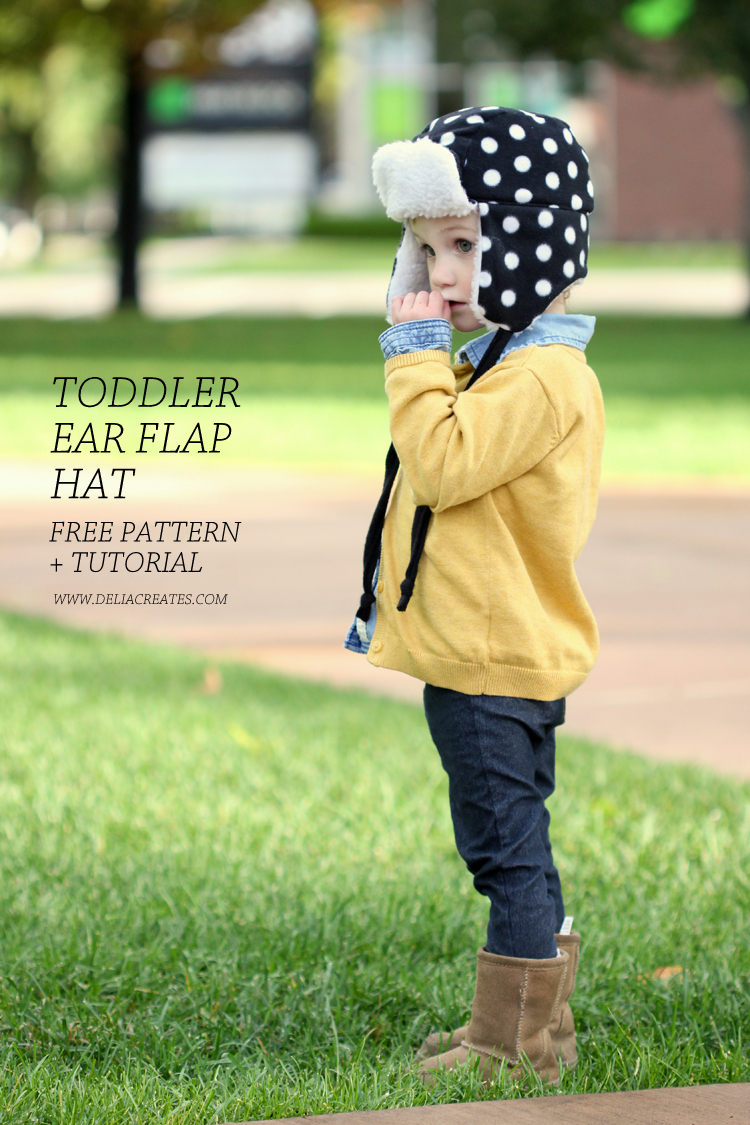 I also thought it would be a good time improve the tutorial and throw in a free pattern as well!
The pattern is just for the toddler size which fits an 18-19″ head. If you want to make it larger or smaller, the Lumber Jack Hat tutorial tells you how to create your own pattern using measurements.
FREE PATTERN:
Click link below to download.
Okay, now we’re ready to rock and roll….er cut and sew. 😉
MATERIALS:
- 1/4 yard main fleece, wool, bottom weight fabric with some stretch
- 1/4 yard lining fleece, sherpa, faux fur, etc.
- matching thread
- basic sewing notions
- scissors
- hand sewing needle
TUTORIAL:
>>>ALL SEAM ALLOWANCES: 3/8 inch<<<
STEP ONE: Prepare your paper pattern.
All the piece will print on 8.5 x 11″ or A4 standard paper. There is no need for piecing (three cheers for that!). Just cut out each pattern piece. There are three: ear flap, front flap, and side hat, plus measurements for the hat top strip.
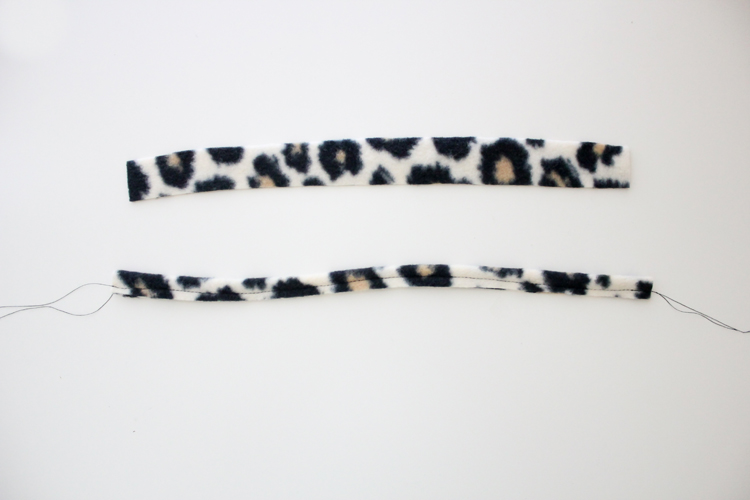
***PLEASE NOTE: The measurements for the rectangle strip piece are 4.75 inches by 13 inches and are listed on the side hat pattern piece.***
STEP TWO: Using the paper pattern pieces, cut out your fabric.
- When you’re done, you should have:
- 2 main side hat pieces, 2 lining side hat pieces
- 1 main hat top strip, 1 lining hat top strip
- 1 main front flap, 1 lining front flap
- 1 main ear flap, 1 lining ear flap – both cut on the fold
- 2 – 12 inch x 1 inch strips of main fleece (not pictured below)
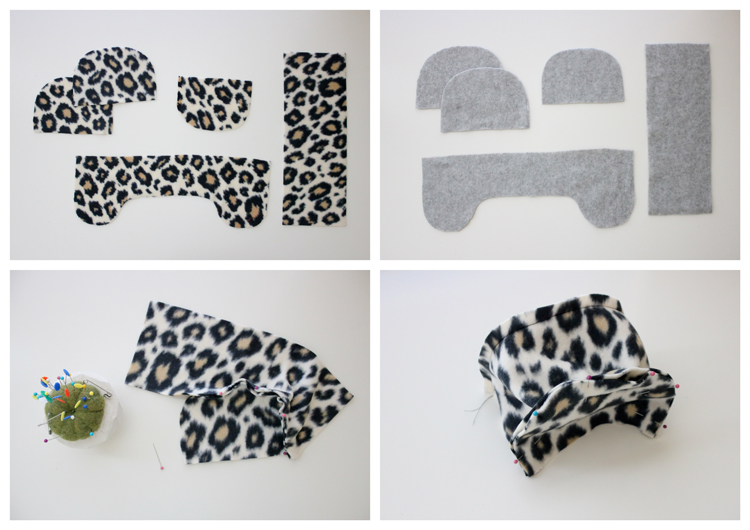
STEP THREE: Sew main hat pieces together.
a. Take the top strip and pin it around the curve of one “side hat piece.” Sew with 3/8″ seam allowance. Repeat for the other side hat piece.
b. Repeat for the lining top strip and side hat pieces. Trim seam allowance down and notch curves if desired. For instruction on notching curves see next step.
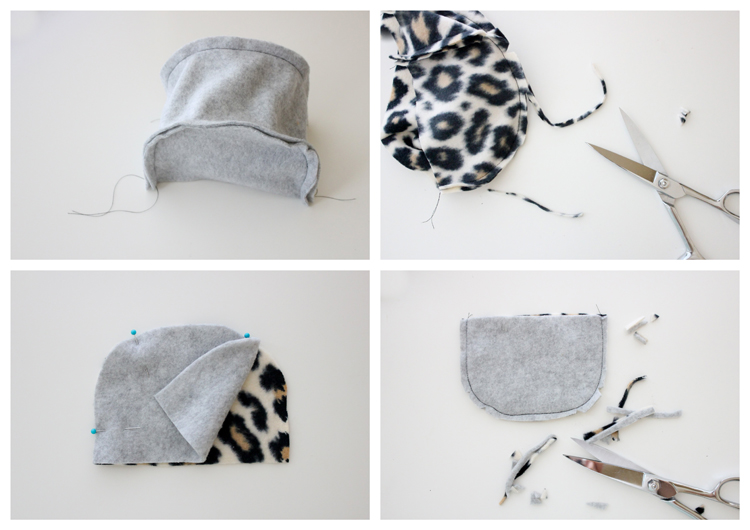
STEP FOUR: Sew front flap, ties, and ear flaps.
a. Pin lining and main front flap pieces together, right sides facing. Sew around, leave the straight edge un-sewn. Notch, or cut small triangles out of the seam allowance, around each curve. Be careful not to snip through stitches.
b. Fold 12″ ties in half, lengthwise, and sew close to the raw edges. c. Pin ear flap pieces together, right sides facing. Sandwich the ties in between the two ear flap layers in the center of each ear flap curve. Make sure the end of the tie is flush with or just past the raw edges of the “ear flap” pieces so that it gets sewn in.
d. Sew around the ear flaps, leaving the long, straight edge un-sewn.
(I’m switching fabrics for these pictures because I forgot to take them with the other hat. Don’t let that throw you. The process is the same.)
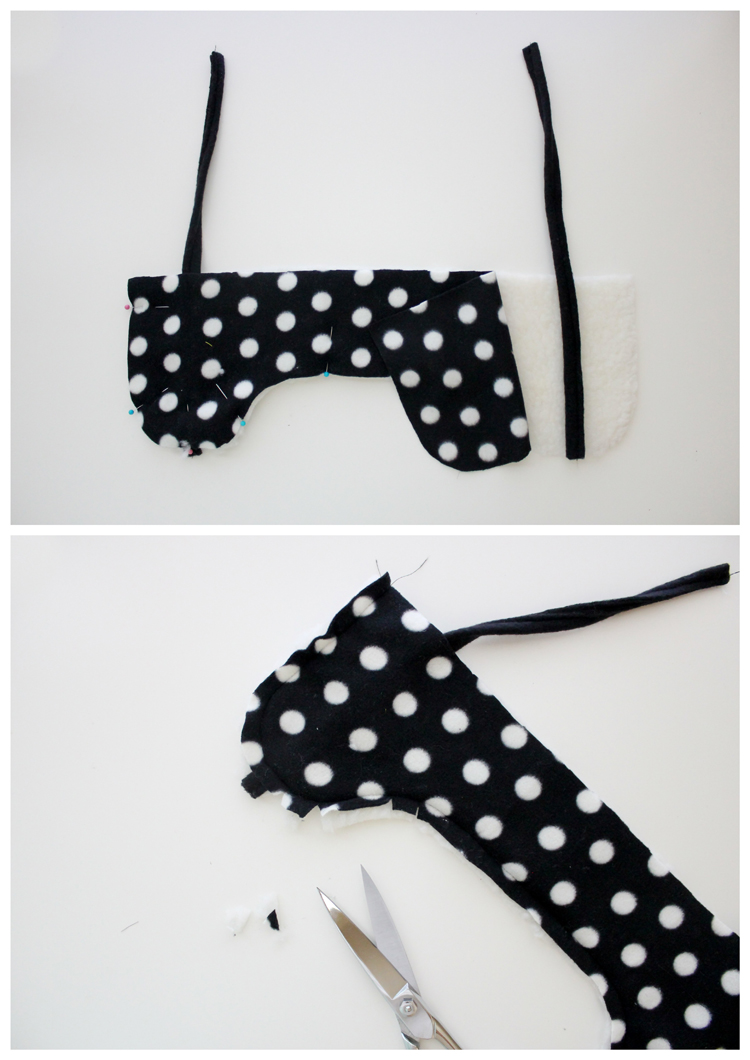
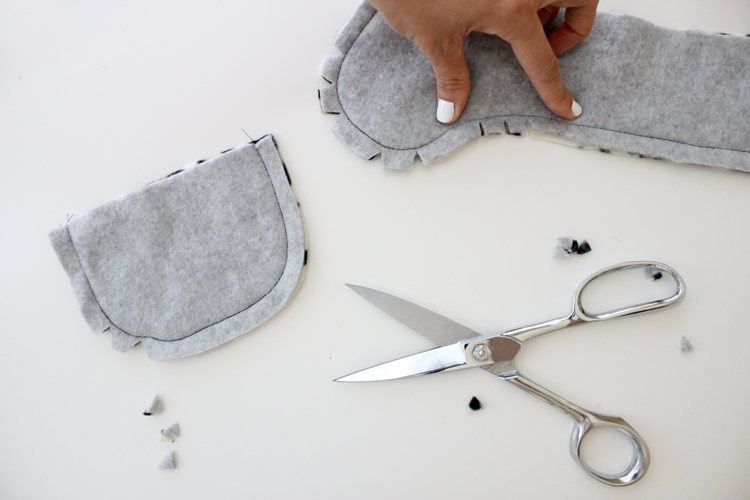
e. To help the pieces lie flat when you turn them right side out, clip concave curves and notch the convex curves. Then turn everything right side out.
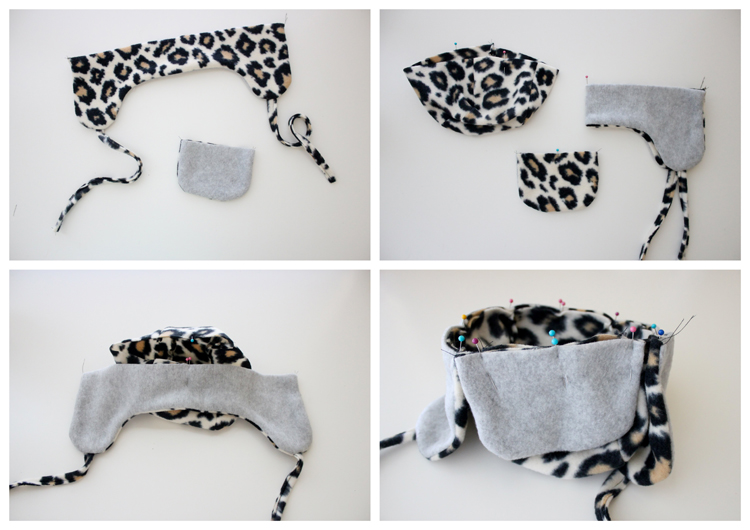
STEP FIVE: Sew main hat together.
a. With all the pieces right side out, mark a pin at the mid point of the straight edges of the ear flap piece, front flap piece, and the top strip pieces.
b. Matching up the pins, pin the ear flap piece to the main hat piece, with right sides facing. Pin the front flap on as well, making sure that everything is evenly spaced.
c. Baste the ear flap and the front flap pieces to the main hat.
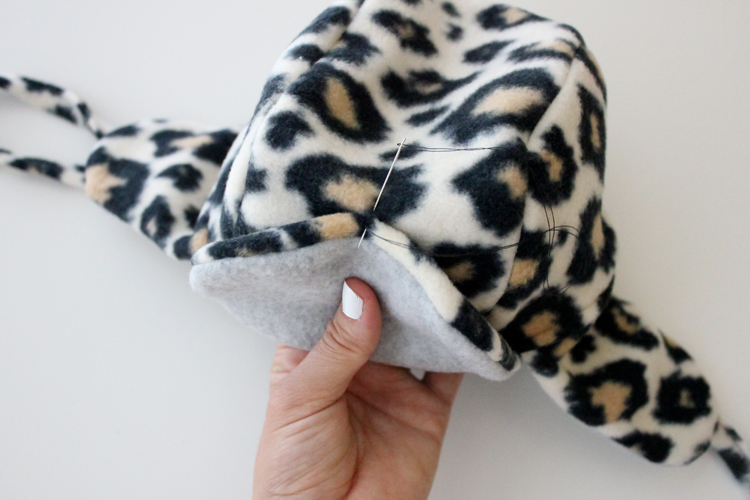
STEP SIX: Sew main and lining hats together.
a. With the lining hat and main hat both wrong side out, nest the main had inside of the lining hat , so that right sides are facing. Tuck the flaps and ties out of the way of the raw edges.
b. Pin raw edges together, but leave an opening at the center of the top strip piece that meets the back of the ear flap piece. Sew around.
c. Pull the hat right side out, through the opening.

c. Fold the raw edges of the opening under. Pin the opening closed. Then pin the rest of the lining seam allowance around the perimeter of the hat to the main seam allowance.
d. Top stitch around the hat, close to the seam, thus closing the opening at the same time.
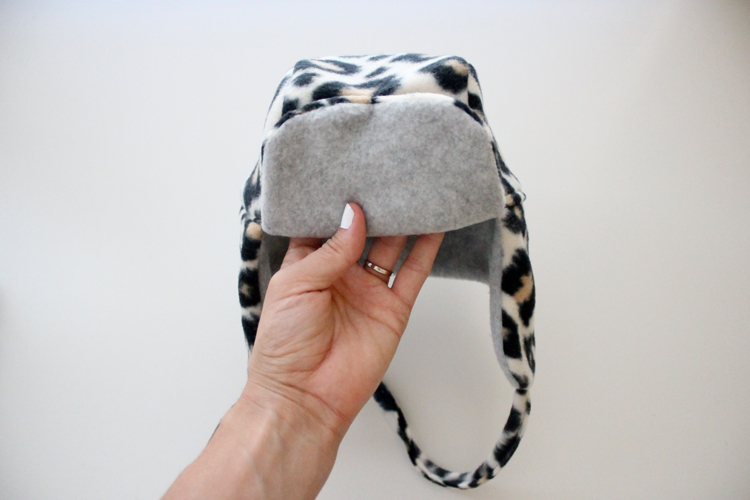
STEP SEVEN: Finishing touches.
a. Hand sew the main layer ONLY of the front flap to the main hat with a whip stitch, so that the front flap stays up.
b. Knot the ends of the ties to the length desired (not pictured).
All done!

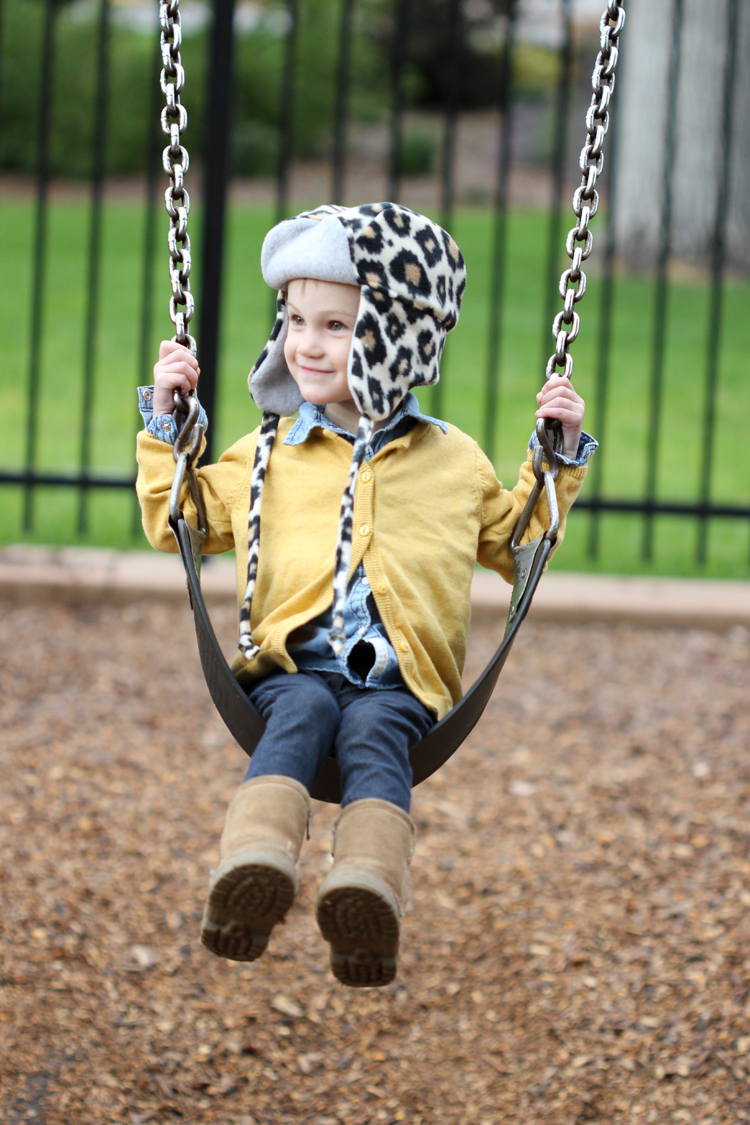
The fleece on fleece is nice and warm, and an easier sew; and I love the gray and cheetah together!
I do love the sherpa version best though.
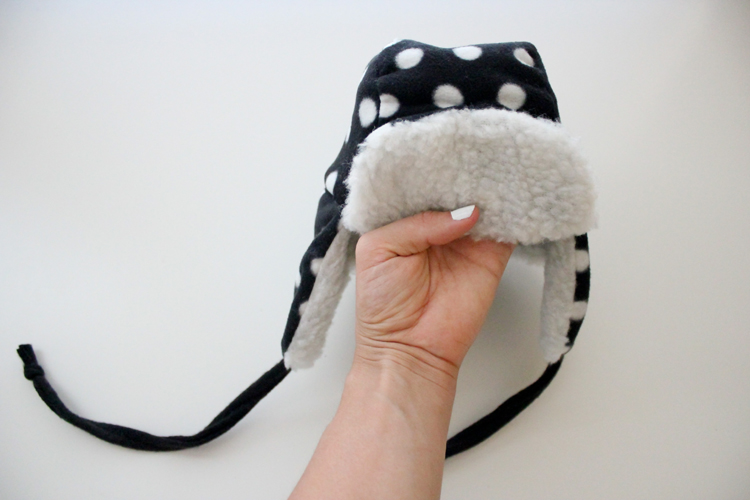
The sherpa lining nicely disguises the puckering on the front flap caused by the whip stitch, which you can see in the fleece version.

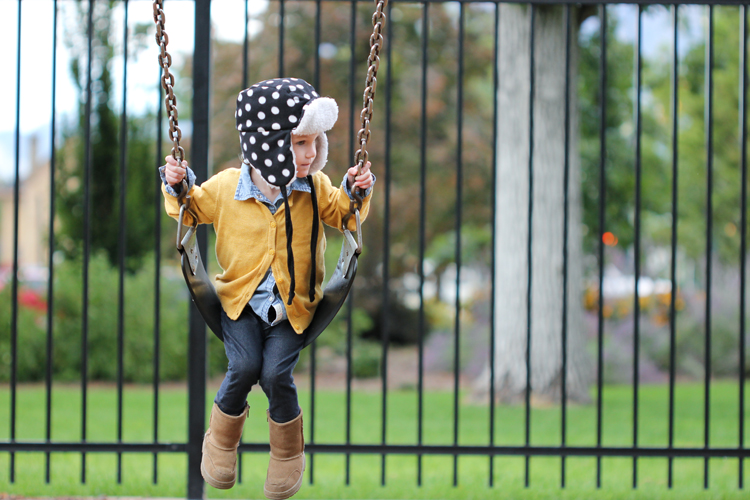

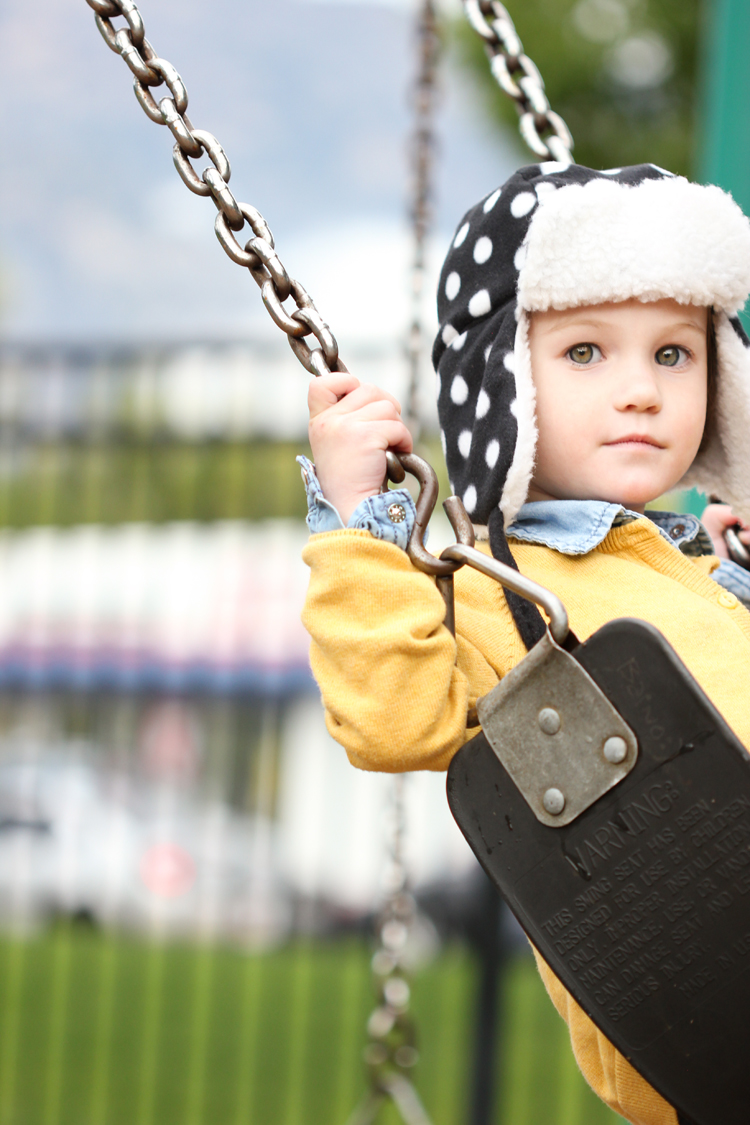
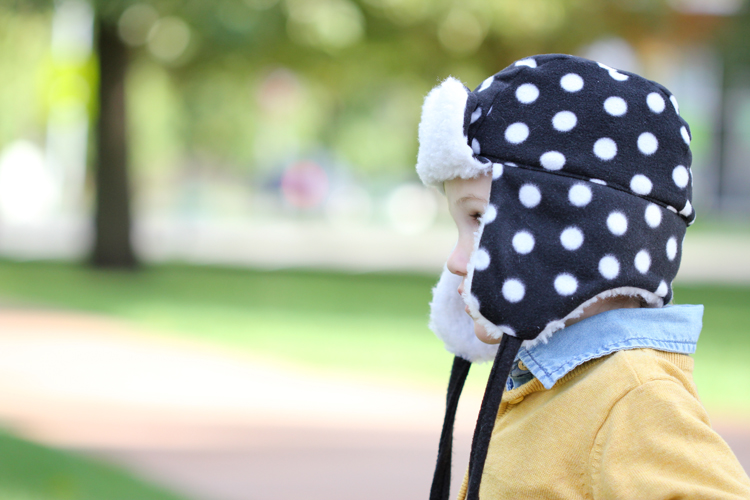
I love having this hat for my kids, because it keeps their ears warm and you can tie the hat on under their chin.
Or… tie the ear flaps up for a fun Sherlock type look! Nat wouldn’t let me do that for these pictures, but I have some of Reid with tied up flaps here.

I think next time I sew this, I’ll use wool and sherpa. Wouldn’t that be beautiful?!

I love this so, so very much. Can you tell me where you buy your sherpa fabric? Thanks!
Thank you! 🙂 I bought my faux sherpa at Jo-Ann. I forgot to put fabric sources! Whoops! Thanks for reminding me!
Yay! I literally pinned your Lumberjack Hat yesterday to make for my little guy. So happy to see that you made it into a pattern! My friend made one a few months ago and it was super cute.
oh awesome! Thanks Caitlin!
I just thought I’d share my finished hat. I love the way it turned out! Thanks again for the pattern: http://littleweaverwomen.blogspot.com/2014/09/fall-sewing-for-my-boy-lumberjack-hat.html
It is so adorable! Love the red buffalo check fabric. What a cutie too!
This hat is SOOOOOO cute! I will be making one for my cute new nephew. I will be sure if I make one to link back to your post!
Anne
http://www.underthebrella.com
Thanks Anne!
Went to Joanns today in anticipation of the pattern coming out tomorrow. So pleased I checked today to see it there already. Thanks for the pattern. Already have the pieces cut and ready to go tomorrow. This tutorial looks better than the other one (looks cleaned up). No offence intended. Thanks again for the tutorial. Chris
Cute Delia! It’s so adorable on Natalie.
And fun that your pattern is on the Craftsy site. Fantastic!
Just finished my first one with new tutorial. Love the updates. Thanks again. Chris
That Natalie… so cute! Love the hats on her, and that Sherpa fabric looks really cozy. I was thinking last year that I should buy some for a hooded cloak… wouldn’t that be adorable? I need to do that this year!
What sweet pictures of Natalie- she has such gorgeous eyes!!!
Thank you Kirstin!
Just “upsized” this one for my (slightly bigheaded) toddler son. 🙂 Not entirely straight, my pins did not want to go through all the layers of fleece & sheep, buuut managed to get it sorta straight with the flap and all… I forgot to read the instructions, but I did not topstitch all around, I first sewed the sheep layers of the front-flap together, then crammed the 4 layers in the hat and sewed all around. From the outside I took the 2 layers of fleece together and edgestitched them together (whip stitch would have been the pretty way to go, but this is more secure and it’s hidden anyway…)
I love this hat, almost forgot the straps, but last-minute remembered to cut some and put them in. I’m a fan of the sherlock-look too, but my kid isn’t either…
Just because a picture (or 2) say(s) more than a 1000 words… 😉
http://i273.photobucket.com/albums/jj231/Jodelien/2014-9-29vosenmuts6_zpsd9b23528.jpg
http://i273.photobucket.com/albums/jj231/Jodelien/2014-9-29vosenmuts4_zpsd0300acd.jpg
Thanks for the inspiration and please don’t disappear from my feedly reader again. I love your blog. 🙂
Thank you so much Jolien! I love your hat. Great job! Thank you so much for sharing it with me.
there is no top part when I printed out the pattern
That’s correct. On the side hat piece it will tell you what dimensions to cut it to. It’s just a rectangle, so I felt creating a pattern piece for it would be a waste of paper. I hope that helps! Let me know if you have any more questions.
There were no measurements on my downloaded hat pattern pieces for the rectangular piece.
Can’t do it without them.
Hi Chris. I should have clarified in the post…will add it now. There are measurements for the rectangle on the side hat pattern piece. It is labeled as the “Hat Top Strip.” Hope that helps!
– Delia 🙂
Thank you so much for sharing ♥ It’s really cute and perfect for winter 😉
Thank you Christelle!
i just made one for my three week old grandson- red and black plaid lined with Sherpa – adorable. Reduced pattern by 20% to get perfect size for infant.
Oh my cuteness. That sounds darling!
Would you happen to know the size for the rectangle for the newborn hat?
Hi Pam. I do! It’s listed on the side hat pattern piece. I hope that helps! 🙂
When printing the pattern, do I print 100% or smaller? the little things that confuse us. 🙂
Love that hat! And Thank You! for sharing.
I love this hat! Would you happen to be selling the pattern in baby toddler and adult sizes???
Thanks! I am not. I am just offering the hat in one size for free at this time.
I used two layers of fleece and I tacked the flap up at the top, but the two layers of fleece want to separate & pull apart, which doesn’t look as nice as the adorable pictures you posted. Can you suggest a solution for this? With cotton material you could use double sided fusible interfacing, but obviously that won’t work with fleece. Would it help to top stitch around the edge of the front flap? Thanks!
The layers do pull a part a little bit but it’s less noticeable with the sherpa. Different kinds and weights of fleece can behave differently though, so if it is really drooping down and pulling apart significantly, I agree that top stitching will help. You can also hand tack the two layers together in a few spots to keep it together. Maybe stick to the edges if you do that so you don’t get any weird puckering.
I hope that helps!
Thank you so mutch for this pattern ! Your pictures are really beautifull.
Thank you!
Im overly ambition so I chose this as my very first pattern to sew. I went with plaid outer layer and fur for the inside/flap. Thanks to your awesome instructions I love love love love how it turned out and NO ONE has questioned whether I bought or made it. They are always shocked to find out it was a diy 🙂 So thank you for giving me the confidence to learn sewing! (Ive screwed up many things since this hat so all my luck must have been used up on it 😉 )
I am so happy it worked out so well for you! I love the feeling of when something comes together just right. Thank you for sharing your story with me!
Thanks so much for this great pattern! I just sewed one last night for my 15 month old son! It’s a little big for him but that’s ok, room to grow!
I’m glad you like the pattern! 🙂 Thank you Kim!
Hola,,quisiera consultarte,,la tira de copa , que medida tiene,,porque no esta en el PDF..
desde ya muchas gracias..Debora
Hi Deborah,
I didn’t include it as a pattern piece, because it’s just a rectangle. The dimensions you need to cut out for it, are listed on one of the pattern pieces. Let me know if that helps.
Best,
Delia
I love this hat. I have two sons. I bought a fleece main fabric and a Sherpa lining fabric. I have every piece assembled, and basted on the ear flaps and front piece. I am now trying to stitch in the Sherpa lining, and my machine won’t do it. I’ve changed the thread tension, the needleneedle, the foot, I’ve re-threaded, and nothing works. It is skipping stitches or not stitching at all. Would you have any ideas on what I can do?
Hi Lauren,
Oh bummer. Have you tried using a jeans/denim needle? I wonder if that would help. Or maybe something even stronger, like a leather needle? Once you get a stronger needle in place, adjust the tension again and see if that helps? You may want to lengthen your stitch as well. I would try 3.0 and then maybe as long as 3.5 mm. I hope that helps! Let me know if you run into more trouble.
Delia
How do I make the hat larger?
Hi Cindy,
You can try to enlarge the hat pattern before printing and then make a muslin out of scrap fabric to ensure it fits before sewing up a final hat. This may work for only maybe one size larger. I hope that helps? I made this a free pattern for one size and did not grade it up.
Let me know if you have any more questions. Happy sewing! 🙂
Delia
Hello, thanks a lot for your great job. I have a question anyway : what does “ALL SEAM ALLOWANCES: 3/8 inch” means ? That they are included or have to be added ?
I’m sorry but I’m a french native speaker and quite new in sewing…
Thanks a lot
Good question! It means that 3/8″ of an inch has been added, so you need to sew with a 3/8″ seam allowance. Let me know if you have any more questions. 🙂
Excellent instructions. Cute hat and your model is adorable.
Thank you Lynn!
Great toddler hat for cold days and it’s soooo cute! Thank you for sharing your free pattern and tutorial!
I featured your post on my blog, you can see it here: http://www.sewingshop.net/blog/cute-toddler-ear-flap-hat/
Thank you so much Linda!
how do I print the directions?
Hi Deni!
Good question. I don’t have them in pdf format since it’s a free pattern/tutorial. All you need to do is select the tutorial with your mouse, copy and then paste it into a Word document. Then print. I hope that helps!
Delia
This hat looks so cute! I have a cut of polartec fleece on one side, and sherpa on the reverse–can you see any issues with having just the one layer?
Thanks!
Jil
Thank Jil! I don’t think so. You’d just have some raw edges showing, but that could look cute!
Need more explanation about sewing the inside out pieces with bottom flaps step 6. Have you considered a video check out the crafty Gemini, made her hats by following video, I’m not a very good sewer so video helps me.
Sorry for the confusion. I have considered video. It’s my goal for this year, to do more videos. Do you have a specific question about step 6 that I can help you with in the mean time? I would love to help the best I can! <3
Since there is no pattern piece for the top hat strip, which way should I cut, ie, should the direction of greatest stretch be front to back (the long way) or side to side (the short way)? Thank you!
Ideally you want to use a fabric in which the cross grain shouldn’t stretch that much more than with the grain, so it shouldn’t matter too much. I hope that helps.
Tank you for this pattern! I made some changes and simply used sheepskin, wich i highly recommend! Warm and nice, no plastic fibres, and easier to sow with just the one layer! 🙂 Thanks again!
Do you have a pattern for this me hat for adults? Those of us the live in a rural area and need to be out shoveling snow or working outside in the winter weather would appreciate something big enough for an adult! You know those of us that live on farms and need to care for the animals under our supervision! Thank you !
I don’t, but I’ll consider it! Thank you for your suggestion! <3
Absolutely love this hat!!! Really would like to make one for this Mom too!! I get so cold playing outside, especially my ears!!
Hi Delia.. can this be used for woven fabric with no stretch ? Please let me know. Thanks for such an awesome pattern
Great question. I designed it to fit with a little flex so you would have to keep that in mind. If your child’s head is smaller than the measurements then you should be okay to use a woven material. If not, then you would need to create a muslin and experiment with enlarging the pattern a bit. I hope that helps!
Is there an adult version of the Ear Flap Hat Pattern?
I do not have one available, although some readers have successfully enlarged the pattern for an adult sized head. I hope that helps.
Hello,
I want to make this cap, but I can’t find the measurements for the rectangle piece. You write that it is on the side hat pattern pattern, but I don’t find it…
Hi Rianne,
It is 4.75 inches by 13 inches. It’s on the side hat piece, not the ear flap pattern piece. Sorry for any confusion.
Delia
I made this hat today for my 3-year-old grandson, and he loves it! Now, everyone in the family wants one!🤣 I wish I could attach a picture! It’s darling, and it just cost a little over $5 with regular priced Sherpa and plaid fleece fabric from Hobby Lobby. There’s even enough fabric leftover to make another one!
That makes me so happy to hear! So glad you and he like the pattern! 🙂
Please give measurements for adult sz hat
I don’t have an adult size version. My apologies.