

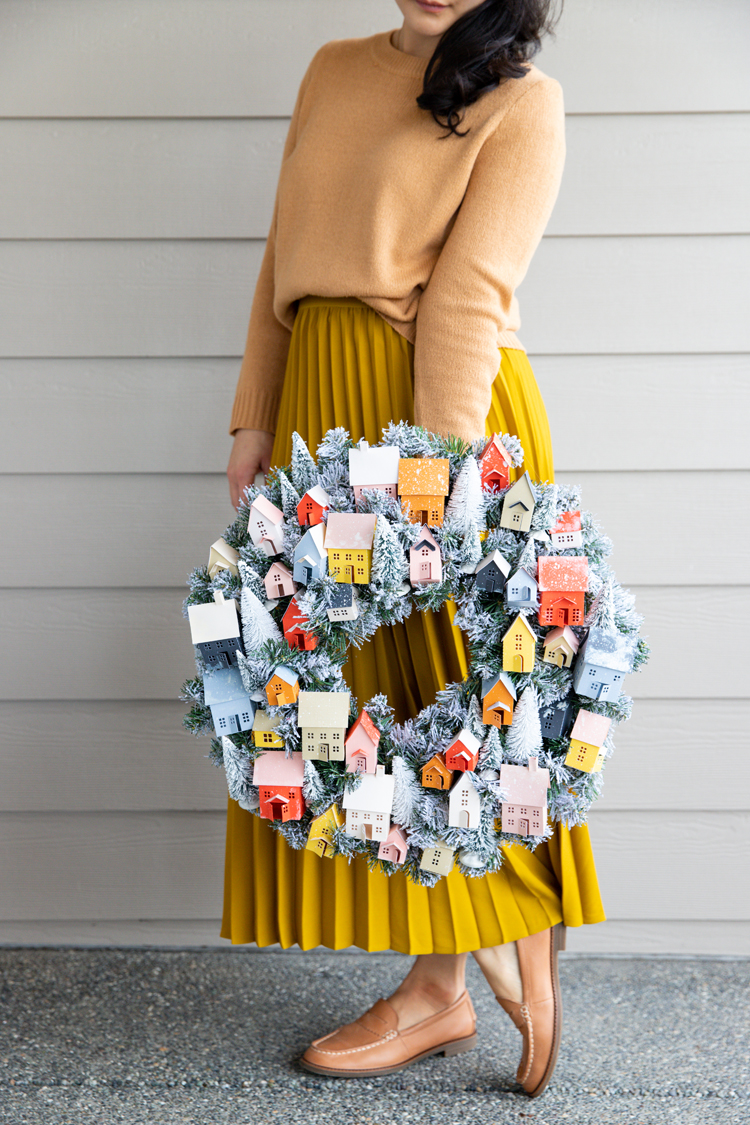
It takes a village…

… to make this fun DIY paper village wreath! 😉

I remember when I first saw the putz village wreath on the cover of Martha Stewart Living in 2014. I wanted to make one so badly! But…sourcing the materials and affording the materials were barriers too steep for me at the time, so I gave up.

Fast forward to the present, six years later. Bottle brush trees are now super easy and inexpensive to find pretty much anywhere and I have since developed a mini paper house obsession that has inspired me to design my own tiny houses using just card stock.
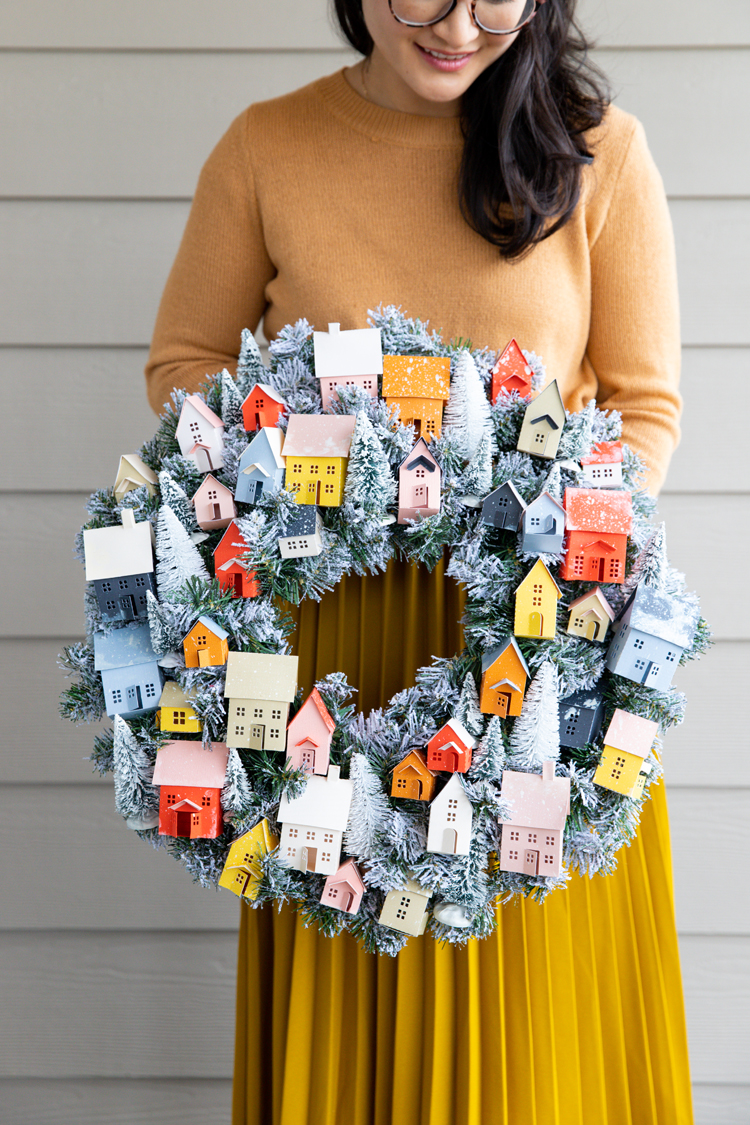
It’s a wreath inspired by Martha, but with its own flair.
It’s also very affordable too. I made this wreath for under $20!
Make yours colorful like mine, or stick to one color way. I was very close to making all the houses shades of red and pink, but I couldn’t resist making it a rainbow of colors. …this time. 😉
Okay, let’s make one!
MATERIALS
- Card stock in your choice of colors*
- Hot glue
- A fake flocked wreath**
- Bottle brush Christmas trees (over a dozen from 1-4 inches tall)
- White craft paint (optional, but it will help the houses match the flocked trees and wreath)
- Cutting tools (either a cutting machine or scissors and exacto knife)
- Free cut files (see below)
Materials Notes:
*I used 10 pieces of card stock. You can easily get away with using less, I just used more to be able to get the colors and combinations I wanted. If you are using a cutting machine, you will need 12×12 inch card stock paper. If you are printing and cutting by hand, you will need 8.5 x 11 inch card stock. I personally like the color selection and paper quality at Jo-Ann the best.
**I found a 24 inch fake flocked wreath at Jo-Ann for $5.99. It was on sale, but I just checked the price today and it is still that price! You can use a non-flocked wreath, but I find that that the bottle brush trees look best on a flocked wreath.
FREE CUT FILES & TEMPLATES
Cut files for Silhouette and Cricut cutting machines:
*The SVG files work better with Cricut software and paid/upgraded Silhouette software. There were some issues with the files not showing up, but that has been corrected in updated versions I added as of 11/11/22. There are two layer groups. One controls the outlines of the houses which should be cut. A separate group of layers controls the lines that should be scored. Select that group and change it to score lines in the software if needed. Cricut hides the score lines on the roofs (not sure why), but if you hide the outline grouped layer, score the score line group, and then unhide it, they will show up.
**I find that the DXF files work better with Silhouette machine free software. You just have to resize them to get them to the correct size. There is a one inch test square on each page to help you get the accurate file size. You can delete it when you’re done resizing. There is no use for it with the houses.
PDF printable templates:
You can print and cut these or use them as templates for tracing. Be sure to print at “actual size” or 100%.
VIDEO TUTORIAL
If it hasn’t already popped to the side or top of your screen, click play below to see a short video showing the wreath assembly.
TUTORIAL

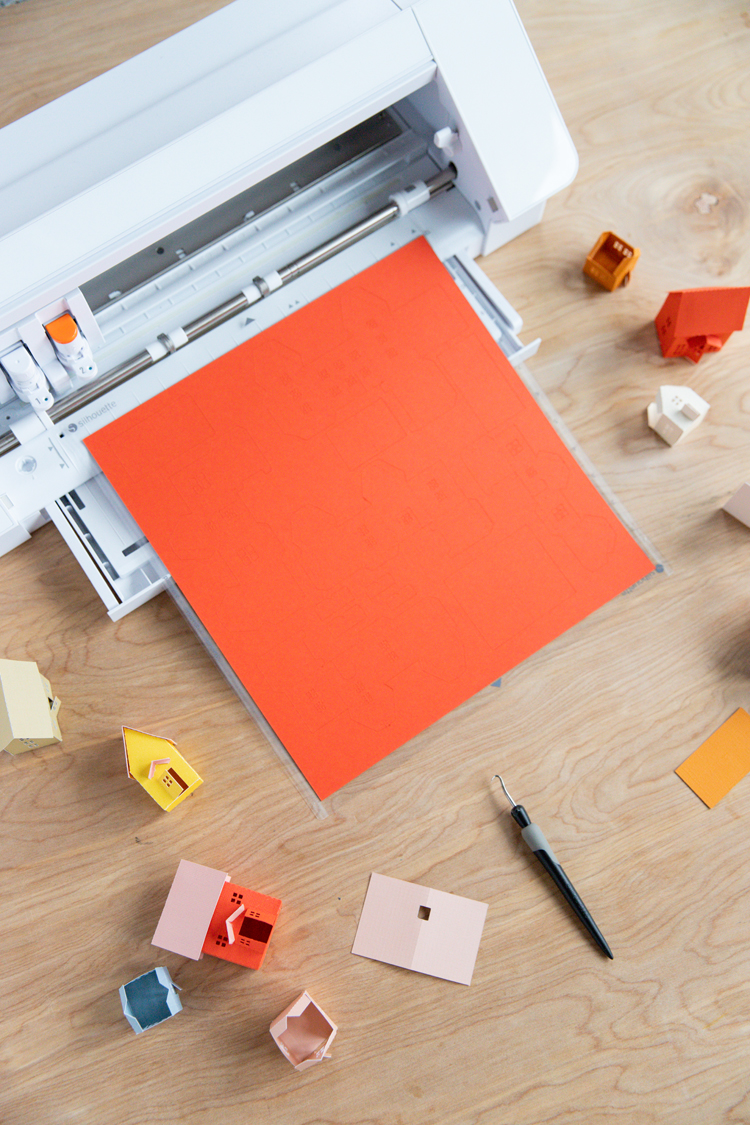
STEP ONE: Cut about two dozen houses with an even variety of house sizes.
There are three different house sizes. Between those sizes, I also switched up the window and door designs on different pages. I personally found that having more of the smaller two houses than large ones, provided a better visual balance to the wreath.
I used 25 houses, but I also stuffed my wreath pretty full.
STEP TWO: Glue the houses together.


Fold the houses at the dashed lines and glue it together at the tabs.
Take care to glue the tabs on the bottom piece that flank the door. This will keep the floor from sagging as the houses get nestled into place.
Add the roofs one side at a time, taking care that it fits snugly over the pitch.
The roofs with holes at the top are for chimneys. The chimneys are meant to be a very tight fit. Once you assemble the chimney, you may have to squeeze it through the hole of the roof and then pop it back open once it’s through.
There are also little portico pieces in two sizes that you can add as details to any of the houses.
OPTIONAL PAINTING STEP:
Water down some white craft paint and splatter the houses to mimic the look of snow. I also painted some onto the houses for bigger clumps of “snow” or to cover up some errant splatters of paint.


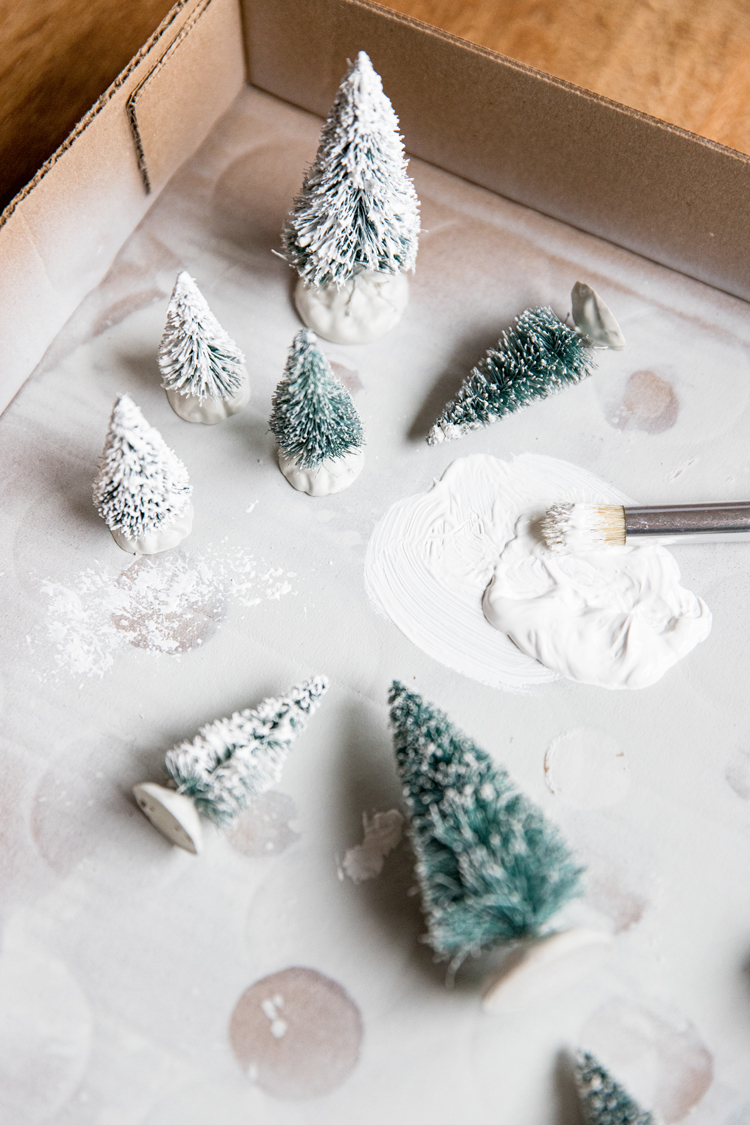
I painted the bottle brush trees with undiluted craft paint as well, so that they would be more thickly snow covered and not blend in so much with the wreath.


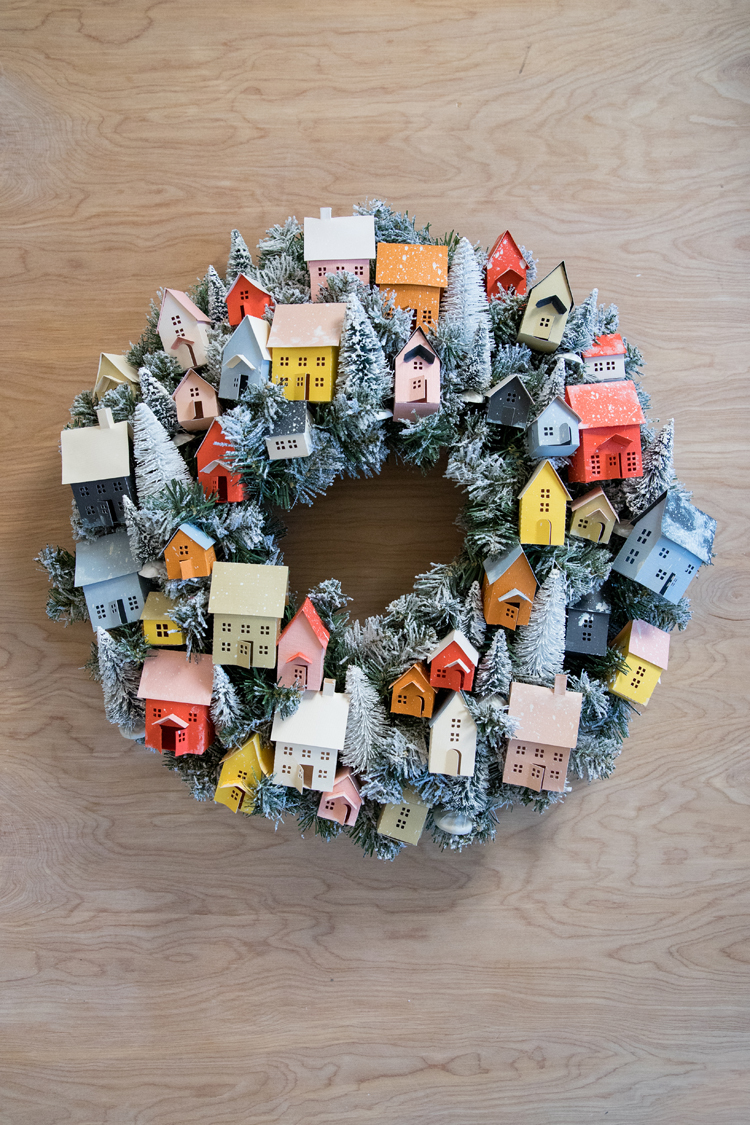
STEP THREE: Place the houses and the trees in the wreath.
Do not glue anything in at this point. Experiment with the placement of the houses and trees, until you get it looking how you want. They should stay put as long as you don’t pick up the wreath too much.

STEP FOUR: Glue everything together.
Once you are sure of how everything is placed, hot glue it to the wreath so that it will be secure.

Now it’s ready to deck the halls!

For more mini paper house files, check out these posts.

Totally awesome! What a beautiful wreath.
Merry Christmas!
Love this wreath! Thanks for the cutting file also. My sister and I are going to have lots of fun together making this wreath! Merry Christmas!
This is one of the coolest projects I have seen for a very long time! That wreath is absolutely gorgeous!!!! Thank you so
much for sharing the directions and templates!
Thank you so much Shar!
Thank you for the pattern and the whole idea, this is exactly what we were looking for <3, the only thing that was a bit complicated is the svg file didn't have the houses separately so it's hard to keep track of which part belongs to each model.
That is good feedback. Thank you for sharing. The files are designed to prioritize saving paper and sapce, but if it helps, most of the pieces can mix and match with each other. Some of the roof pieces are too small/large but you can play with that and customize each house to your preference.
Girl, I love this SO MUCH. I’ve been searching for the perfect whimsical colourful but not tacky wreath for the last few years and when I say my jaw DROPPED when this showed up in my Pinterest feed! I’m so excited to grab these supplies. THANK YOU so much for sharing!!!
Thanks Vanessa! I hope you have lots of fun making one. <3
This is amazing!! Do you make and sell these on Etsy by chance:))?? I so need one for my mother in law!!
Thanks Amanda! I don’t sell them. I have considered making kits, but not for this year. I wish I had a better answer for you. Sorry.
Ooo, I just finished making my wreath. It’s gorgeous. I really appreciate your generosity and clear instructions.
That makes me so happy to hear! Thank you for your kind comment.
I absolutely adore this wreath as I too am obsessed with tiny houses! Unfortunately I can’t seem to make the downloads cut properly. I have a Cricut Explore Air2 & was completely unable to upload the unzipped svg file to my machine as after I browsed to the file & chose it you couldn’t see anything in the preview but a few tiny lines. I downloaded the dxf files and was able to upload them no problem but I didn’t see any 1 inch test box, though I just resized it to fit on a 12×12 paper. It looked right on the canvas but when I went to “make it” it looked all crazy so I went back to the canvas, selected it all & clicked attach. After that it appeared to look correct when i went to cut it but the perforations were cut & the windows and roofs are all missing one side of the cut. I’m so sorry to be a pain but could you please tell me what I’m doing wrong? I bought all the materials and was so excited to make this!
I appreciate your help in advance,
Kelly
I’m so sorry you’ve had issues. The test square is tricky because I didn’t want to label a cut file and have the letters cut out. It should be the only true square. I saved the file in Adobe Illustrator as an .svg. I’ll have to look into why that’s not translating well to the Cricut. So sorry for the trouble. If you wouldn’t mind emailing me: [email protected]…I’ll try to trouble shoot the file issue tomorrow.
Hello Delia, I am having the same issue as the above comment. The SVG file doesn’t have the perforated lines intended for folding, so the cricut explore air 2 is cutting every line. Even the ones that are meant to be folded. Also the windows are missing a line so it isn’t a complete square. Some of the roofs are also missing lines, so it looks like a capital “I.” If you update the file can you please let me know!!! This is the cutest Pinterest DIY I have come across. My 6 year old daughter is so excited for this wreath. Thanks sooooo much Delia.
Hi Kandice,
Thank you so much for the feedback. I did some investigating this morning and had to pretty much overhaul the files. The update is now posted. Please, please let me know if you have any other issues. I prefer to use my Silhouette so sometimes the issues with Cricut software can escape me; so I really appreciate when people say something.
I hope the updated file works better. There is a caveat with the roof score lines that I just could not fix in Illustrator (nothing I changed fixed it in Cricut’s design space), but I did stumble on a fix in the Cricut software. I explain it in the notes under the file download.
Hey Kelly! I worked on the Cricut/svg file issues this morning and it should be all fixed (fingers crossed). Please let me know if you have any more issues. I’m happy to help you troubleshoot. The fastest way to contact me is email: [email protected] or instagram: @deliacreates.
Gorgeous! So inspiring.
I am new to Cricut and am not sure how to resize the file to use it. Could you please direct me to a tutorial, or send instructions? I love this project and can’t wait to get started. Thanks so much!
Hi Nancy. To select the object you want to enlarge, click and drag over all the pieces you want to enlarge, so that they enlarge all at the same time. Then click shift to lock the aspect ratio of the shapes and drag your mouse out to make it larger, in to make it smaller. I hope that helps. That is how you do it in Silhouette and Adobe Illustrator…I believe Cricut software is similar. You might want to search in Youtube, “how to resize an image in Cricut software” if that doesn’t work for you.
Hi Nancy,
I just wanted to let you know that I updated the svg files so they *should* (fingers crossed) upload in the correct size with no changes. Let me know if you have any more questions.
Happy making!
Delia
Omg! Beautiful and so creative!
I’m looking for printables for my girls school project and these house sizing is going to work perfectly!
Thank you so much for sharing!
Thank you! Hope all goes well with the school project!
I Will pay you to make this for me.
Thank you for the offer. Unfortunately, I do not make finished items for sale. If you can find a local creator to make them, the files are free to use for personal use and for small businesses to sell finished items.
This project is so inspiring!! I’m seriously considering it. Question: where do you display it? It feels too amazing and a bit too fragile to go on an exterior door. I wish I had a mantle for it to go above! Thanks for sharing!
Thanks Tyne! Yeah..it can get damaged outside, so I recommend displaying it inside. I hang mine on the inside of my door and save my fresh evergreen wreath for outside.
Thank you so much, Delia! I can’t wait to try again this weekend. I appreciate your update very much!
Picking up my wreath and paper tomorrow to make this, this week! Thank you for the free files 🤗
I’m new to the Silhouette Portrait (have an old machine but never learned how to use it). This project pushed me to learn how to use it. Is there a way to use the cutting machine file on 8-1/2″ x 11″ machine? I have a long way to go to learn the software and all it can do. Thanks so much. This wreath is beautiful!
Hi Melanie. You can use an 8.5 x 11 inch mat, but you will have to delete some of the pieces in the file to get it to fit. Just drag and select all the pieces, then right click, and select ungroup. Then delete the ones that don’t fit. Or you can copy them onto another board so you can cut them on a separate piece of paper. Please let me know if you have any more questions. I am able to respond faster by email: [email protected] or instagram @deliacreates.
This is such an amazing project. I am just sitting down now to try and cut the houses. It looks like the score lines are working fine once you select the group and change them on Design Space. The only issue that I am having is that I can’t separate out the cut components so I can’t make the roofs a different colour which I was hoping to do. Does anyone have better Design Space skills than my beginner skills 🙂 Any ideas? Thanks!
Hi Kyla. You should be able to drag and select all the pieces, right click, and select ungroup. This should allow you to delete or move pieces around. I grouped the score lines and the cut lines into different groups so that you can change the action (score, cut, etc.) for each group all at once. You may have to select ungroup more than once and I recommend doing that after you change the lines that should be scored from cut to score. (Sometimes the software will treat them all as cut lines when first opened)
It will likely ungroup every single line though, so if you want to keep say a house piece all together as one piece, you may want to drag and select that and group it so it stays intact.
I hope this helps. Please let me know if you have any more questions – [email protected]
How do you separate out the roofs from the house frames in Design Space so that you can cut different colours? When I upload the file to design space, I can’t ungrounded them so they all show up on the same mat. Any help would be hugely appreciated!!
Thanks!
Kyla
Good question. Have you tried selecting all of the shapes and then ungrouping them? If you do that then you can delete the ones you don’t want to cut and then open another file to isolate the roof pieces.
We enjoyed making 40 houses yesterday & today! SVGs to Cricut Design Space just fine! I fixed the score lines and then attached them to the houses. We also needed 1 medium roof per sheet. Not hard to copy 1, add a score line, and print 8 more.
Thank you for the great project! Our houses are cream, light pink, dark pink, light green, & dark green. 💕
Awesome!! Glad the files worked well for you. Those colors sound beautiful. I really like green and pink as Christmas colors.
So cute! I remember the wreath on Martha Stewart Living too! Love this wreath! I have not tried anything yet but I also want to say I am so impressed with your response, patience, and politeness to all of those who commented with issues. I can tell you are top notch! Thank you for being a ray of light today.
That is so kind of you to say Pam. Thank you for being so supportive and appreciative. <3
I just made this with teal, pink, and white paper and I love it!
Ooh! Those colors sound so lovely!
These are so flippin cute. Thank you!
Thanks Marci!
I love this sooooo much. The cutest wreath I’ve ever seen. Thank you for sharing and for the files!
Thanks Lucy!
This is adorable and so budget-friendly if you use a thrifted wreath too. Thanks for sharing!
Thanks Larissa!
I made this Wreath last year and absolutely love it!! But I cut all the houses out by hand since I didn’t have a cricut. I want to make another one this year and use a cricut since cutting out by hand was time consuming. I’ve downloaded the svg files and uploaded them to the cricut but every time I got to start the cut the preview shows all the different cuts grouped together. Like all the windows are in a row and all the angle cuts are in a row, etc. I’m not sure what I am doing wrong and wanted to see if you had any ideas??
I did also try using the DXF files and it did the same thing.
Thanks!
I think Cricut must have updated something that is causing this, because I am getting messages from several people about this. I just sent a quick video tutorial on how to fix this to someone else via instagram. I can send it to you too to see if it helps. I can also help troubleshoot with you via direct message until we get it working. I’m @deliacreates over there. Sorry for the cutting issues!
Love this wreath and was going to make last year but time got away from me. Another persons comment was the ticket for me. Just select all and click attach and it cut and scored perfectly! Thanks for this. I love the houses so much!
Oh yay!! So glad that fixed it for you!
I loved the Martha Stewart wreath as well. I always wanted to try making it but never even attempted it because of the cost–I could not believe my eyes when I saw this pop up on my pinterest feed. So talented and generous of you! Also, I hope you don’t mind my asking, where did you get your shoes? They are so cute!
Aw thanks! These are Sperry loafers but I actually got them at Ross years ago.
I am so thrilled I found your .PDF file for the 8.5 x 11 sheets of cardstock! I don’t have any fancy machines like the cricut or the silhouette, but I do have cardstock, a printer, and some scissors and an X-acto knife! I am going to try and pull off an idea that I had for my mantle using your template! I want to assemble these adorable houses and then punch a hole through the back of each house and individually place them onto a Christmas light on my pre-lit faux garland! I might practice with just one first to see how it looks, but I hope its as adorable as I hope it is! Thank you for making this a free download so I can test my idea out; it is so appreciated! Happy Holidays!
That sounds like such a fun idea!! I’d love to see it (and share it if you want). Would you be willing to message me on instagram? I’m @deliacreates over there.
Thank you very, very much! I also love little paper or cardstock houses
I haven’t had luck loading the svg or dxf files in the cricut software. I’m able to select the layers to score and print but it turns into a jumbled mess when I try to “make” it. I’m proficient with all the Adobe Software but cannot troubleshoot this. If you have any other tips let me know. Thank you!
I am so sorry that I just saw your comment. You have to select all, right click then “group,” and then select “attach” on the bottom right hand corner before you select “make.” If you don’t attach it it will turn into a mess when you go to cut it (honestly, I don’t know why and it just started requiring that this year as far as I know). I hope that helps. So sorry this is a late reply. I respond faster through instagram direct message in the future (@deliacreates).
Hi! How did you add the chimneys? I am cutting by hand with an exacto… and am confused how you made the chimneys but they are so cute! Thank you!!
Good question! So I keep the bottom flaps open and glue the chimney into a tube-ish shape. I pushed the chimneys through the roof with a square hole and then glued the flaps to the underside of the roof with the roof bent in the shape it will be on top of the house. If you glue it with the roof laid flat the chimney will keep it from bending later.
I hope that helps. If you have further questions, I am easier to reach on instagram, I’m @deliacreates, or through email: [email protected]
I have wanted to make this for the past two years. I finally have a cricut machine, got all the paper and trees and the wreath. I went to upload your files to start cutting and nothing but errors. I’m so sad. I can’t get this to upload to the cricut software to cut. It won’t recognize your files. I can’t find any free SVG files for paper villages that are the size of yours or as cute. BIG BUMMER!!! I am so sad right now.
Amber! Oh no! I am so sorry to hear about this. I feel like with Cricut, I have to update the files every year to keep them working. I don’t want this to be the end of the story for you. Please email me: [email protected] or direct message me on instagram (@deliacreates). I would be happy to work on these files to see what is happening and hopefully fix it. I created the files in Illustrator so I can save them in whatever format will be needed.