


Hola! 🙂
After I saw See Kate Sew’s Project Run and Play All-Stars look from the first week, I just had to make a copy cat version of that cute shirt! I think she screen printed hers (which I really want to learn how to do) but I simply used good old fabric paint and freezer paper stenciling.
I didn’t stop there though. I grabbed a half dozen blank summer tees at the store and dolled those up as well. I got my kids to pitch in too!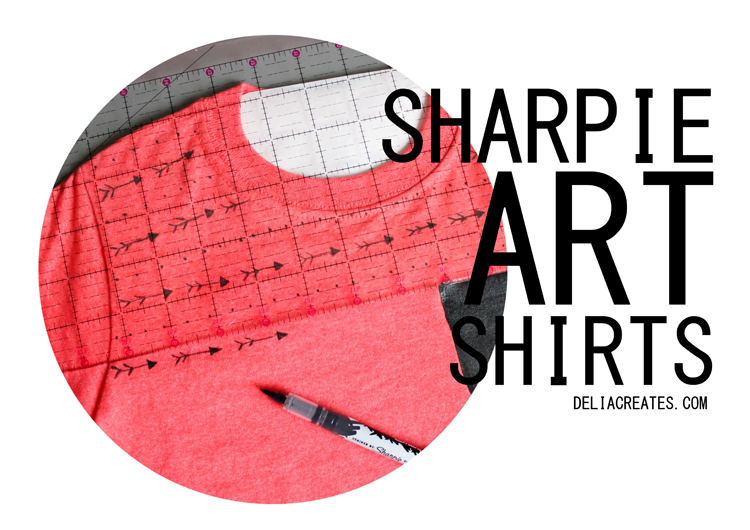
You might have noticed that I’ve taken quite a liking to my Sharpie fabric pen as of late. See these Sharpie Doodle Onsies I made for my baby.
Sharpie Fabric pens write like well…a sharpie. Nice and smooth and easy to use. They wash well also. Just be sure to run a nice hot iron over your designs before laundering and you’re good to go.
This is a really fun project, great for kids and adults alike.
Here’s what you’ll need…

Materials:
Fabric Sharpie (it’s called “Stained” and runs about $2 from Staples, other stores carry it as well in the office supply aisle and most often in multi- packs)
Freezer Paper (optional but helpful)
Pencil (opt.)
Ruler (if making a striped design)
Scissors (opt.)
Washi Tape (opt.)
A T-shirt – of course!

I got the freezer paper insert idea from a reader, Carol. Thanks again Carol! It helps to keep things smooth and the knit from catching and pulling too much as you draw. As a extra bonus, it prevents ink from bleeding into the opposite layer.
Also, remember that short light strokes are key. Just keep adding more marker strokes to make your design bolder if you desire.

I’m really loving the arrow trend right now. For some reason, this pattern reminds me of the Gecko shirts my brother used to wear. Remember those?
The pocket you see on this T-shirt and the ones below were freezer paper stenciled on! Easy, easy.
After I had my fun, I called my kids over to design their own shirt.

For my four year old, I had him draw out the design he wanted on paper first. I then marked off an area of the shirt with Washi tape to help him know where to draw. I wanted his shirt to look kid designer and not just a crazy mess. By giving him a boundary, I helped him find a cool place to showcase his designs in a pleasing manner.
Reid does not have a ton of patience for crafting. Mid-way through, he declared that he was done. So, I traced his preliminary paper drawings the best I could onto the shirt, repeating a few guys here and there. After a short break, Reid felt interested enough to come back and add more.
For Owen, my eight year old, he decided he wanted some Star Wars ships (new obsession).
We printed up some free coloring sheets online and loosely cut around them. Then we added the ships to the back of his shirt. First…

We had a few stray marks here and there which we easily fixed by adding some more ship elements. 😉
Now, don’t forget to press your designs with a hot iron…and done!

I think it ended up looking pretty slick.


And Reid’s as well…


I could not resist adding a little something extra on the back shoulder of this coral shirt. Reid randomly named our Elf on the Shelf from Christmas “Red Phantom.” It just felt too perfect to put that name right here and Reid loves it.
For the remainder of the shirts, I stuck with freezer paper stenciling and fabric painting. Using Kate’s Hola shirt as inspiration and this Munkstown shirt, I came up with these two “very good”shirts. 😉

I instagrammed (find me @deliacreates) about how imperfect the blue one came out and asked if I should try to fix it. The vote leaned toward no (and I was leaning that way already) so I left it. Thanks guys for enabling my laziness! 🙂

It’s kind of poetic. You can still be “very good” and not perfect. Right?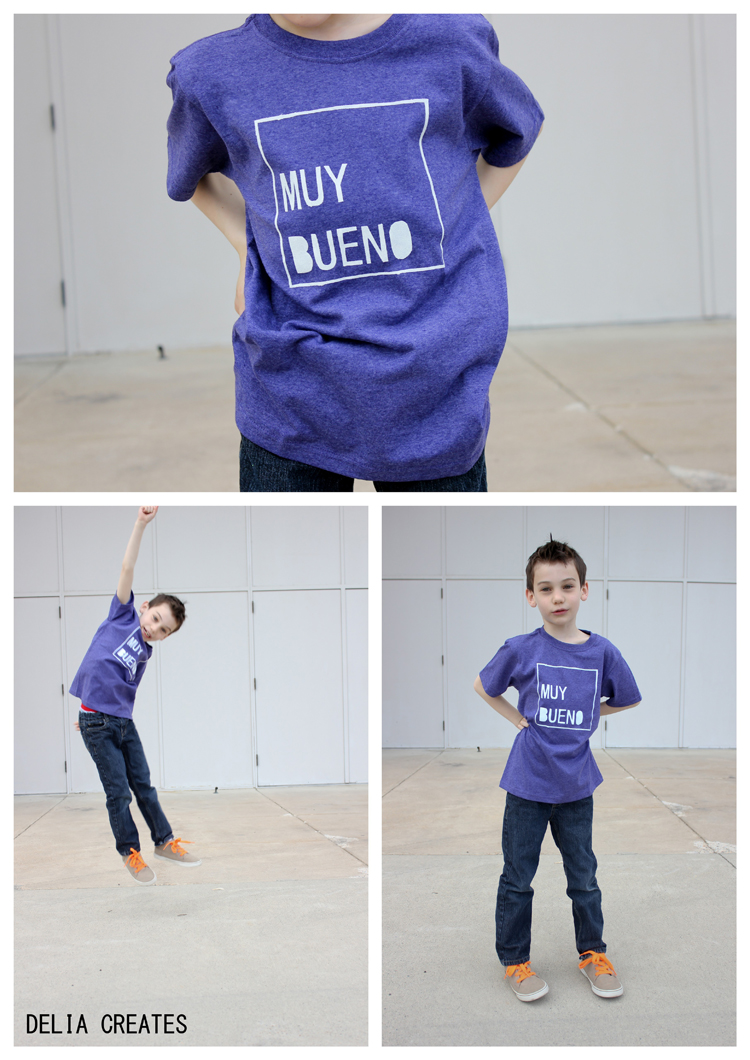
I also had a short panic-y moment when I wondered if I used correct Spanish grammar (I only know un poquito). For a minute I thought I was supposed to use “muy bien”…which is an adverb and means “very well”. I guess that would be fun too. But muy bueno or very good is what I was going for. Phew!

This kid = such a stud.
Natalie was there too, but she spent most of her time doing this.
.jpg)
Wandering away. 🙂
If you follow me on instagram, this onsie will look familiar:

I made another sharpie onsie , patterned after the lovely star fabric I used in one of these Geranium dresses and in the pocket lining of these Cargo pants. (I am sorry to say I have no idea what the fabric source is, but it is older, possibly 80’s vintage?)

Her green baby cardigan is seriously getting way too small. It was a warm-ish day but not warm enough for my petite, bald little baby to be out in short sleeves. So, I paired her new onsie with my favorite green cardigan and she was ready to go!… Plus how can you resist her cute little belly poking out of her too small cardigan.

I love this babe.
She did not want to stand still at. all. She happily zipped around in her sunglasses, while I caught these paparazzi-like (or mamarazzi?) shots of her walking away…

The boys kept trying to entice her into the shot, so I could get all three of them. This is the best I got…

I kind of think it’s perfect. 🙂
Have a good one.
You are amazing! I need those fabric sharpies like yesterday! thanks for the tips and the pics are awesome! You know I have an arrow addiction at the moment so I can't wait to grab one of these sharpies and go to town 🙂
The really turned out well! Your boys are great models. I am totally inspired to go to twon with my children's clothes. 🙂
Very Cute! Love the shirts, and the baby onesie-
to die for! Nice Job!
Wow…Adorable. My kids will love to do this! Thank you 🙂
love the pic of the three of them. each of them's looking soo cool (and cute – but better don't tell that the boys…)
Great pictures! I'll try with my kids.
What a fun idea! I'm tagging this one for the summer. My kids will love it! Nat looks adorable in the green sweater. Did you make it?
I looooooveyour tutorials and these shirts are awesome! Where did you get the boys' solid color shirts!? They look so soft and cozy.
Haha I love the shot of the three of them. Walk this way! 🙂 very cute shirts. Olivia had the same sunnies as Natalie! Twins 😉 I think I need some fabric sharpies!
LOVE all these new shirts! Those fabric sharpies look like tons of fun- I'm itching to try that with Carlos! I've been bit by the shirt-designing bug myself (at this moment I'm anxiously waiting for the paint to dry on one so I can peel off the freezer paper!)
Your kids are quite the cool cats, they were cracking me up! 🙂
Laura- how fun! Those sunglasses are so cute. We got them at The Children's Place for $1.50! 🙂
Kelly – They are just the basic Fruit of the Loom Tees from Walmart. $3.50 a piece.
Shannon and Laura- Yes you must get a fabric sharpie! They are my new favorite craft tool as of late. They are only $2 a marker at Staples or about $8 for I think a five pack at Walmart??? Not
Really cute shirts and great pictures! You have such cute kiddos. 🙂
I love everything in this post! ALl the photos, especially the last few oh my! And the crafting, super inspirational & easy!
Should I make a GDAY one for Vince? haha
So much adorableness in one place! How do you stand it? The shirts came out great! I love that the boys helped on theirs. I bet they'll be the most worn shirts all summer.
Super cool! They look like the types of shirts people would pay good money for on etsy. Can't believe the fabric sharpies work so well – might need to get some of those!
Love that last photo! And these shirts are so fun… I keep wanting to buy some fabric sharpies but keep forgetting. Soon. =)
This is just to addorable and great models you got there. hahaha
http://www.3girls1apple.com
Delia you rock so hard! The arrows are my favorite!
These shirts are all so cute, especially the arrow one. And I can't believe Natalie actually kept her glasses on! I can't ever get my nieces to keep them on so I can take a picture. 🙂
I had no idea until reading this that there was a sharpie for fabric now. How cool is that! Your shirt ideas are all awesome, and the kids are adorable in them. The arrow shirt kind of reminds me of old school billabong for some reason. I think I had a shirt like that once.
You are seriously one talented lady.I really enjoy your unique spin. Thanks for the darling pictures as well as inspiration! Heidi
They are really nice Delia. Oh goodness I'm really going to have to try and make some myself! Why do you always have to be so darn inspiring?!! Now I've just got to find the time to do it… (cue my hilarious laughter at the idea of time to do anything right now!)
I love your shirts! The muy bueno is really cute.
It is perfect.
Seriously. I should just pin your blog with the caption:
"make everything."
Awesome t-shirts momma! I am creating a round up of boy T-shirt Ideas for T-shirt Week on my blog and will be including one of yours on Friday! Thanks so much for the inspiration!
xo
H
What an adorable shirt!!! I want one for me! I do hope you do a pattern for this. Much easier for me to let you work the details out! I am so sad you didn't make it through to be the winner of PR&P. I was totally cheering for you! In fact, I was probably more bummed than you were. But I do love that we got to see this outfit any way. Your projects were stunning! Great job. I definitely
Love this idea! How did you get the white on black (Hola!) though? The Fabric Sharpies don’t come in white, and I want to make soccer balls for my daughter’s team this weekend. Can you point me in the right direction please?
Thanks Melissa! I used white fabric paint for the white on black. The Soft Tulip brand matte in white works best for me. I think I applied a couple of coats to get good coverage. Careful not to go too thick or it will crack like crazy later. I hope that helps! Good luck with the T-shirt painting!