

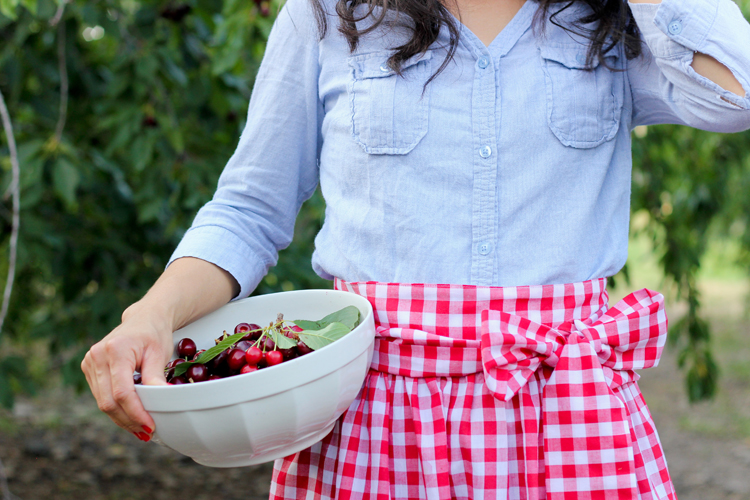
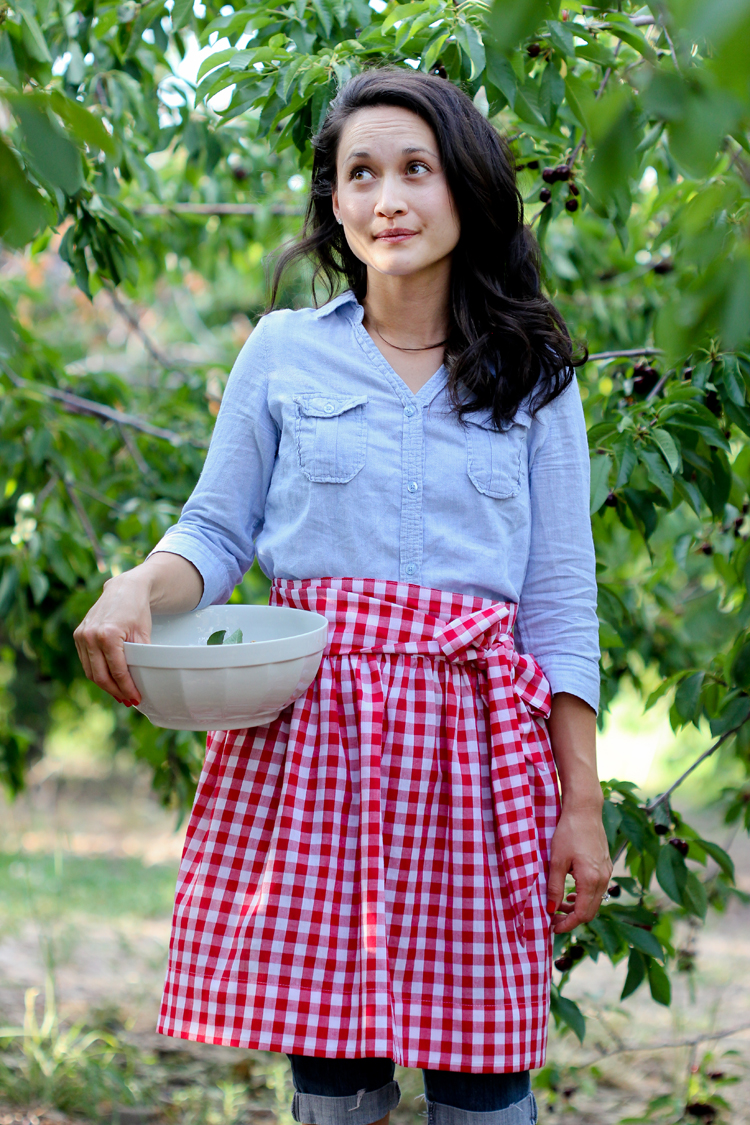
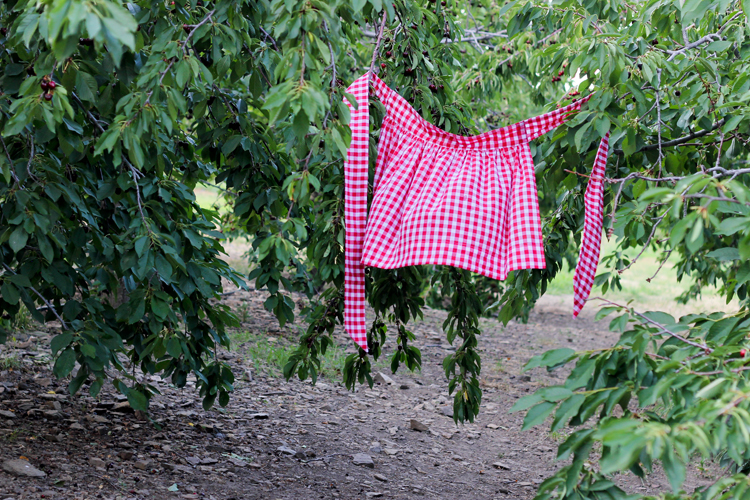
 A couple of weeks ago, the kids and I visited a u-pick cherry farm.
 It was so beautiful, and so inspiring, that I dropped everything I was working on to design a project and some recipes around the concept of this cherry farm; including this gathered half apron.
 I know? Crazy, right? I just couldn’t get this idea out of my head and I was (literally) crazy excited about it.
 The apron is not crazy though. 😉 It’s actually really simple. This tutorial post is quite long, but that is only because it is thorough.
 I designed it so that you only have to make a few straight cuts from 1 1/4 yard of fabric.
 It has no raw edges, so that if you use reversible fabric and wear it wrong side out, no one will know!
It also sports a nice full apron skirt that gives it a feminine flair.
 An apron you can twirl in? I’m in.
I should probably make a mini one for Natalie, now that I think of it!
Okay…Let’s make one shall we?
MATERIALS
1 1/4 yard of 44″ wide woven cotton fabric* matching thread rotary cutter and self healing mat or scissors ruler iron pins, sewing machine, basic sewing supplies optional: binder clips or clover clips are helpful*This apron is sized to fit most people. It should fit RTW sizes 2-6 so that you can double wrap the ties around your waist and any sizes larger than that, by tying it in the back. 45″ wide fabric works fine and will produce very similar results. If you want to double wrap the apron ties and you are a size 8 or more, you can either add length to the apron ties, or buy a wider fabric. Follow the directions in the same way, but use the ratios I provide, not the measurements.
BEFORE YOU BEGIN.
a. Wash and dry your fabric.
 b. Even out the grain. Sometimes, your fabric gets cut off grain at the store. Even it out now before you start to cut into it. Having a repeating pattern can help you determine where the grain is and how to square it off. If you find that you have to cut off as much as a couple inches to fix the grain, don’t fret. I have given you about 3 inches of leeway with the fabric requirement for this situation.
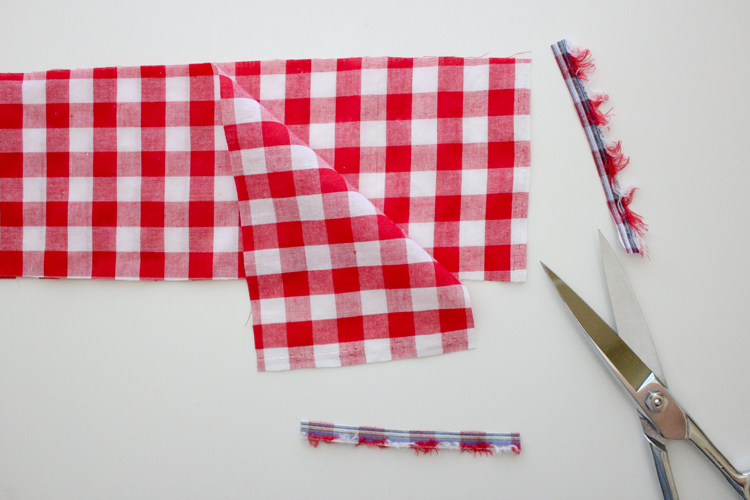 c. Trim off the selvage if desired. Most of it will get sewn into the seam allowance, so you don’t need to be too picky about it. I trimmed it off after cutting. You can do it before. Either way… 🙂 Just be careful not to cut off too much, as it will alter the measurements.
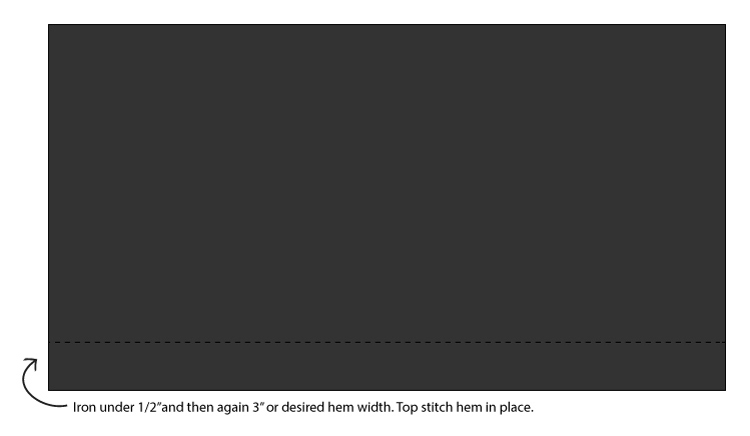
STEP ONE: Cut your fabric.
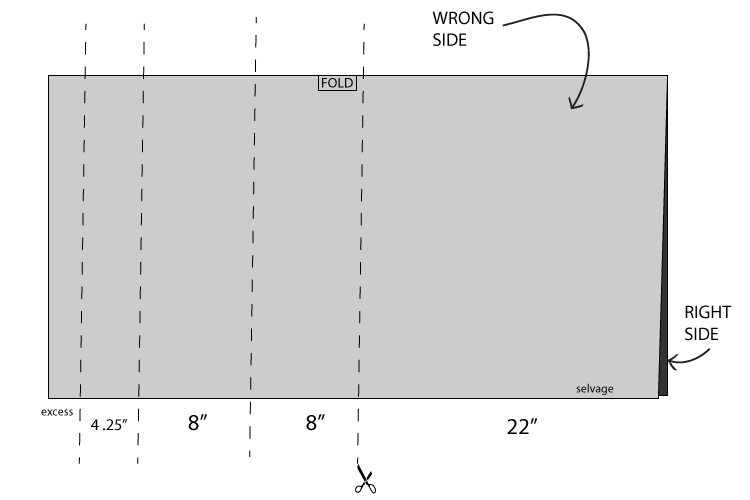 *As you can see, the light gray signifies the wrong side of the fabric and the dark gray is the right side, for the illustrations. The fabric I used in the color photos doesn’t have a noticeable right or wrong side. I will signify which side to pay attention to in the written text, when it is not clear in the pictures.
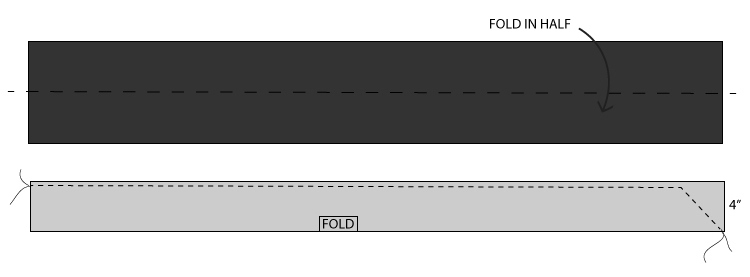
a. Lay your fabric folded in half (or fourths if you don’t have a large enough mat) with selvage edges touching and cut according to the guide.
b. These are the pieces you should have when you’re done with Step One:
one – 4.25 x 44″
two – 8 x 44″
one – 22×44″
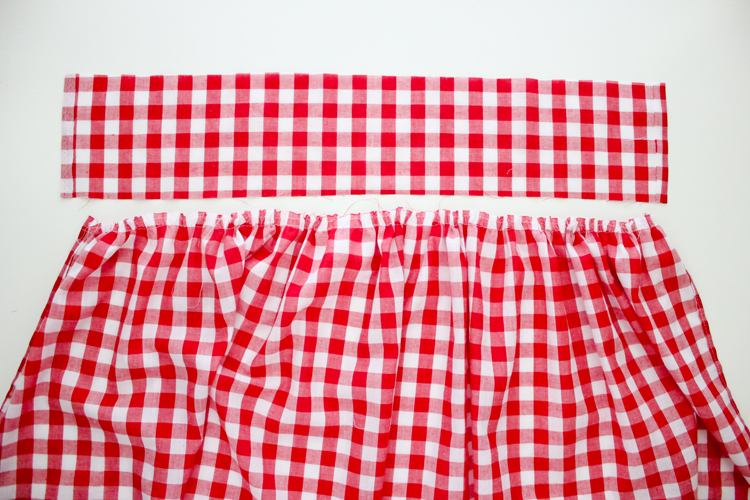
STEP TWO: Prepare the waistband. 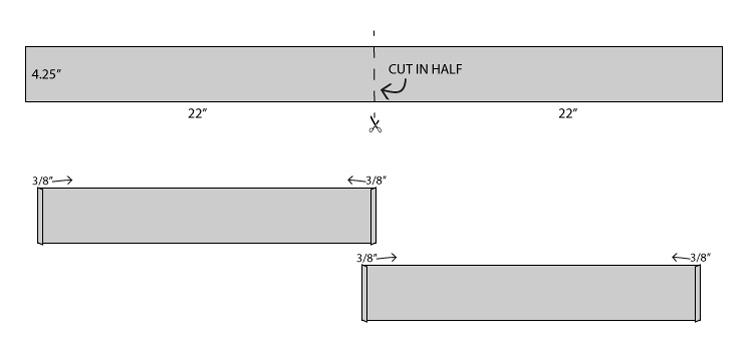
a. Take your 4.25 x 44″ piece and cut it in half lengthwise. These two pieces will comprise your waistband.
b. Press each of the short ends inward 3/8″.
STEP THREE: Prepare the apron skirt.
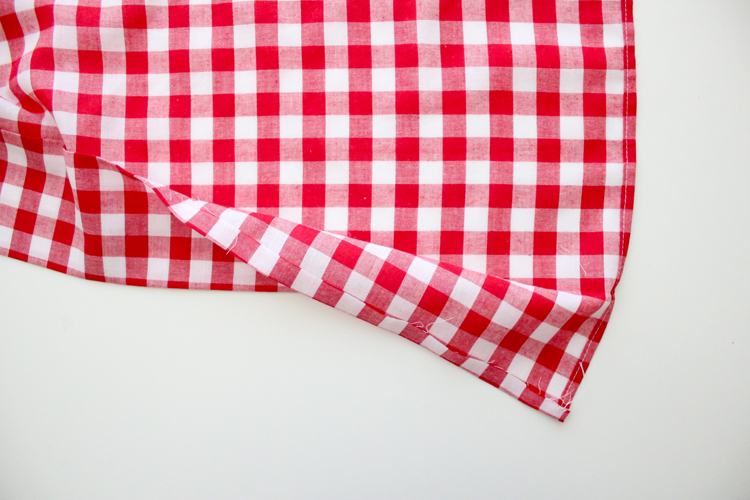
a. Fold the short sides of the apron under 1/4″ twice, encasing the raw edge. Press in place and then top stitch.
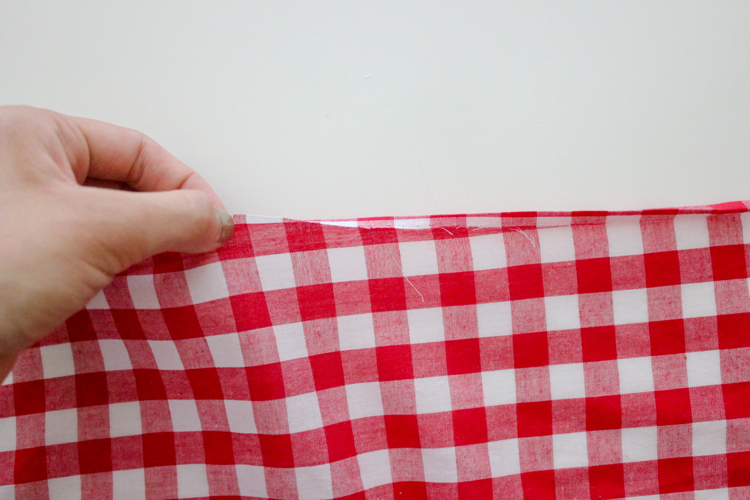
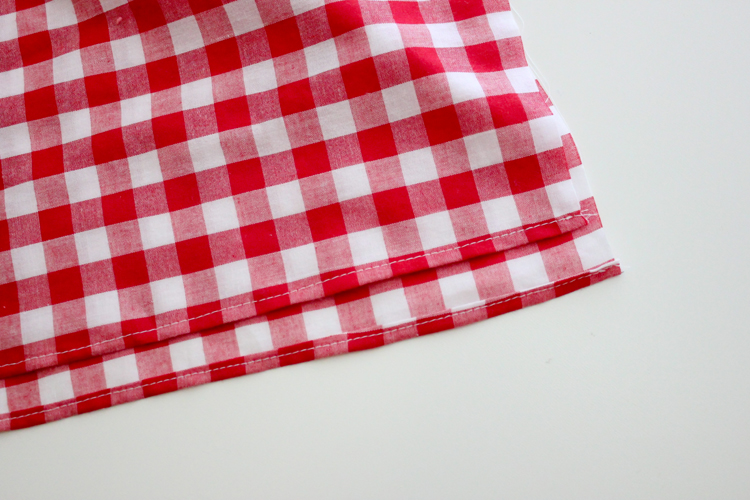 b. Hem the bottom edge under to the wrong side of the apron skirt.
 *Note about picture above: the WRONG side is facing up and the hem is being folded to the wrong side.
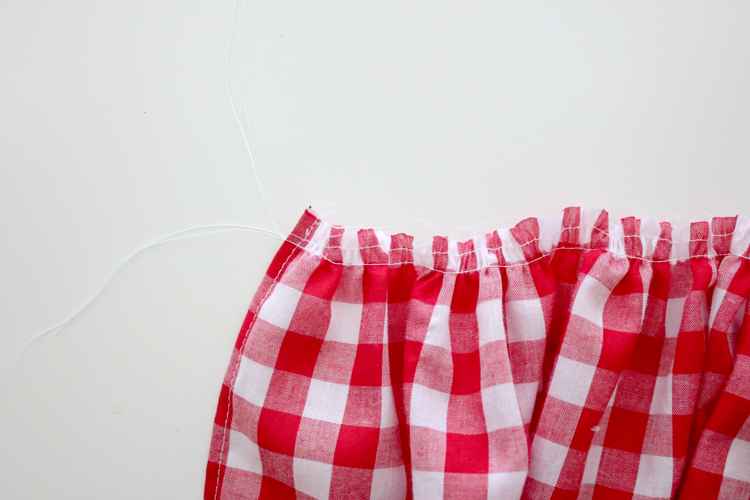
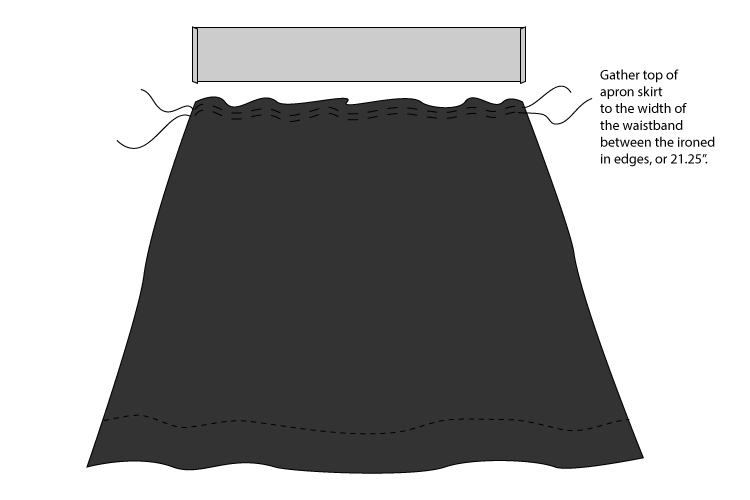
c. Lengthen your stitch and tighten your tension as long and as tight as you can. Sew two lines of gathering stitches 1/4″ and 3/8″ away from the raw edge of the top of the apron skirt. Pull the bobbin tails to gather the skirt.
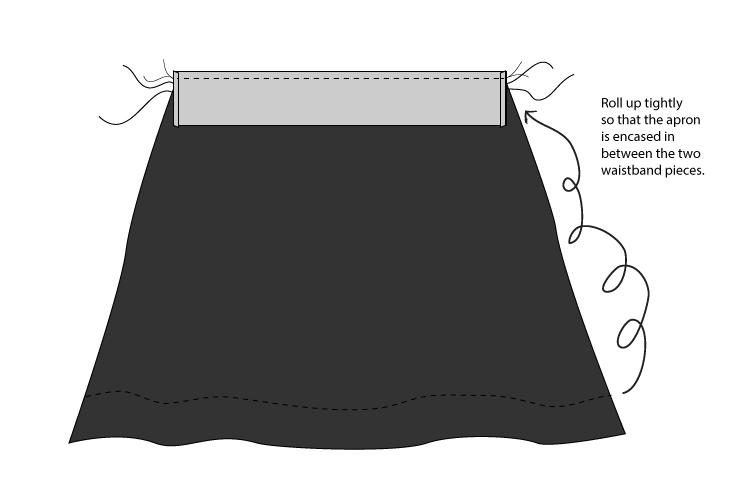
STEP FOUR: Attach waistband to apron skirt.
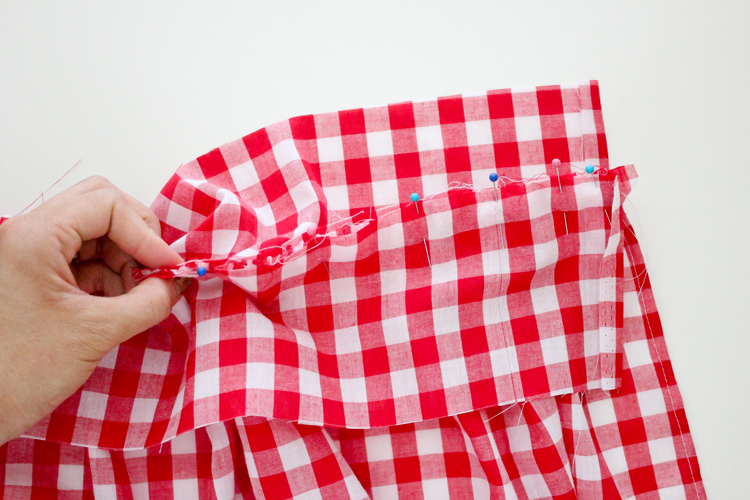 a. Pin the waistband pieces to the gathered edge of the apron skirt. One waistband piece should be right side facing the right side of the apron skirt and the other should be right side facing the wrong side of the skirt. Pin both pieces together with the skirt sandwiched in between.
 b. Sew together with 3/8″ seam allowance.
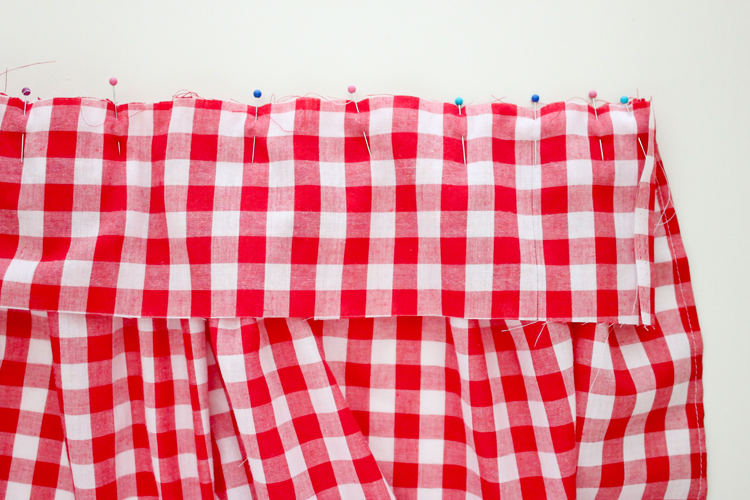
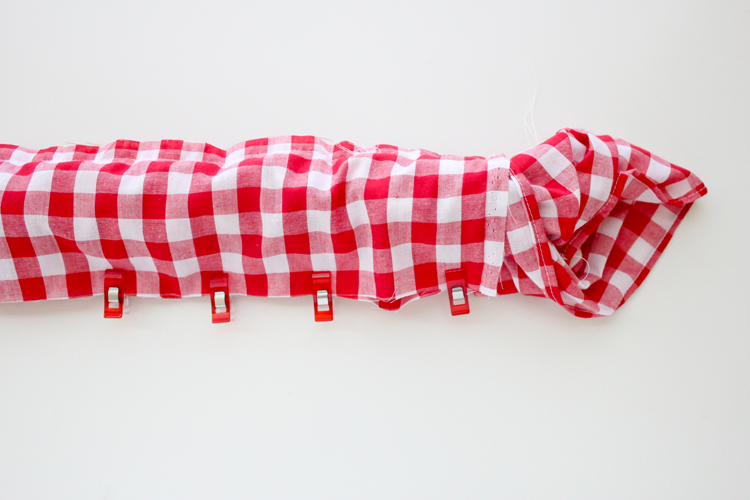
c. Now, sew the other edge of the waistband by rolling the apron skirt into the waistband.
 Pin or clip the other two raw waistband edges together, being careful to not catch the apron skirt. I find clover or binder clips to be a little easier to manage at this step.
 d. Sew along the remaining raw waistband edge with 3/8″ seam allowance.
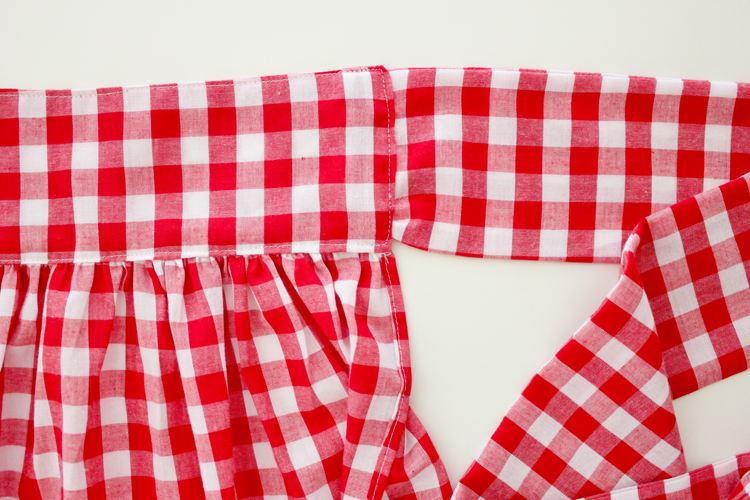
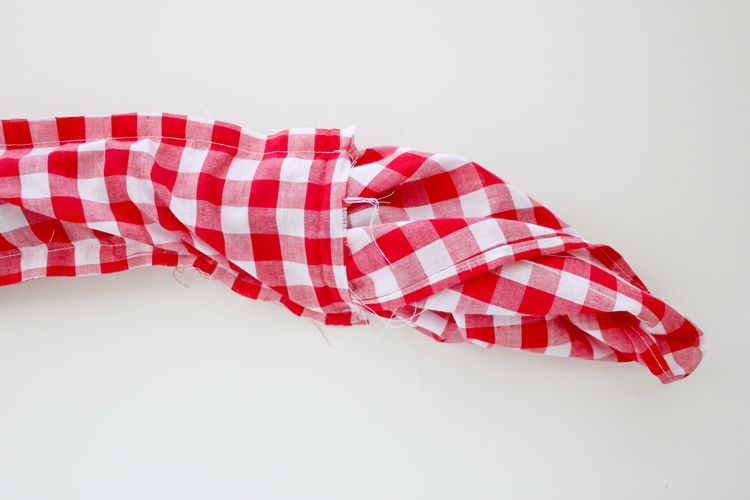 e. Now pull the skirt out through one of the waistband’s side openings.
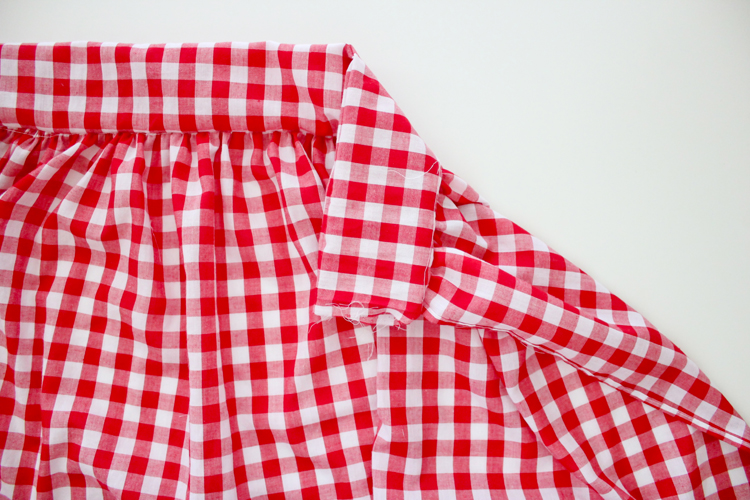 Ta da! No raw edges!
f. Press the apron flat with an iron.
 After you pull it right side out, it might look a little sloppy. Remove the gathering stitches since you don’t need them anymore and press the gathers. This always makes them look much cleaner. Press the raw short side edges under again as well (as pictured).
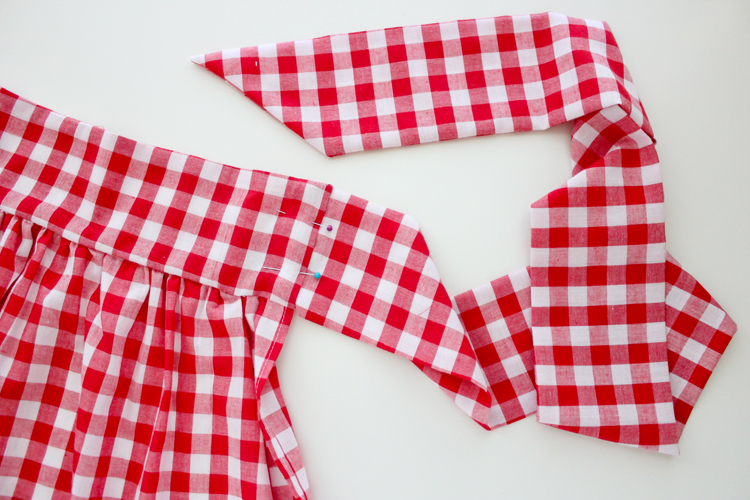
STEP FIVE: Prepare the apron ties.
 a. Take your two 8 x 44″ pieces and fold them in half width wise, with right sides facing.
b. Optional: Mark a 45 degree angle at one end of each tie.
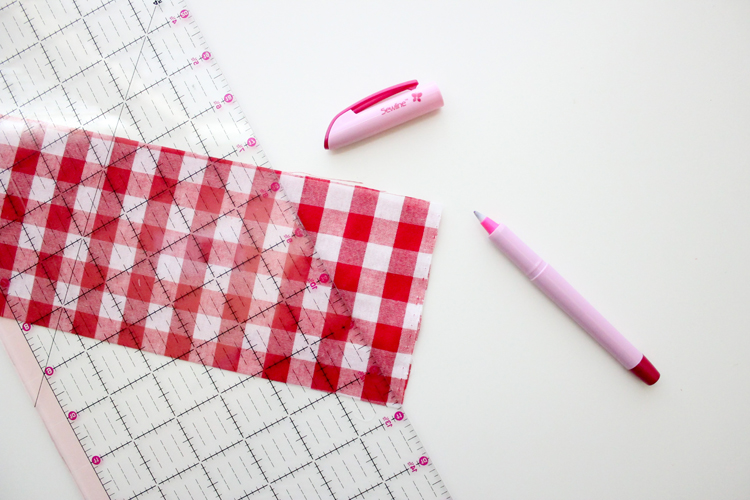 c. Sew along the raw edge of each tie and at a diagonal at each end, using the 45 degree line guide you just drew. This time, use a 1/2″seam allowance.
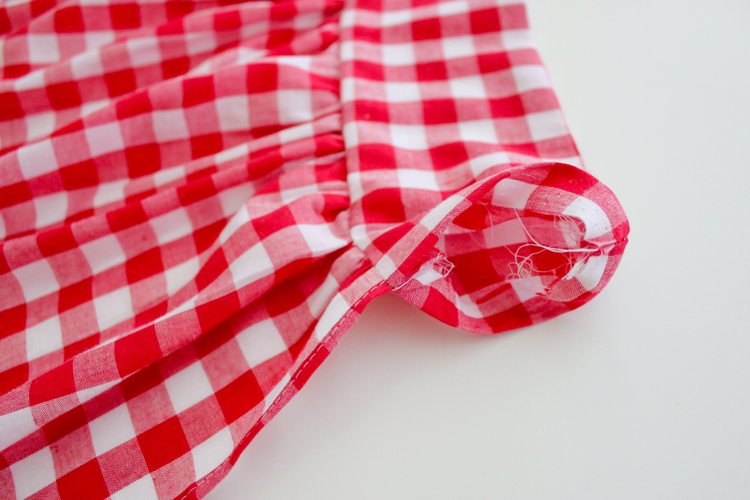
d. Cut away the excess at the end of the ties and trim corners to reduce bulk. Turn ties right side out through the un-sewn short end. Press flat with an iron.
STEP SIX: Attach apron ties to waistband.
a. Pin raw edges of ties into the sides of the waistband.
 b. Top stitch around the perimeter of the waistband, close to the edge.
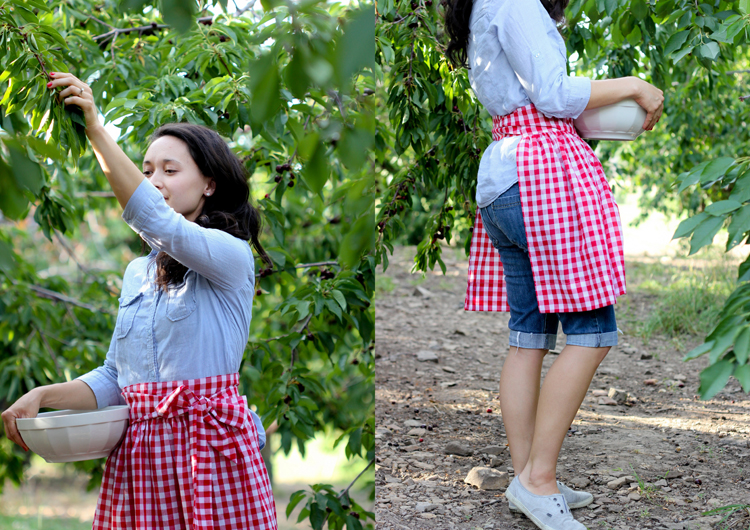
You’re done!
Go ahead and tie it on…
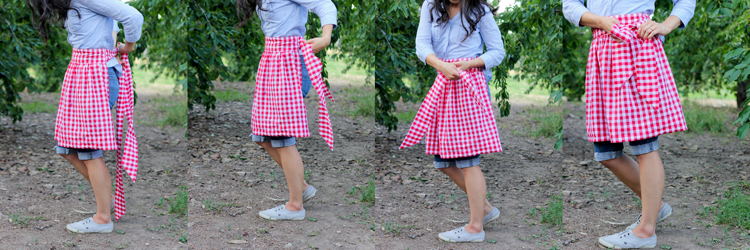
 I like to tie it in the front for two reasons:
1. It’s waaaay easier.
2. You can slide a dish towel over the ties to keep it handy, like I did with this pin-tucked half apron HERE.
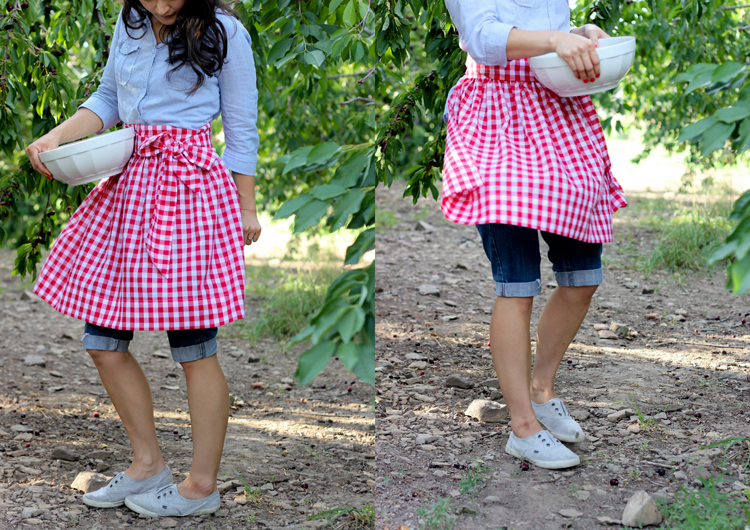
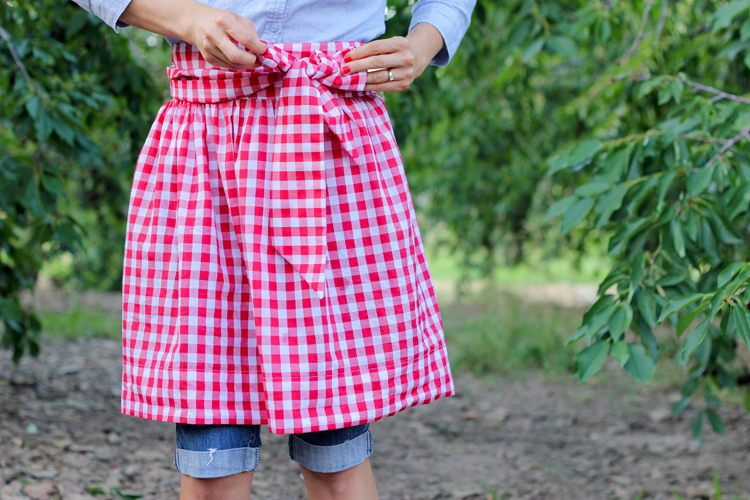
 I kept this apron simple, but you can dress yours up with pockets, trim, or contrasting ties… etc.
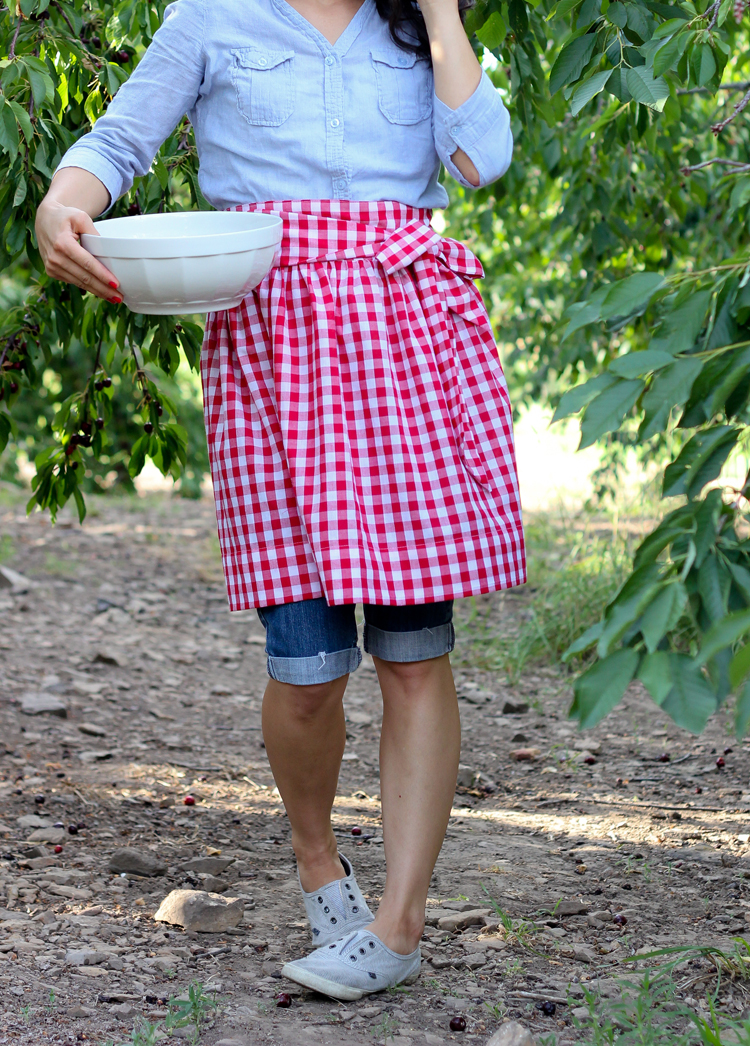

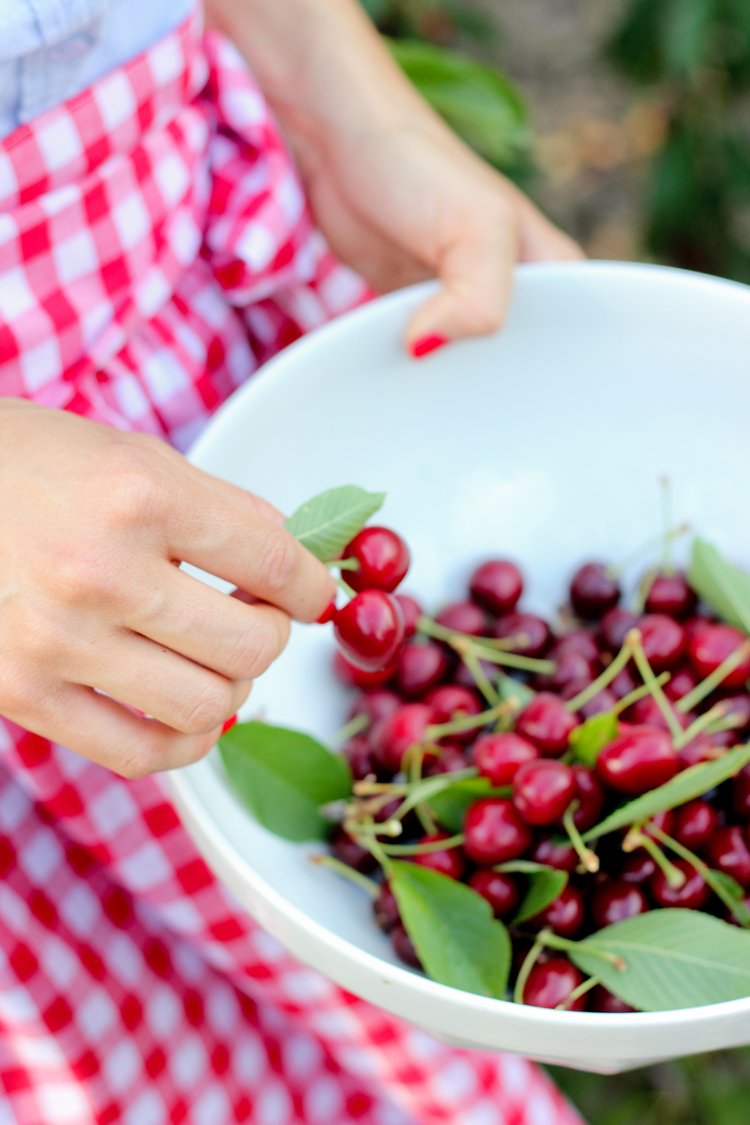
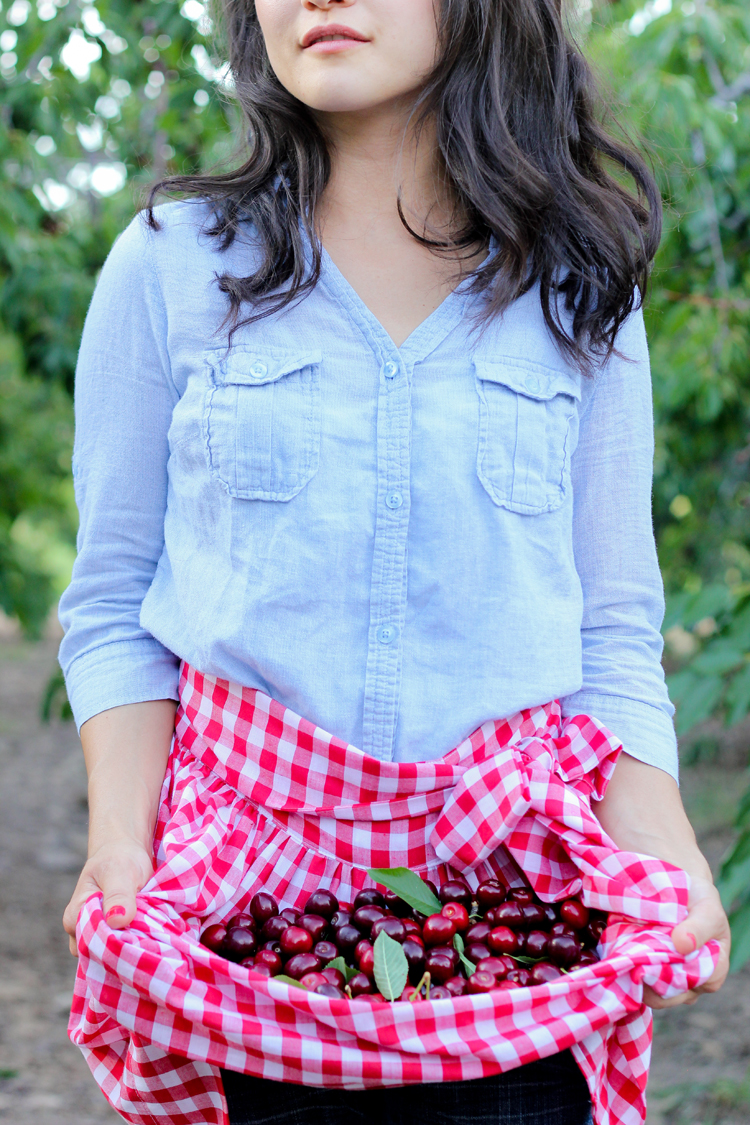
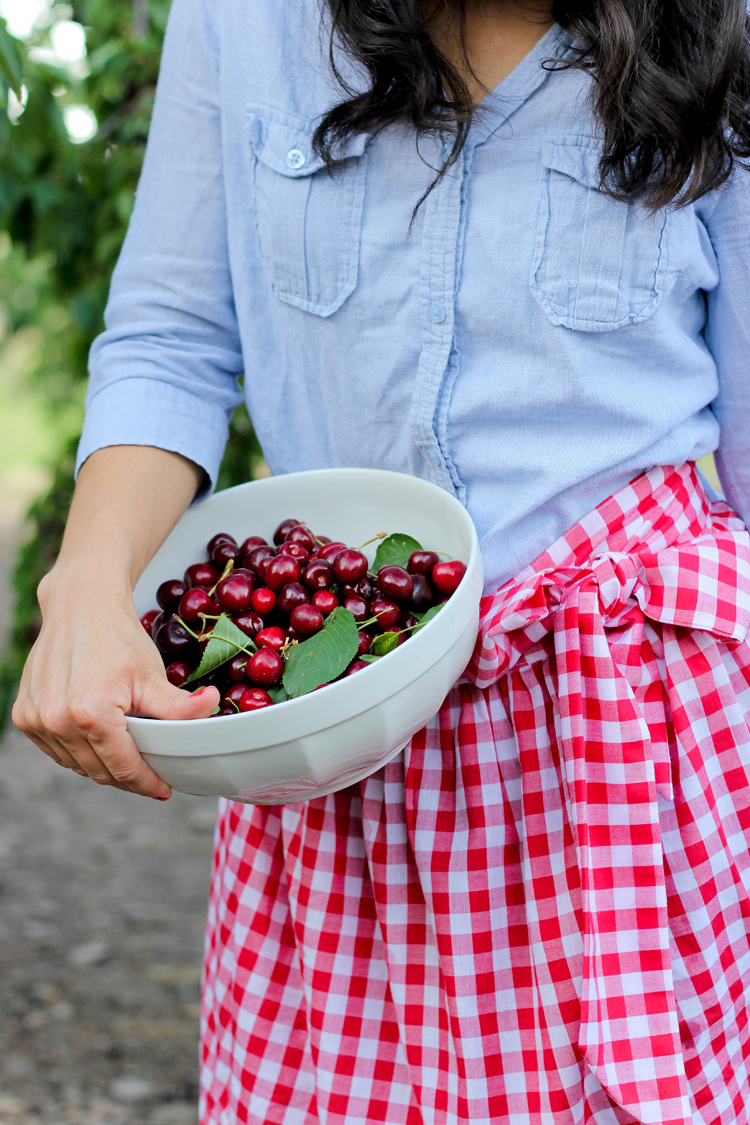
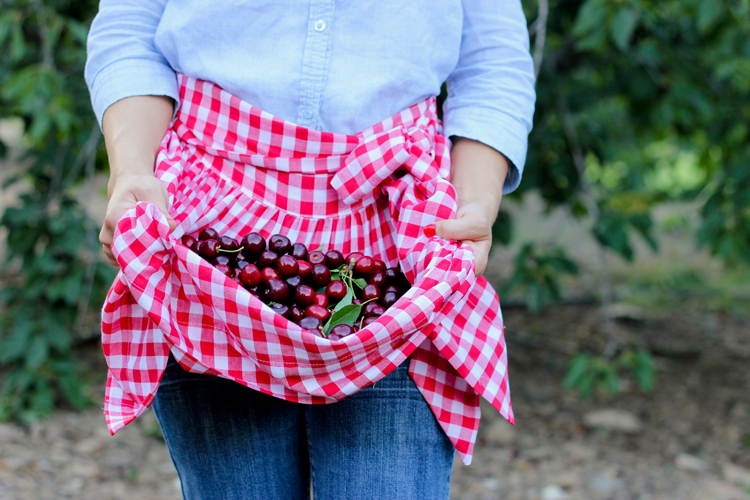
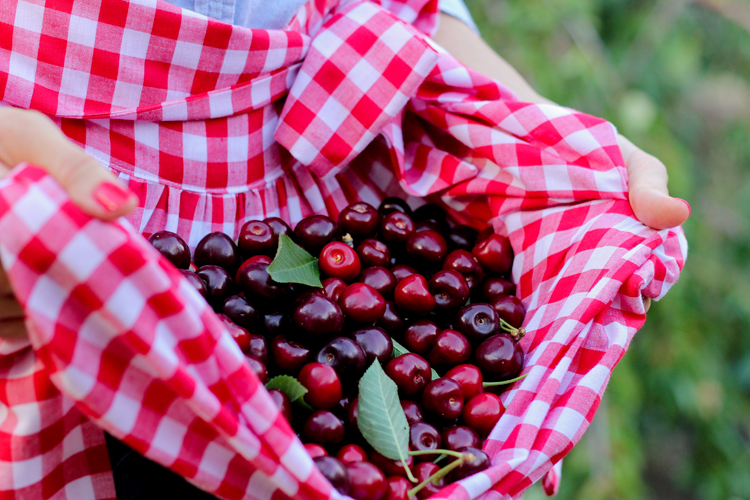 I decided to eventually ditch the bowl and fill my apron with cherries. At 75 cents a pound it was hard not to go on a picking spree!
 Because I picked SO many, I’ve whipped up five cherry recipes to share this week. See you back here tomorrow!
That is the cutest thing ever! It makes me want to live on a farm and bake pies all day. I have to make this (and add a couple of pockets for extra flair.)
Thanks for the inspiration, Delia!
I know right? It was a bit of drive to get out to this farm, but so worth it! Makes me want to move out to the country too. Thanks Grace!
Where is this farm at! I must plan a visit there next year! U-pick cherries are the best! (well, u-pick anything is the best)
thank you for this pattern. I was also wondering if thid method of connecting the waistband and ties can be used for the anywhere skirt by Dana from made it?
Good question. Her skirt has you insert the ties into the side seams of the waistband so the process has to be inherently a little different than an apron that doesn’t have side seams. I hope that helps?
That is the cutest thing ever! It makes me want to live on a farm and bake pies all day. I definitely will make it (and maybe add a couple of pockets for extra sass.)
Thanks for the inspiration, Delia!
That’s a darling apron! Aren’t cherries the perfect inspiration? You are so lucky that you were able to pick some for 75 cents a pound! I only know of one u-pick cherry place in AZ, and it’s a 5 hour drive through the hottest part of the state, and I don’t have air conditioning. I’m definitely jealous.
Whaauw! What a fantastic apron! I’m going to wear aprons from now on 😉 Thanks for the tuto (and the lovely pics, looks delicious)! Groetjes uit België !! (greetings from Belgium)
aw delia, you’re so darn cute! love these photos and that apron is adorable. look at you with your fancy illustrator diagrams! such a pro.
Thanks Kristin! 😉
Thanks so much for the beautiful illustrations and clear directions. I thought it was going to be hard to make, but it was so easy! This is the first apron I have ever sewn. My mom will love her birthday present!
You are most welcome! I am so so happy to hear that you found the tutorial useful!
What a fabulous apron tutorial. I make aprons from vintage tablecloths and this is by far my favorite pattern. I literally sat down and finished this apron in one hour. Thank you so much for this easy to understand tutorial. This will be my go to pattern from now on!!!!!! Thank you!!!! This is the first time I have ever posted a comment- this is how much I love my apron I just made.
Karen,
Gosh! Thank you for your kind words. I am so glad you like the tutorial! Thank you for so kindly taking the time to tell me so. It means a lot. 🙂
Delia <3
Thank you so much for bringing back so many memories. I was was a child in the 60s when every lady wore an apron, even my sisters.
I was actually jealous that I could not wear one!
My one observation…I know you don’t agree but for me a pretty half apron has to be tied in a big bow at the back. Just my quirk.
Did you know that in Germany where they wear the dirndl, where you tie the apron bow denotes marital status…so be careful !
Many congratulations
Mike
Thanks Mike! I had no idea about dirndl aprons. I looked it up and will definitely be more aware from now on! ha!
Delia
Fabulous apron..and tutorial, thanks. (just went out and bought the gingham, in the washing machine as we ‘speak’!) But ohhhhh cherries at 75c a pound??? i’m in New Zealand, with cherries only over the Christmas season and even living close to cherry growing area, we don’t have pick your own (as we do with tons of berries) PLUS they are up to $30 per kg!!! (so $15 a pound!!) boohoo…anyways…love your images..fabulous! going to check out the rest of your blog now 🙂 xx
Thank you Jessie! <3
I can't believe $15/pound! Wowee! I love that you guys get cherries around this time of year though. It's all apples and pears this time of year, this far north.
Have fun sewing up an apron!
This looks super cute! I’m curious if you have any thoughts about how you would scale it down to a little girl’s size (age 6)? This is exactly the style I am looking for! Thanks!
Ooh good question. Take her waist measurement and then multiply it by 2/3. That should about do it. You also want the length of the apron to go from the waist to just above her knees.
I hope that helps!
Perfect, thank you!!
Thank you for this tutorial, Delia – I made this apron today and it was so easy to follow and turned out beautifully 🙂
Thank you Kristy! I am so so happy you like the apron! <3
Ok, I’ve now made this apron 4 times and they just keep getting better and better! On my third one I used contrasting fabrics for the waistband and skirt, and added a panel in the same fabric as the waistband at the bottom of the skirt and it turned out beautifully. The added length is gorgeous and feminine 🙂
That sounds so pretty!
You ladies must be excellent sewers 🙂 I got completely lost on the waistband and was ready to scrap the entire project. I found another tutorial that helped a lot. This apron is absolutely adorable. If anyone else struggles a bit don’t give up!
I’m so sorry you got lost on the waistband! I’m happy you figured it out though. Can you tell me what was confusing to you? If I can add clarification to the instructions, I would really like to do my best to prevent others from being confused too!
I wondered why you had to cut the waistband and attach ties after waistband is attached. Can it not be sewn as one piece?
You could, but since fabric often doesn’t come in the full length you’d need for the ties and the waistband, this offers a way to sew them in that gives a cleaner finish. If you are making more than one apron or don’t mind the waste, buying more yardage and making the ties all one piece could work.
Hi, I stumbled upon your tutorial and was inspired to make the apron in your tutorial.
I have a problem I’m quite big and I know the measurement won’t fit me.
This will be my very first sewing project by myself and I want to use this during my bakesale since the design is so pretty.
Can you help me use the correct measurement for the fabric?
My bust is 105 cm, waist is 88 cm and hips is 96 cm.
Hope to receive your help and thank you for making projects like this and inspiring us to do the same!
Hi Karen!
You don’t sound big to me! Making an apron your size is very doable. All you need to do is multiply your waist by about 1.5 or 2 to get the fabric width you need. If you can find 58-60 inch wide fabric, that would be perfect. Simply follow the same instructions but with the wider fabric. I hope that helps! Best wishes with the bake sale!
Delia
Hi Delia!
I’m so glad that you answered my question.
Unfortunately, we only have 40 – 45″ fabrics available here in my area. Can I use that instead? What adjustments do I need to do for it to fit?
Won’t making the cloth be too much if I multiplied the width by 2?
Thank you!
Hi Karen!
So you will likely have to piece it together. The measurements don’t have to be too precise because it’s an apron. To make it full and gathered, multiplying it by 1.5 should be plenty. If you double it, it will be extra gathered and a bit poofy. To be precise, an ideal width for you would be 52 inches. You can piece the apron together, maybe dividing the apron into threes, so you don’t have a seam line right down the center. Or you can use 45″ wide fabric and simply gather it little less.
I hope that helps!
Delia
Lovely! 🙂 I haven’t touched my sewing machine in years. I think this little project is just what I need to get back on track again. Thank you. 🙂
You are most welcome. It makes me happy to hear that you feel inspired to sew! Have fun!
I made this apron with my daughter who’s learning to sew. Our neighbour’s daughter needed a white half apron for her Victorian maid costume in her end of year play. It was so easy to make but needed so many new techniques for a beginner. A real joy of a project and it turned out extremely well. Thanks for inspiration
I am so happy to hear you and your daughter found the tutorial helpful! You both sound like wonderful neighbors! <3
This apron is darling! I have some fabric that would be perfect but only 1 yard! Not sure how much leftover you have with this pattern. Do you think it would be possible to make with less yardage? Thank you!
Thanks Scarlet! There really is not a lot of leftover yardage. However, if you have 55-60 inch wide fabric, a yard should be enough. You can also use a different fabric for the waistband if need be. I hope that helps!
I was searching for a pretty apron to sew and this one was the cutest! Mine is in a pretty grey floral pattern (I wish I knew how to add a picture to the comments). It was easy to whip up and turned out awesome! thank you for posting! I might make another and add pockets for fun:)
Ashley,
I wish I could see it too! I am so glad you found the tutorial helpful. Thanks for leaving such a lovely comment! <3
Delia
Good morning again,
Thank you so much for the instructions to make this lovely apron. After a long time I have finally encouraged my wife to make one that looks exactly like yours, same colour and same design.
It looks perfect and brightens up the room when she is wearing it. The only thing different is she ties her bow at the rear and not at the front like yours. This might be because she prefers that position, but is probably because she is not as slim as you…..but don’t tell her that …lol.
Thank you again for the inspiration and bringing back many childhood memories to my house.
Very best wishes…stay safe.
Mike
Great tutorial and pictures! The apron is really adorable. I love how you made it simple because I am not one for long detailed directions. I think I can do this 🙂
You should post this on instagram! Thank you and Happy Holidays!
Thanks Susan! I’m so glad you enjoyed the tutorial. I have thought about sharing a new apron pattern. If I do, I will definitely share it on social media. Thanks!
Oh and happy holidays to you too!
Love! Love! Love this apron! I made 27 from your pattern for Christmas. They were a total hit! I used different CHRISTMAS fabrics and made some with two patterns. Everyone loved them. Thank you for this wonderful pattern!
Judy
That makes me so happy to hear that you enjoyed the pattern Judy! Twenty-seven aprons…I am so impressed!
I love this pattern. I just happened to have enough gingham fabric and made this yesterday. It’s sew cute.
Oh wonderful! Thank you.