

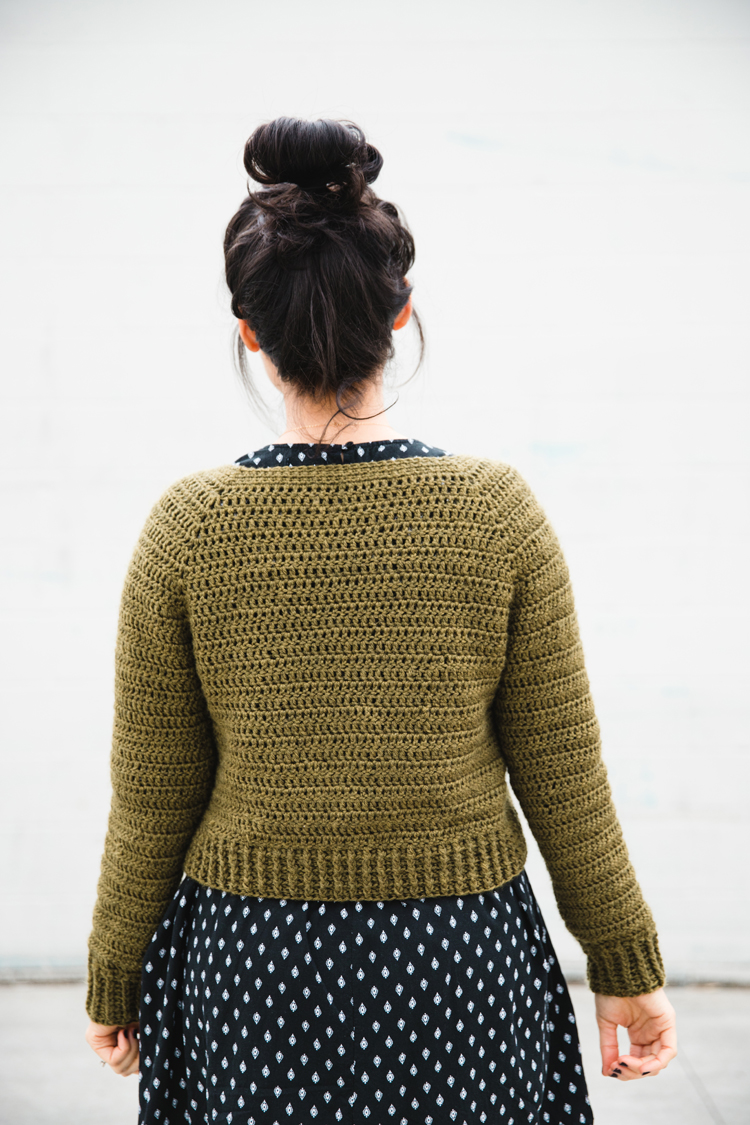
I started designing this cardigan over a year ago and have just now finished it! Whoo hoo! Doesn’t that seem so on brand for 2020/21? Haaaa.

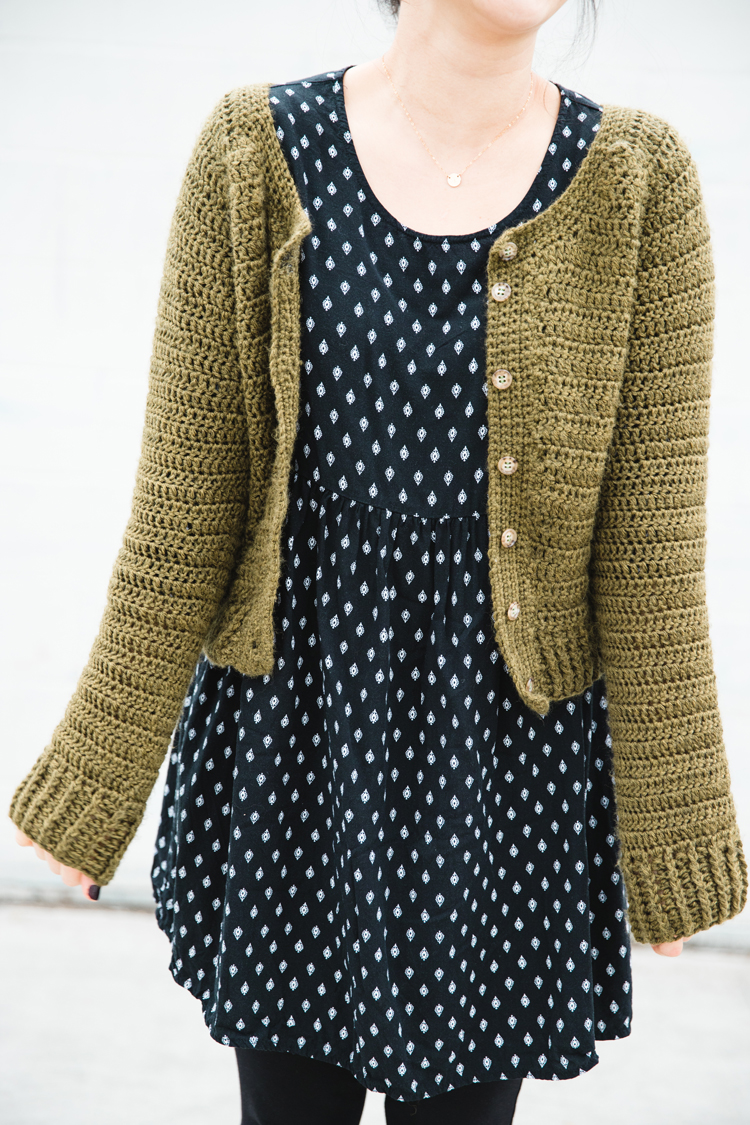
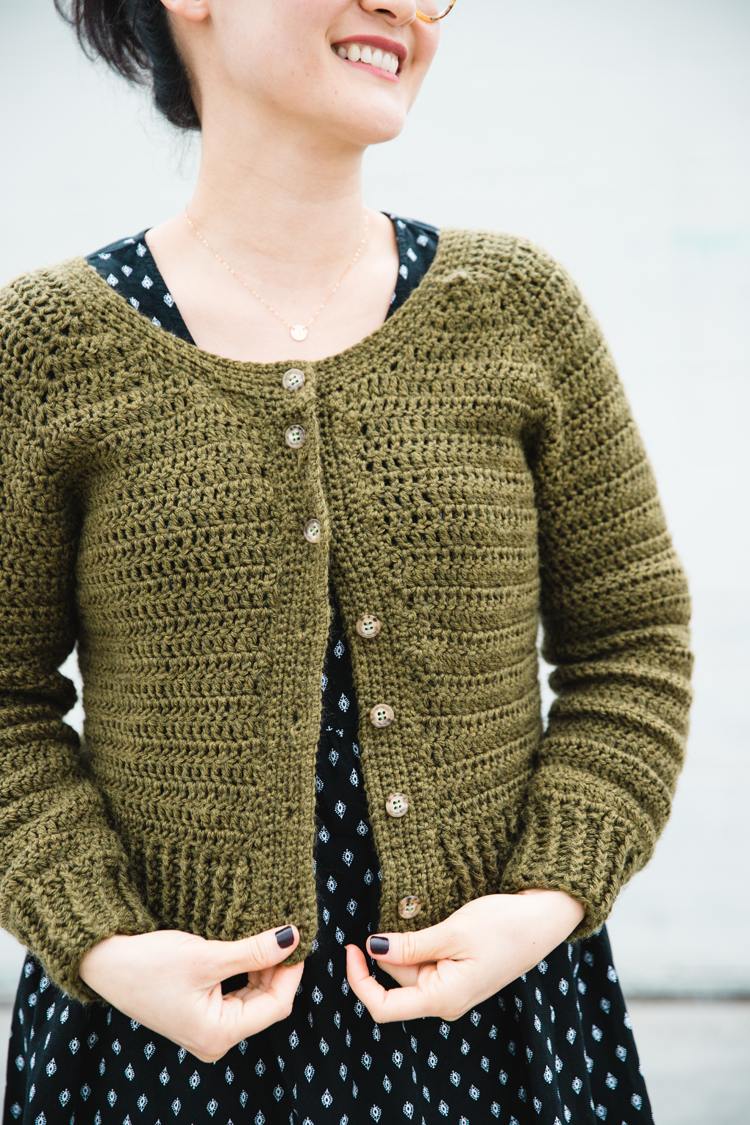
It’s a simple, cropped raglan cardigan, made up of mostly double crochet stitches and the softest, superwash Merino wool yarn gifted to me from WeCrochet.
I have to giggle a little at the simple part of that title. The design of this cardigan is pretty minimal, but creating this pattern was definitely not straightforward for me. Figuring out the raglan sleeves with a scooped neckline was an adventure!
Which is why I am going to start this pattern off with a disclaimer:
This pattern has not been through proper testing and it’s my first women’s cardigan (ever actually). In my sewing patterns I like to make the size range much more inclusive, but I am just not able to do that quite yet for this pattern. My sincere apologies.
For those reasons, I am making it free. I would love any feedback you can offer as you make it. Please comment and I’ll make this post a working pattern that will hopefully be improved overtime.
We’ve got a lot of ground to cover. Let’s go!
MATERIALS
- DK or category 3 yarn, about 400-450 g*
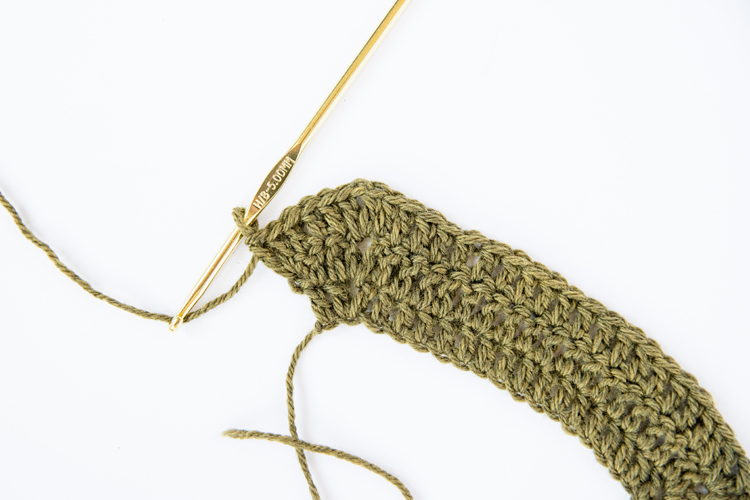
- H/8 or 5.00 mm hook
- yarn needle
- 6 buttons 1/2-5/8″
- matching all-purpose thread**
Material Notes:
*I used about 9 skeins of the Swish DK Yarn from We Crochet in Moss.
**You can use yarn to sew on your buttons, but I find that sewing thread provides a more secure attachment.
GAUGE
4 inch x 4 inch square = 13.5 dc x 8.5 rows
ABBREVIATIONS
- ch = chain
- sc = single crochet
- dc = double crochet
- fpdc = front post double crochet
- bpdc = back post double crochet

SIZING
| Size | Bust Measurements (inches) |
| XS | 33 |
| S | 35 |
| M | 37 |
| L | 40 |
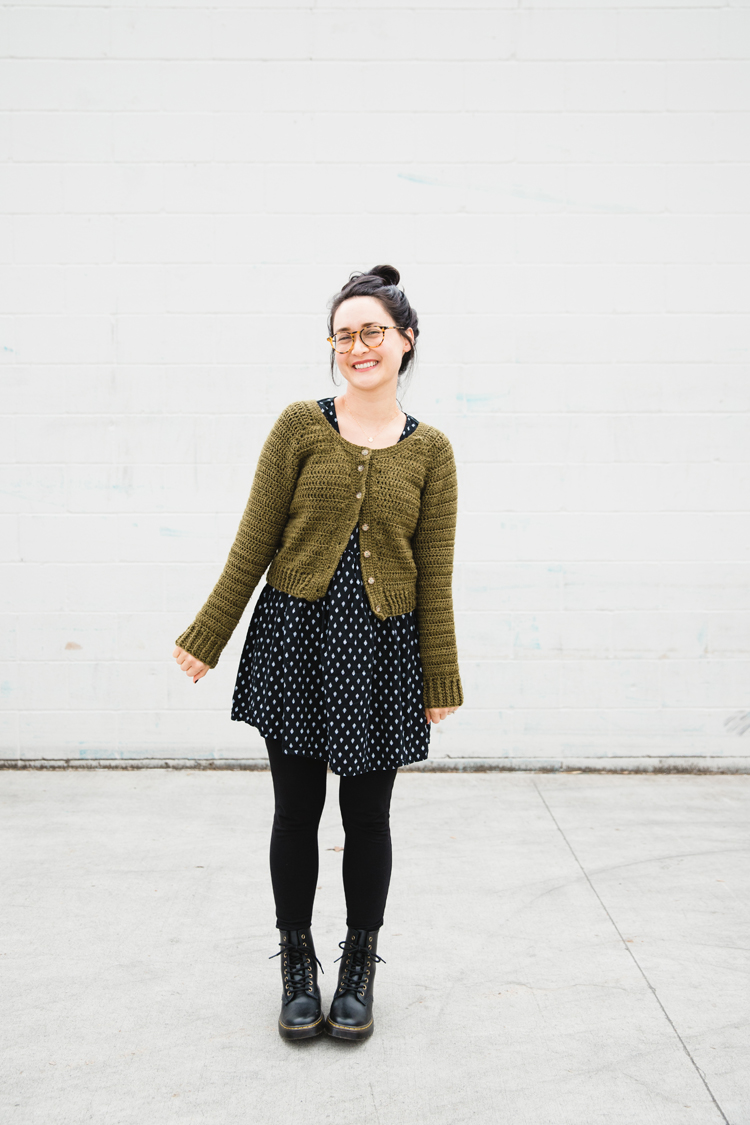
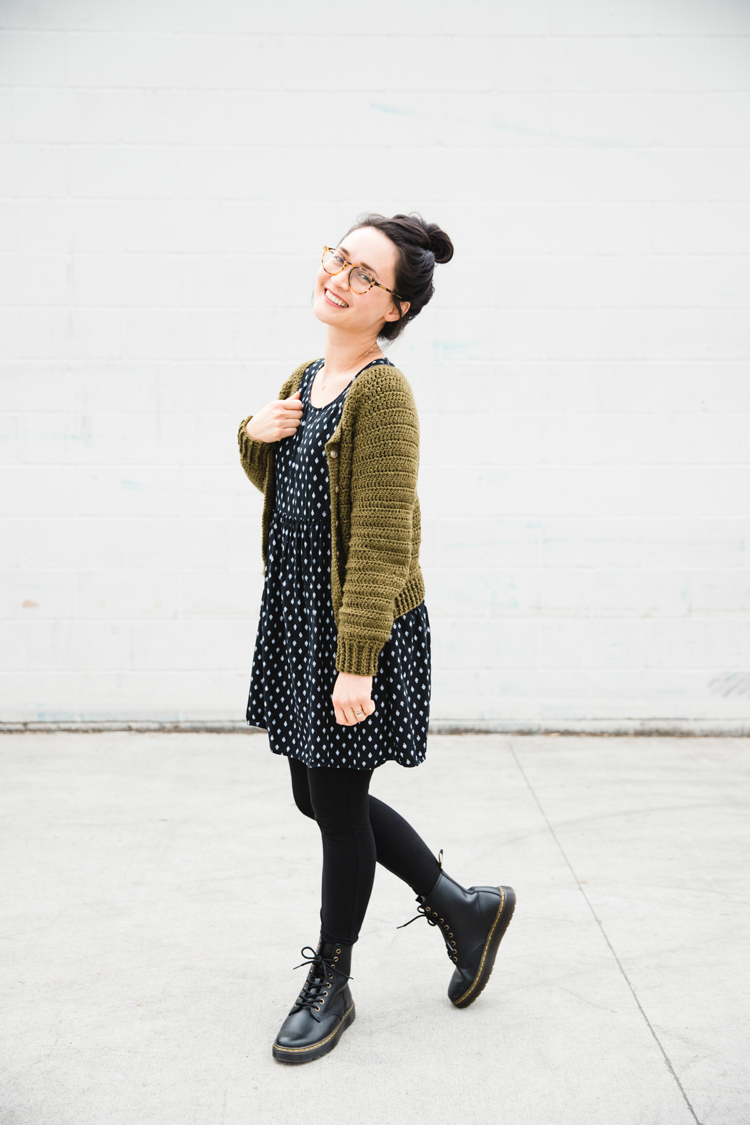
Because the garment has some stretch, the sizing can be a little flexible. For reference, I am wearing size XS in the photos. My ready to wear size is usually S but when I sew, I often sew size XS.
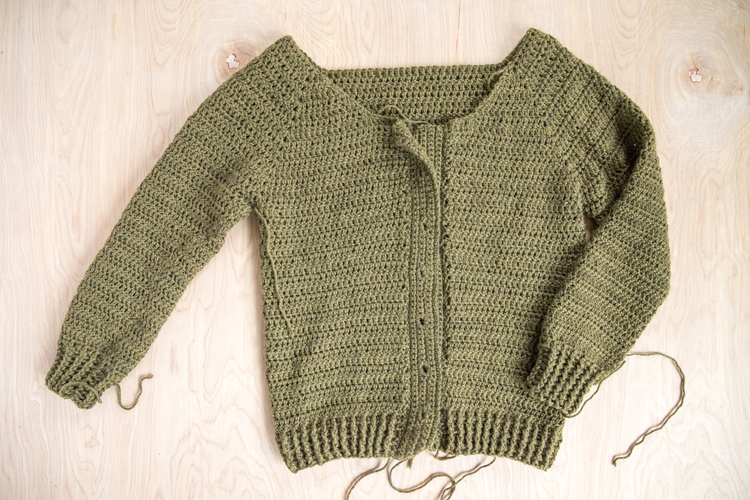
LENGTHENING AND SHORTENING
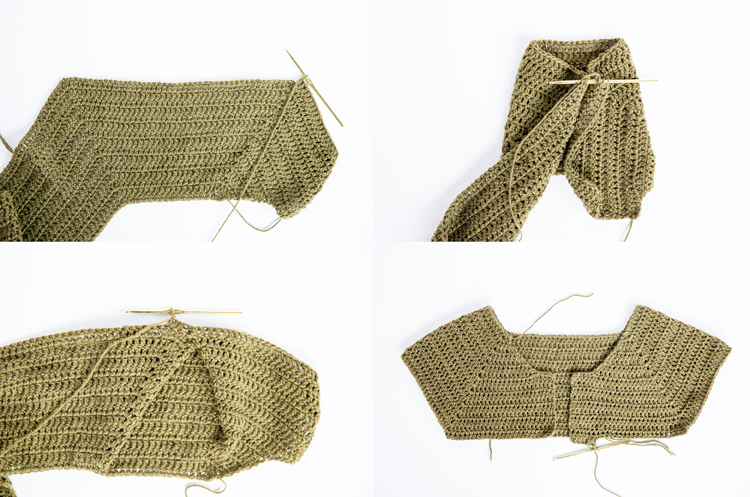
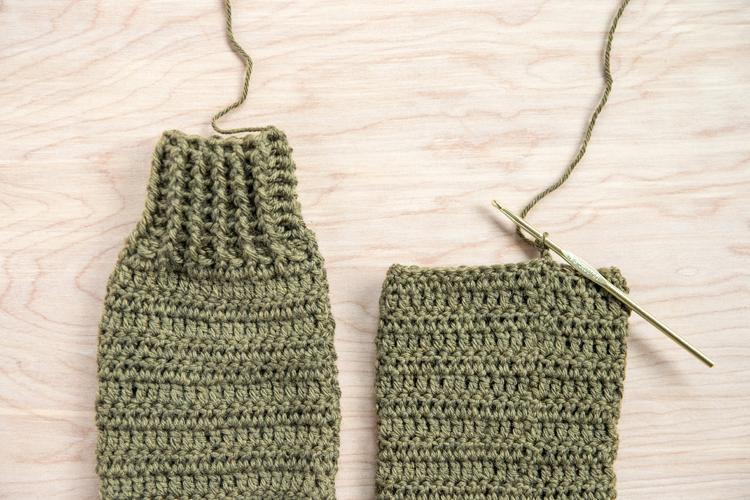
I originally made this sweater longer, and then frogged it so I could make it cropped. You will see tutorial photos with a longer cardigan, but please note that the pattern is written for the cropped version you see me wearing.
This does not really affect the process. In the pattern, I will indicate certain rows that can be repeated or deleted to make the cardigan longer or shorter both in the body and the sleeves.
PATTERN NOTES
Sizes in the pattern will be list as XS (S, M, L).
Final stitch count will be listed at the end of each row as follows: [XS, S, M, L]
Row 8 of the main body of the cardigan can be tricky. There is a short video that illustrates how I extended the row to create the scooped neckline.
RAGLAN CARDIGAN PATTERN
Main Body of the Cardigan Pattern
Note: This cardigan includes two dc in the same stitch with a chain in between at each point where the neckline needs to pivot or curve.
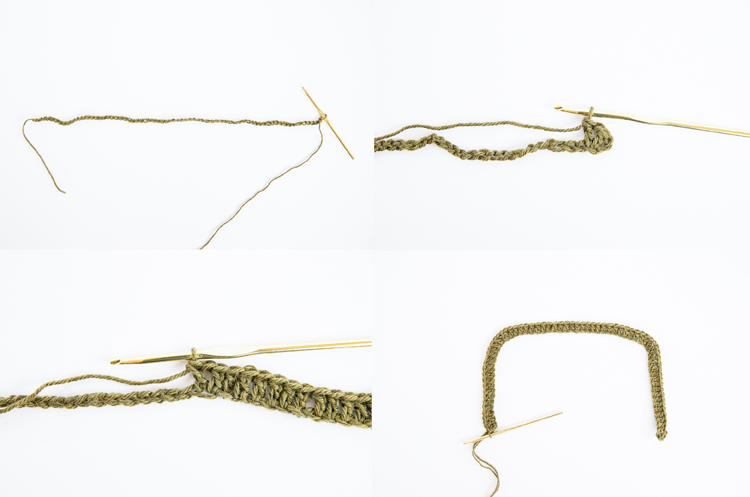
Chain 65 (69, 71, 75)
ROW 1:
- Turn, dc in third chain from hook (2 dc, 2 dc, 3 dc). Beginning chain 2 counts as one stitch, remaining chains do not count toward total stitch 1 count.
- dc, ch, dc in same stitch. Dc in next 15 (15, 16, 16) stitches.
- Dc, ch, dc in same stitch. Dc in next 26 (28, 28, 30) stitches.
- Dc, ch, dc in same stitch. Dc in next 15 (15, 16, 16) stitches.
- Dc, ch, dc in same stitch. 2 dc (3 dc, 3 dc, 4 dc). [68, 72, 74, 78]
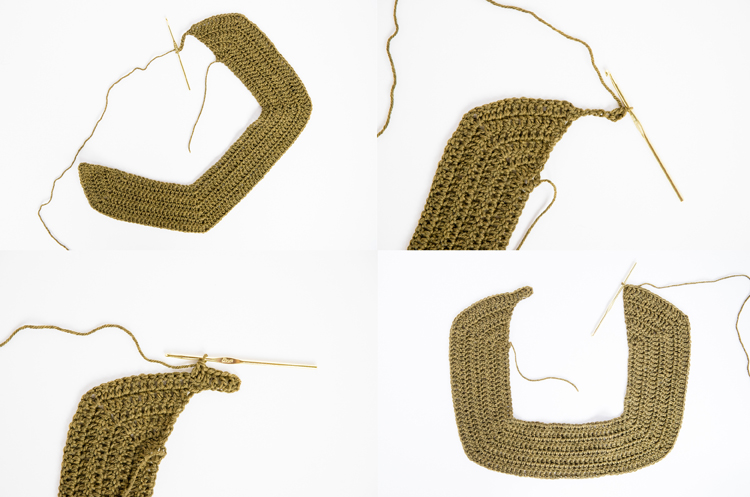
Note: From here to Row 8, you will work two stitches into the same stitch at the beginning and the end of the row, to help the front portions of the cardigan to slope outward.
ROW 2:
- Chain 2, dc in same stitch, 2 dc (3 dc, 3 dc, 4 dc). Only beginning chain two in the row counts as one stitch for the remainder of the pattern.
- Dc, ch, dc in chain space. Dc in next 17 (17, 18, 18) stitches.
- Dc, ch, dc in chain space. Dc in next 28 (30, 32, 32) stitches.
- Dc, ch, dc in chain space. Dc in next 17 (17, 18, 18) stitches.
- Dc, ch, dc in chain space. 2 dc (3 dc, 3 dc, 4 dc), 2 dc in last stitch. [78, 82, 84, 88]
ROW 3:
- Chain 2, dc in same stitch, 4 dc (5 dc, 5 dc, 6 dc).
- Dc, ch, dc in chain space. Dc in next 19 (19, 20, 20) stitches.
- Dc, ch, dc in chain space. Dc in next 30 (32, 32, 34) stitches.
- Dc, ch, dc in chain space. Dc in next 19 (19, 20, 20) stitches.
- Dc, ch, dc in chain space. 4 dc (5 dc, 5 dc, 6 dc), 2 dc in last stitch. [88, 92, 94, 98]

ROW 4:
- Chain 2, dc in same stitch, 6 dc (7 dc, 7 dc, 8 dc).
- Dc, ch, dc in chain space. Dc in next 21 (21, 22, 22) stitches.
- Dc, ch, dc in chain space. Dc in next 32 (34, 34, 36) stitches.
- Dc, ch, dc in chain space. Dc in next 21 (21, 22, 22) stitches.
- Dc, ch, dc in chain space. 6 dc (7 dc, 7 dc, 8 dc), 2 dc in last stitch. [98, 102, 104, 108]
ROW 5:
- Chain 2, dc in same stitch, 8 dc (9 dc, 9 dc, 10 dc).
- Dc, ch, dc in chain space. Dc in next 23 (23, 24, 24) stitches.
- Dc, ch, dc in chain space. Dc in next 34 (36, 36, 38) stitches.
- Dc, ch, dc in chain space. Dc in next 23 (23, 24, 24) stitches.
- Dc, ch, dc in chain space. 8 dc (9 dc, 9 dc, 10 dc), 2 dc in last stitch. [108, 112, 114, 118]
ROW 6:
- Chain 2, dc in same stitch, 10 dc (11 dc, 11 dc, 12 dc).
- Dc, ch, dc in chain space. Dc in next 25 (26, 27, 27) stitches.
- Dc, ch, dc in chain space. Dc in next 36 (38, 38, 40) stitches.
- Dc, ch, dc in chain space. Dc in next 25 (26, 27, 27) stitches.
- Dc, ch, dc in chain space. 10 dc (11 dc, 11 dc, 12 dc), 2 dc in last stitch. [118, 122, 124, 128]
ROW 7:
- Chain 2, dc in same stitch, 12 dc (13 dc, 13 dc, 14 dc).
- Dc, ch, dc in chain space. Dc in next 27 (27, 28, 28) stitches.
- Dc, ch, dc in chain space. Dc in next 38 ( 40, 40, 42) stitches.
- Dc, ch, dc in chain space. Dc in next 27 (27, 28, 28) stitches.
- Dc, ch, dc in chain space. 12 dc (13 dc, 13 dc, 14 dc), 2 dc in last stitch. [128, 132, 134, 138]
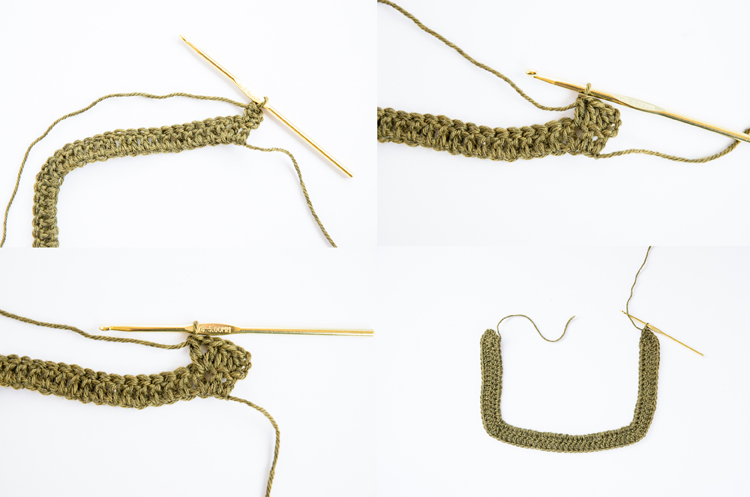
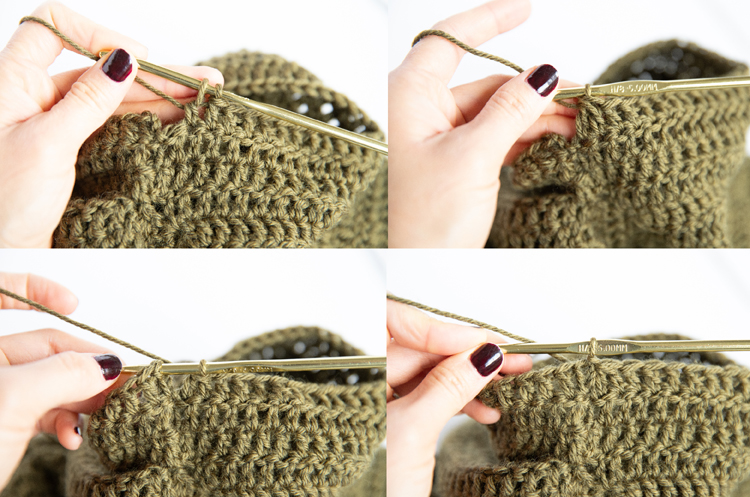
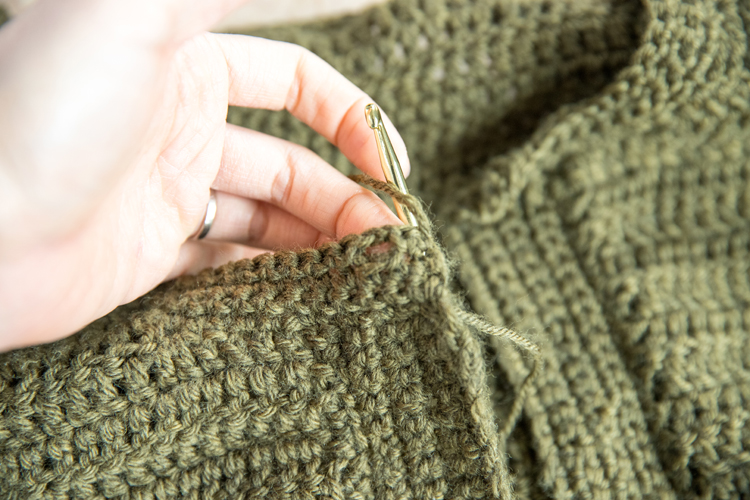
Now it’s time to extend the neckline.
See below if you need a video visual of how the end of this row is worked. You essentially hook into the last stitch, pull through one loop to create the “chain,” then complete a dc stitch. Repeat this a total of four times to match the chains and dc stitches you created at the beginning of the row.
ROW 8:
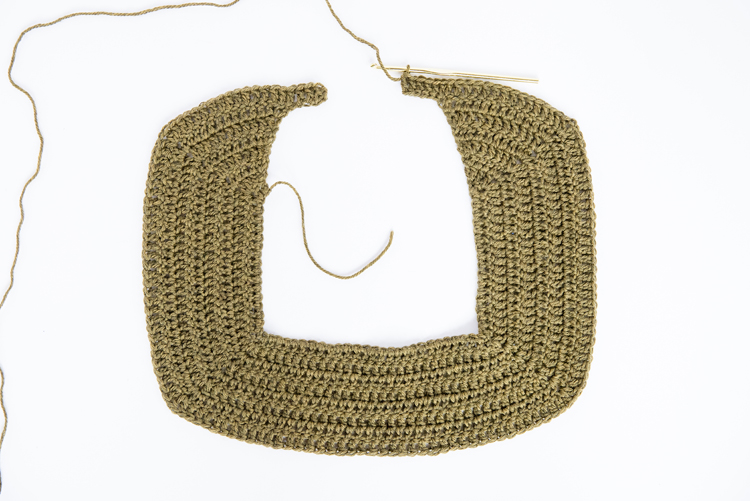
- Chain 6, skip 2 ch, dc in third chain from hook, 18 dc (19 dc, 19 dc, 20 dc). Remember, only beginning chain two counts as one stitch.
- Dc, ch, dc in chain space. Dc in next 29 (29, 30, 30) stitches.
- Dc, ch, dc in chain space. Dc in next 40 (42, 42, 44) stitches.
- Dc, ch, dc in chain space. Dc in next 29 (29, 30, 30) stitches.
- Dc, ch, dc in chain space. 14 dc (15 dc, 15 dc, 16 dc), work 2 dc in last stitch.
- Now work four foundation dc as follows: *Yarn over, insert hook into the bottom/side of the previous stitch. Yarn over and pull through one loop. Yarn over and pull through two loops. Yarn over and pull through remaining two loops like a dc.* Repeat from * to * three more times.
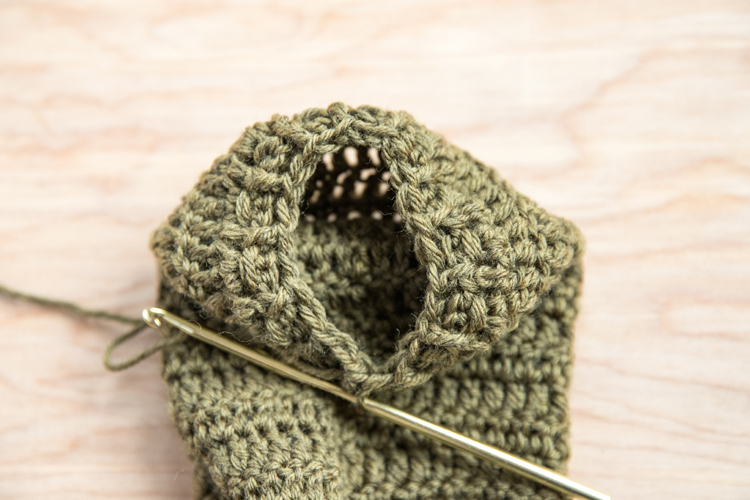
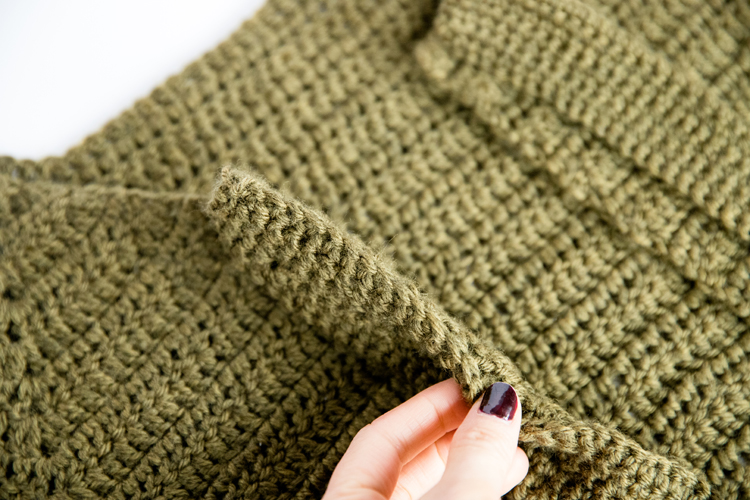
[146, 150, 152, 156]

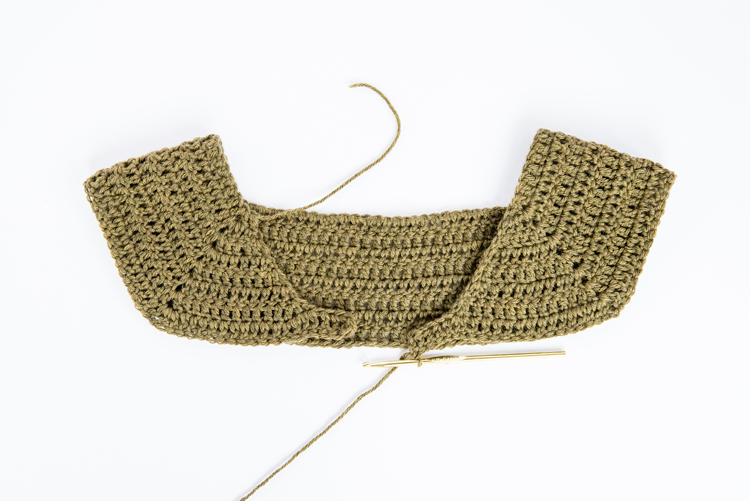
This is what it looks like folded. You can see the scooped neckline and how the cardigan is starting to take shape.
ROW 9:
- Chain 2, dc in next 20 (21, 21, 22) stitches.
- Dc, ch, dc in chain space. Dc in next 31 (31, 32, 32) stitches.
- Dc, ch, dc in chain space. Dc in next 42 (44, 44, 46) stitches.
- Dc, ch, dc in chain space. Dc in next 31 (31, 32, 32) stitches.
- Dc, ch, dc in chain space. Dc in remaining 21 (22, 22, 23) stitches. [154, 158, 160, 164]
ROW 10:
- Chain 2, dc in next 21 (22, 22, 23) stitches.
- Dc, ch, dc in chain space. Dc in next 33 (33, 34, 34) stitches.
- Dc, ch, dc in chain space. Dc in next 44 (46, 46, 48) stitches.
- Dc, ch, dc in chain space. Dc in next 33 (33, 34, 34) stitches.
- Dc, ch, dc in chain space Dc in remaining 22 (23, 23, 24) stitches. [162, 166, 168, 172]
ROW 11:
- Chain 2, dc in next 22 (23, 23, 24) stitches.
- Dc, ch, dc in chain space. Dc in next 35 (35, 36, 36) stitches.
- Dc, ch, dc in chain space. Dc in next 46 (48, 48, 50) stitches.
- Dc, ch, dc in chain space. Dc in next 35 (35, 36, 36) stitches.
- Dc, ch, dc in chain space Dc in remaining 23 (24, 24, 25) stitches. [170, 174, 176, 180]
ROW 12:
- Chain 2, dc in next 23 (24, 24, 25) stitches.
- Dc, ch, dc in chain space. Dc in next 37 (37, 38, 38) stitches.
- Dc, ch, dc in chain space. Dc in next 48 (50, 50, 52) stitches.
- Dc, ch, dc in chain space. Dc in next 37 (37, 38, 38) stitches.
- Dc, ch, dc in chain space Dc in remaining 24 (25, 25, 26) stitches. [178, 182, 184, 188]
ROW 13:
- Chain 2, dc in next 24 (25, 25, 26) stitches.
- Dc, ch, dc in chain space. Dc in next 39 (39, 40, 40) stitches.
- Dc, ch, dc in chain space. Dc in next 50 (52, 52, 54) stitches.
- Dc, ch, dc in chain space. Dc in next 39 (39, 40, 40) stitches.
- Dc, ch, dc in chain space Dc in remaining 25, 26, 26, 27) stitches. [186, 190, 192, 196]
ROW 14:
- Chain 2, dc in next 25 (26, 26, 27) stitches.
- Dc, ch, dc in chain space. Dc in next 41 (41, 42, 42) stitches.
- Dc, ch, dc in chain space. Dc in next 52 (54, 54, 56) stitches.
- Dc, ch, dc in chain space. Dc in next 41 (41, 42, 42) stitches.
- Dc, ch, dc in chain space Dc in remaining 26 (27, 27, 28) stitches. [194,198, 200, 204]
ROW 15:
- Chain 2, dc in next 26 (27, 27, 28) stitches.
- Dc, ch, dc in chain space. Dc in next 43 (43, 44, 44) stitches.
- Dc, ch, dc in chain space. Dc in next 54 (56, 56, 58) stitches.
- Dc, ch, dc in chain space. Dc in next 43 (43, 44, 44) stitches.
- Dc, ch, dc in chain space Dc in remaining 27 (28, 28, 29) stitches. [202, 206, 208, 212]
Now it’s time to connect the sides to create the sleeve and start the body of the cardigan. For sizes S, M, and L you will need to work a few more rows before connecting the sides. See the size specific patterns for this portion.
XS only
ROW 16:
Chain 2, dc in next 27. Yarn over, insert hook in next stitch, skip 45 stitches from chain space to chain space, and insert hook into the next stitch to connect the body of cardigan and create a sleeve opening. Complete a dc through both stitches. Dc in next 54. Yarn over, insert hook in next stitch, skip 45 stitches from chain space to chain space, and insert hook into the next stitch to create the sleeve on the other side. Complete a dc through both stitches. Dc in remaining 28 stitches. [112]
ROW 17:
Chain 2, dc across row. [112]
ROWS 18-32: Repeat ROW 17. **Add or subtract rows to get desired length.**
HEM BAND
ROW 33: Chain 2, work alternating fpdc and bpdc stitches for the rest of the row. [112]
ROWS 34-38: Repeat ROW 33, following the fpdc and bpdc pattern from the previous row.
Tie off end.
S only
ROW 16:
- Chain 2, dc in next 28 stitches.
- Dc, ch, dc in chain space. Dc in next 45 stitches.
- Dc, ch, dc in chain space. Dc in next 58 stitches.
- Dc, ch, dc in chain space. Dc in next 45 stitches.
- Dc, ch, dc in chain space Dc in remaining 29 stitches. [214]
ROW 17:
Chain 2, dc in next 29. Yarn over, insert hook in next stitch, skip 47 stitches from chain space to chain space, and insert hook into the next stitch to connect the body of cardigan and create a sleeve opening (this is essentially a dc2tog). Complete a dc through both stitches. Dc in next 58. Yarn over, insert hook in next stitch, skip 47 stitches from chain space to chain space, and insert hook into the next stitch to create the sleeve on the other side. Complete a dc through both stitches (aka dc2tog). Dc in remaining 30 stitches. [120]
ROW 18:
Chain 2, dc across row. [120]
ROWS 19-33: Repeat ROW 18. **Add or subtract rows to get desired length.**
HEM BAND
ROW 34: Chain 2, work alternating fpdc and bpdc stitches for the rest of the row. [120]
ROWS 35-39: Repeat ROW 34, following the fpdc and bpdc pattern from the previous row.
Tie off end.
M ONLY
ROW 16:
- Chain 2, dc in next 28 stitches.
- Dc, ch, dc in chain space. Dc in next 46 stitches.
- Dc, ch, dc in chain space. Dc in next 58 stitches.
- Dc, ch, dc in chain space. Dc in next 46 stitches.
- Dc, ch, dc in chain space Dc in remaining 29 stitches. [216]
ROW 17:
- Chain 2, dc in next 29 stitches.
- Dc, ch, dc in chain space. Dc in next 48 stitches.
- Dc, ch, dc in chain space. Dc in next 60 stitches.
- Dc, ch, dc in chain space. Dc in next 48 stitches.
- Dc, ch, dc in chain space Dc in remaining 30 stitches. [224]
ROW 18:
Chain 2, dc in next 30. Yarn over, insert hook in next stitch, skip 50 stitches from chain space to chain space, and insert hook into the next stitch to connect the body of cardigan and create a sleeve opening (this is essentially a dc2tog). Complete a dc through both stitches. Dc in next 60. Yarn over, insert hook in next stitch, skip 50 stitches from chain space to chain space, and insert hook into the next stitch to create the sleeve on the other side. Complete a dc through both stitches (aka dc2tog). Dc in remaining 31 stitches. [124]
ROW 19:
Chain 2, dc across row. [124]
ROWS 20-34: Repeat ROW 19. **Add or subtract rows to get desired length.**
HEM BAND
ROW 35: Chain 2, work alternating fpdc and bpdc stitches for the rest of the row. [124]
ROWS 36-40: Repeat ROW 35, following the fpdc and bpdc pattern from the previous row.
Tie off end.
L ONLY
ROW 16:
- Chain 2, dc in next 29 stitches.
- Dc, ch, dc in chain space. Dc in next 46 stitches.
- Dc, ch, dc in chain space. Dc in next 60 stitches.
- Dc, ch, dc in chain space. Dc in next 46 stitches.
- Dc, ch, dc in chain space Dc in remaining 30 stitches. [220]
ROW 17:
- Chain 2, dc in next 30 stitches.
- Dc, ch, dc in chain space. Dc in next 48 stitches.
- Dc, ch, dc in chain space. Dc in next 62 stitches.
- Dc, ch, dc in chain space. Dc in next 48 stitches.
- Dc, ch, dc in chain space Dc in remaining 31 stitches. [228]
ROW 18:
- Chain 2, dc in next 31 stitches.
- Dc, ch, dc in chain space. Dc in next 50 stitches.
- Dc, ch, dc in chain space. Dc in next 64 stitches.
- Dc, ch, dc in chain space. Dc in next 50 stitches.
- Dc, ch, dc in chain space Dc in remaining 32 stitches. [236]
ROW 19:
Chain 2, dc in next 32. Yarn over, insert hook in next stitch, skip 52 stitches from chain space to chain space, and insert hook into the next stitch to connect the body of cardigan and create a sleeve opening (this is essentially a dc2tog). Complete a dc through both stitches. Dc in next 64. Yarn over, insert hook in next stitch, skip 52 stitches from chain space to chain space, and insert hook into the next stitch to create the sleeve on the other side. Complete a dc through both stitches (aka dc2tog). Dc in remaining 33 stitches.
[132]
ROW 20:
Chain 2, dc across row. [132]
ROWS 21-35: Repeat ROW 19. **Add or subtract rows to get desired length.**
HEM BAND
ROW 36: Chain 2, work alternating fpdc and bpdc stitches for the rest of the row. [132]
ROWS 37-41: Repeat ROW 36, following the fpdc and bpdc pattern from the previous row.
Tie off end.
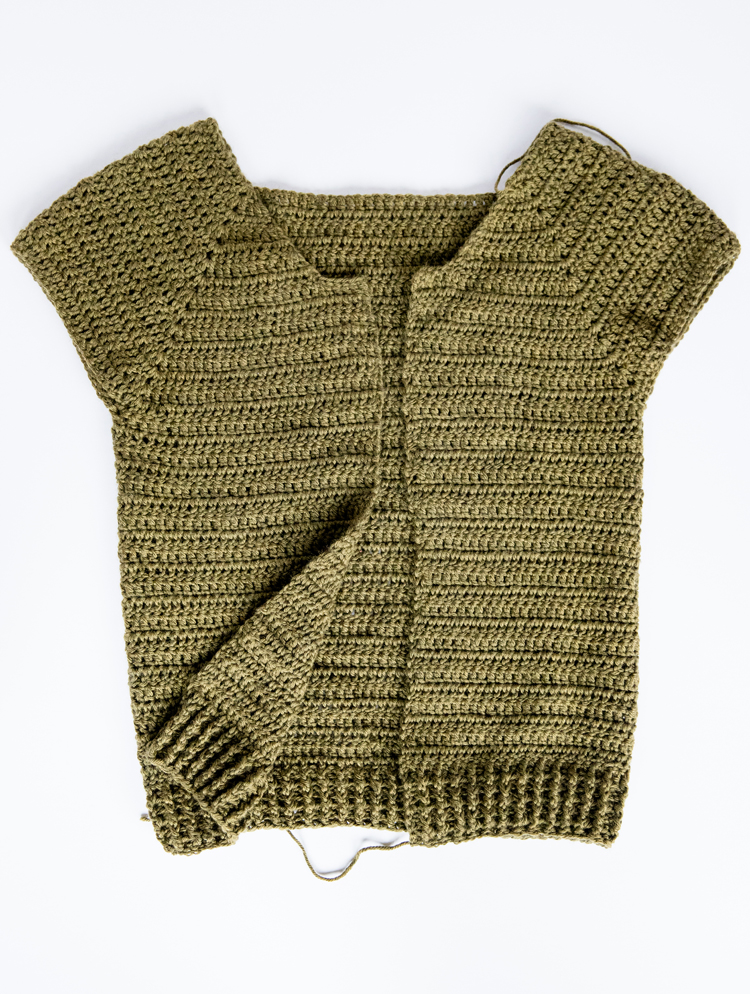
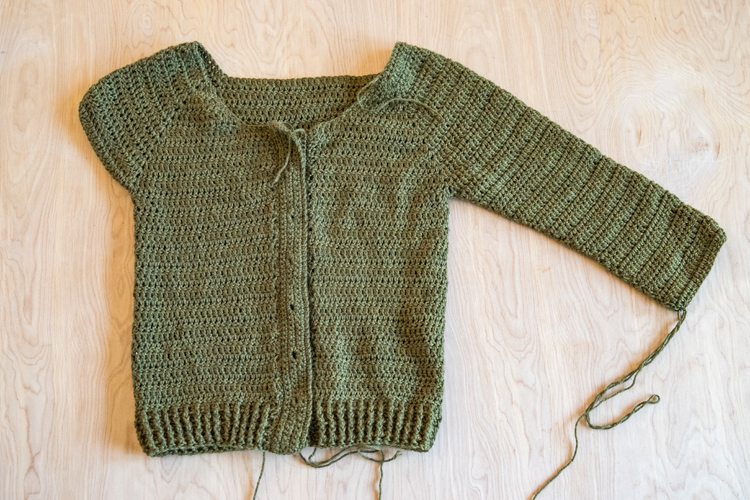
Main body of the cardigan is complete!
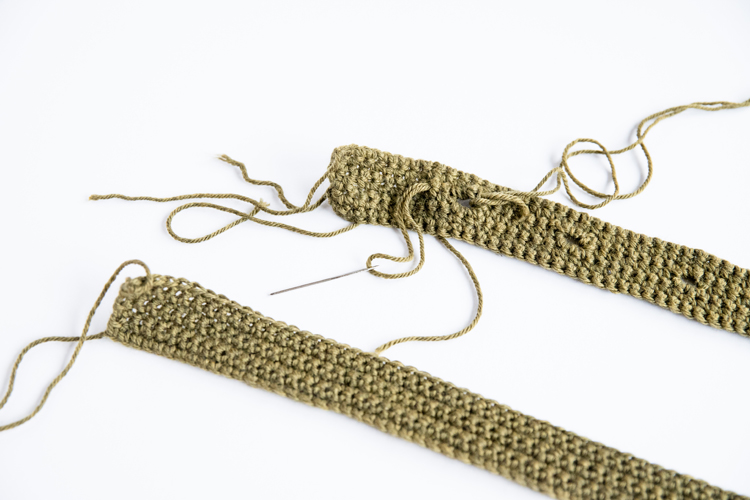
Sleeve Pattern
NOTE: The sleeves will be worked in looped rows. The front and back of double crochet stitches look slightly different. If you want to match the alternating row look of the body of the cardigan, you will want to flip the direction you work the sleeves with each row as well. This is optional. The difference in texture will not be discernible to most.
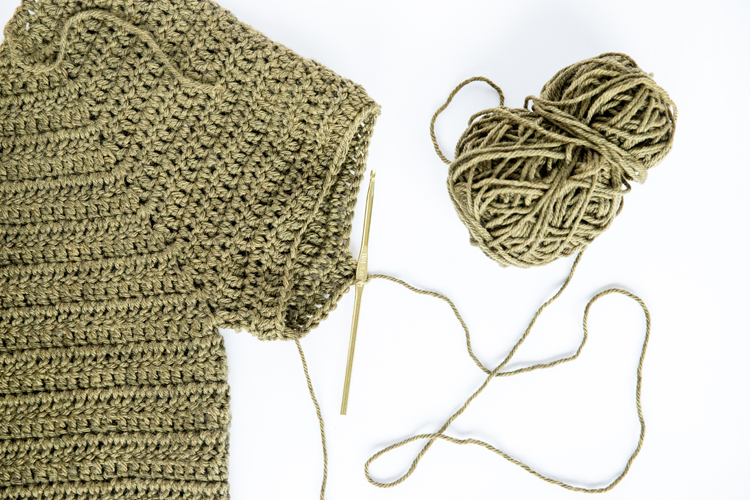
Tie slip knot onto hook, insert hook into the bottom of the sleeve where the sides of the body of the cardigan connect.

To taper the sleeve, you will work a decreasing dc at the end of every other row for the next several rows. Complete each row by slip stitching to the top of the chain two from the beginning of the row.
SLEEVE ROW 1: Chain 2, dc in next stitch which may technically be a chain space. Dc 45 (47, 49, 52) more times around. Slip stitch to the top of the chain 2. [47, 49, 51, 54]
SLEEVE ROW 2: Chain 2, work 46 (48, 50, 53) dc around looped row, slip stitch to the top of the chain 2. [47,49, 51, 54]
SLEEVE ROW 3: Chain 2, work 44 (46, 48, 51) stitches around looped row, work a decreasing dc in the last two stitches, slip stitch to the top of the chain 2. [46, 48, 50, 53]
SLEEVE ROW 4: Chain 2, work 45 (47, 49, 52) dc around looped row, slip stitch to the top of the chain 2. [46, 48, 50, 53]
SLEEVE ROW 5: Chain 2, work 43 (45, 47, 51) stitches around looped row, work a decreasing dc in the last two stitches, slip stitch to the top of the chain 2. [45, 47, 49, 52]
SLEEVE ROW 6: Chain 2, work 44 (46, 48, 51) dc around looped row, slip stitch to the top of the chain 2. [45, 47, 49, 52]
SLEEVE ROW 7: Chain 2, work 42 (44, 46, 49) ( stitches around looped row, work a decreasing dc in the last two stitches, slip stitch to the top of the chain 2. [44, 46, 48, 51]
SLEEVE ROW 8: Chain 2, work 43 (45, 47, 50) dc around looped row, slip stitch to the top of the chain 2. [44, 46, 48, 51]
SLEEVE ROW 9: Chain 2, work 41 (43, 45, 48) stitches around looped row, work a decreasing dc in the last two stitches, slip stitch to the top of the chain 2. [43, 45, 47, 50]
SLEEVE ROW 10: Chain 2, work 42 (44, 46, 49) dc around looped row, slip stitch to the top of the chain 2. [43, 45, 47, 50]
SLEEVE ROW 11: Chain 2, work 40 (42, 46, 47) stitches around looped row, work a decreasing dc in the last two stitches, slip stitch to the top of the chain 2. [42, 44, 46, 49]
SLEEVE ROW 12: Chain 2, work 41 (43, 45, 48) dc around looped row, slip stitch to the top of the chain 2. [42, 44, 46, 49]
SLEEVE ROW 13: Chain 2, work 39 (41, 43, 46) stitches around looped row, work a decreasing dc in the last two stitches, slip stitch to the top of the chain 2. [41, 43, 45, 48]
SLEEVE ROW 14: Chain 2, work 40 (42, 44, 47) dc around looped row, slip stitch to the top of the chain 2. [41, 43, 45, 48]
SLEEVE ROW 15: Chain 2, work 38 (40, 42, 45) stitches around looped row, work a decreasing dc in the last two stitches, slip stitch to the top of the chain 2. [40, 42, 44, 47]
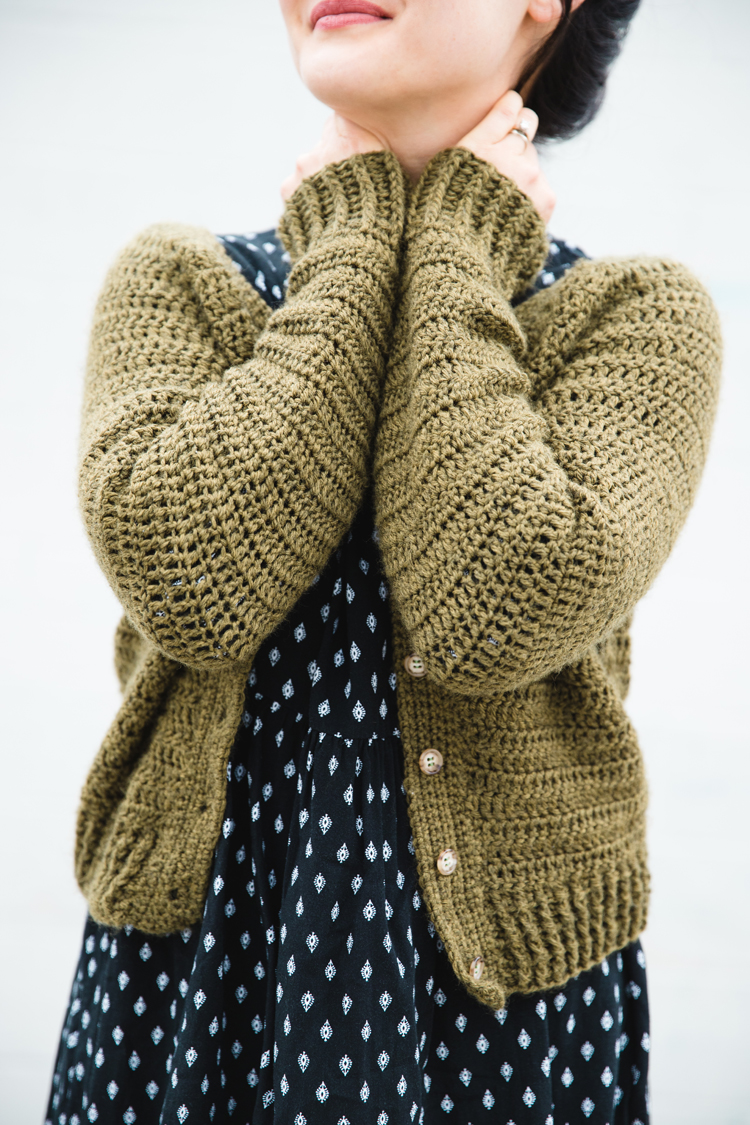
For the smallest size, the rows stop decreasing. For larger sizes a few more rows need to be worked until decreases stop. Follow the size specific patterns for this section. This section also adds the sleeve cuffs.
The number of stitches stays the same, but the fpdc and bpdc stitches cinch the sleeve into smaller, stretchy cuff.
Note: If you have been turning your rows, you do not need to do this for the cuff portion.
XS ONLY
SLEEVE ROWS 16 – 26: Chain 2, work 40 dc around looped row, slip stitch to the top of the chain 2. [40]
**Add or subtract rows to get desired sleeve length.**
SLEEVE CUFF ROWS
SLEEVE ROW 27: Chain 2. Work alternating fpdc and bpdc stitches for the rest of the row. Slip stitch to the top of chain 2. [40]
SLEEVE ROWS 27 – 34: Repeat ROW 27, following the fpdc and bpdc pattern from the previous row.
Tie off the your end.
Repeat for second sleeve.
S ONLY
SLEEVE ROW 16: Chain 2, work 41 dc around looped row, slip stitch to the top of the chain 2. [42]
SLEEVE ROW 17: Chain 2, work 39 stitches around looped row, work a decreasing dc in the last two stitches, slip stitch to the top of the chain 2. [41]
SLEEVE ROWS 18 – 28: Chain 2, work 40 dc around looped row, slip stitch to the top of the chain 2. [41]
**Add or subtract rows to get desired sleeve length.**
SLEEVE CUFF ROWS
SLEEVE ROW 29: Chain 2. Work alternating fpdc and bpdc stitches for the rest of the row. Slip stitch to the top of chain 2. [41]
SLEEVE ROWS 30 – 37: Repeat ROW 29, following the fpdc and bpdc pattern from the previous row.
Tie off the your end.
Repeat for second sleeve.
M ONLY
SLEEVE ROW 16: Chain 2, work 43 dc around looped row, slip stitch to the top of the chain 2. [44]
SLEEVE ROW 17: Chain 2, work 41 stitches around looped row, work a decreasing dc in the last two stitches, slip stitch to the top of the chain 2. [43]
SLEEVE ROWS 18 – 29: Chain 2, work 40 dc around looped row, slip stitch to the top of the chain 2. [43]
**Add or subtract rows to get desired sleeve length.**
SLEEVE CUFF ROWS
SLEEVE ROW 30: Chain 2. Work alternating fpdc and bpdc stitches for the rest of the row. Slip stitch to the top of chain 2. [43]
SLEEVE ROWS 31 – 38: Repeat ROW 30, following the fpdc and bpdc pattern from the previous row.
Tie off the your end.
Repeat for second sleeve.
L ONLY
SLEEVE ROW 16: Chain 2, work 46 dc around looped row, slip stitch to the top of the chain 2. [47]
SLEEVE ROW 17: Chain 2, work 44 stitches around looped row, work a decreasing dc in the last two stitches, slip stitch to the top of the chain 2. [46]
SLEEVE ROWS 18 – 29: Chain 2, work 40 dc around looped row, slip stitch to the top of the chain 2. [43]
**Add or subtract rows to get desired sleeve length.**
SLEEVE CUFF ROWS
SLEEVE ROW 30: Chain 2. Work alternating fpdc and bpdc stitches for the rest of the row. Slip stitch to the top of chain 2. [43]
SLEEVE ROWS 31 – 38: Repeat ROW 30, following the fpdc and bpdc pattern from the previous row.
Tie off the your end.
Repeat for second sleeve.
Button and Buttonhole Plackets
Note: You will need to adjust sizing if you shorten or lengthen the body of your cardigan.
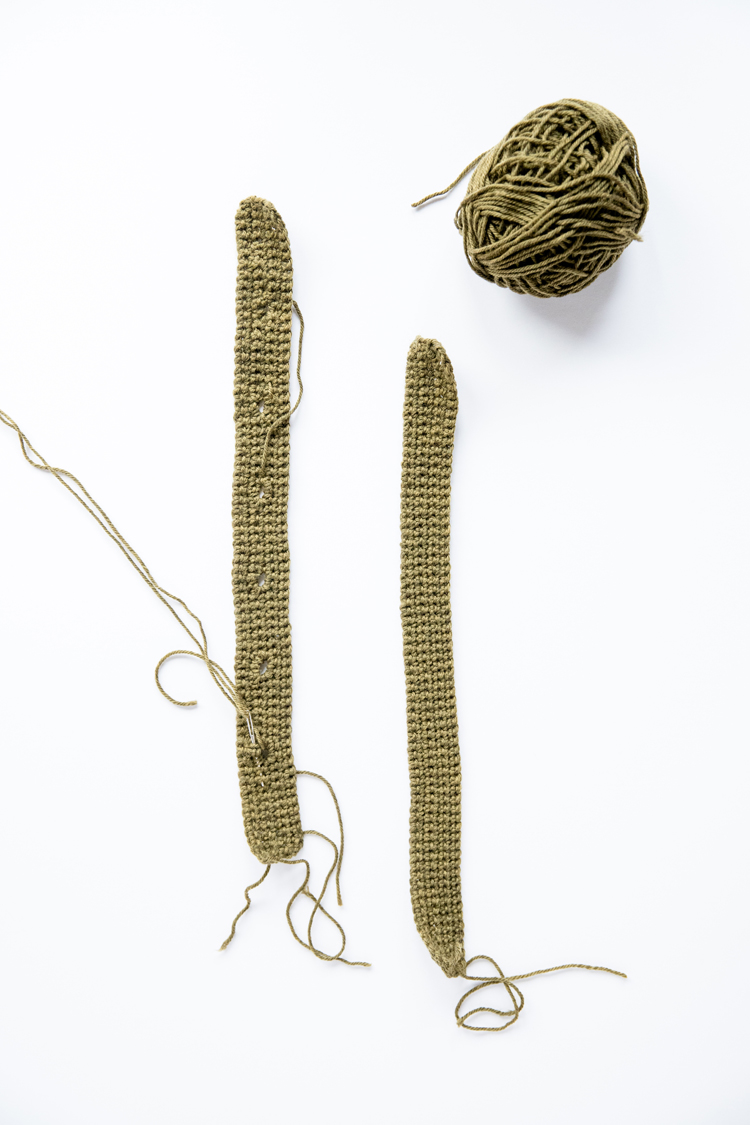
Buttonhole Placket
Chain 55 (57, 59, 61)
ROW 1: Work sc in second chain from the hook. Work 53 (55, 57, 59) more sc. Note: The skipped chain counts as one stitch. [55, 57, 59, 61]
ROW 2: Chain 1, sc 54 (56, 58, 60) times. [55, 57, 59, 61]
ROW 3: Repeat ROW 2.
XS (S)
ROW 4: Chain 1, sc 3 (4) times, chain and skip a stitch. Sc in next 8 stitches, chain and skip a stitch. Sc in next 8 stitches, chain and skip a stitch. Sc in next 8 stitches, chain and skip a stitch. Sc in next 8 stitches, chain and skip a stitch. Sc in next 8 stitches, chain and skip a stitch. Sc in remaining 5 (6) stitches. [55, 57 including chains]
M (L)
ROW 4: Chain 1, sc 3 (4) times, chain and skip a stitch. Sc in next 9 stitches, chain and skip a stitch. Sc in next 9 stitches, chain and skip a stitch. Sc in next 9 stitches, chain and skip a stitch. Sc in next 9 stitches, chain and skip a stitch. Sc in next 9 stitches, chain and skip a stitch. Sc in remaining 4 (5) stitches. [59, 61 including chains]
ALL SIZES
ROW 5: Chain 1, sc 54 (56, 58, 60) times. [55, 57, 59, 61]
ROWS 6-7: Repeat ROW 5.
Tie off end.
Sew around the opening of each chain space in the buttonhole placket. This will emphasize and reinforce the buttonhole openings. You can multipurpose the tails for this as you weave them in as well.
Button Placket
Chain 55.
ROW 1: Work sc in second chain from the hook. Work 53 (55, 57, 59) more sc. Note: The skipped chain counts as one stitch. [55, 57, 59, 61]
ROW 2: Chain 1, sc 54 (56, 58, 60) times. [55, 57, 59, 61]
ROWS 3- 7: Repeat ROW 2.
Tie off end.

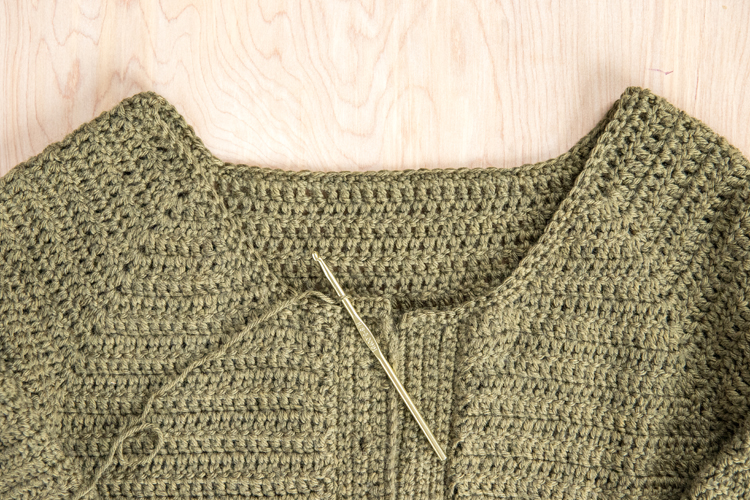
ATTACHING BUTTON PLACKETS
**Complete these steps before completing the neckband pattern.**
- Weave in all ends.
- Attach both button plackets to the front opening of the cardigan. It doesn’t really matter which placket should go to which side, but traditionally the buttonhole placket should go on the right (from the wearer’s perspective). You can seam the plackets to the main body of the cardigan with with a yarn needle and slip stitches or use a hook and slip stitches if desired.
Neckband Pattern
Tie slip knot onto hook, insert hook into the neckline of the cardigan, starting at the corner of the placket on the right side (oriented from the wearer’s perspective…this matters for the button hole we will be creating).
ROW 1: Chain 2, sc around the neckline 101 (105, 107, 111) times. [102, 106, 108, 112]
ROW 2: Chain 1, work 19 (20, 20, 21) sc. Work a decreasing sc. (a decreasing sc will now be work at every chain space/raglan sleeve seam). 15 (15, 16, 16) sc ,decreasing sc, 26 (28, 28, 30) sc, decreasing sc, 15 (15, 16, 16) sc, decreasing dc, 19 (20, 20, 21) sc. [98, 102, 104, 110] beginning chain 1 will not count in this row and in the remaining neckband pattern rows].
ROW 3: Chain 1, 19 (20, 20, 21) sc, decreasing sc, 14 (14, 15, 15) sc, decreasing sc, 25 (27, 27, 29) sc, decreasing sc, 14 (14, 15, 15) sc, decreasing sc, 18 (19, 19, 20) sc. [94, 98, 100, 106]
**Row 4 will create a buttonhole at the end of the row.**
ROW 4: Chain 1, 18 (19, 19, 20) sc, decreasing sc, 13 (13, 14, 14) sc, decreasing sc, 24 (26, 26, 28) sc, decreasing sc, 13 (13, 14, 14) sc, decreasing sc, 15 (16, 16, 17) sc, 1 tight chain and skip one stitch, 2 sc. [90, 94, 96, 102]
ROW 5: Chain 1, 18 (19, 19, 20) sc, decreasing sc, 12 (12, 13, 13) sc, decreasing sc, 23 (25, 25, 27) sc, decreasing sc, 2 (12, 13, 13) sc, decreasing sc, 17 (18, 18, 19) sc. [86, 90, 92, 98]
ROW 6: Chain 1, 17 (18, 18, 19) sc, decreasing sc, 11 (11, 12, 12) sc, decreasing sc, 22 (24, 24, 26) sc, decreasing sc, 11 (11, 12, 12) sc, decreasing sc, 17 (18, 18, 19) sc. [82, 86, 88, 94]
Sew around the opening of the buttonhole you created in Row 4.
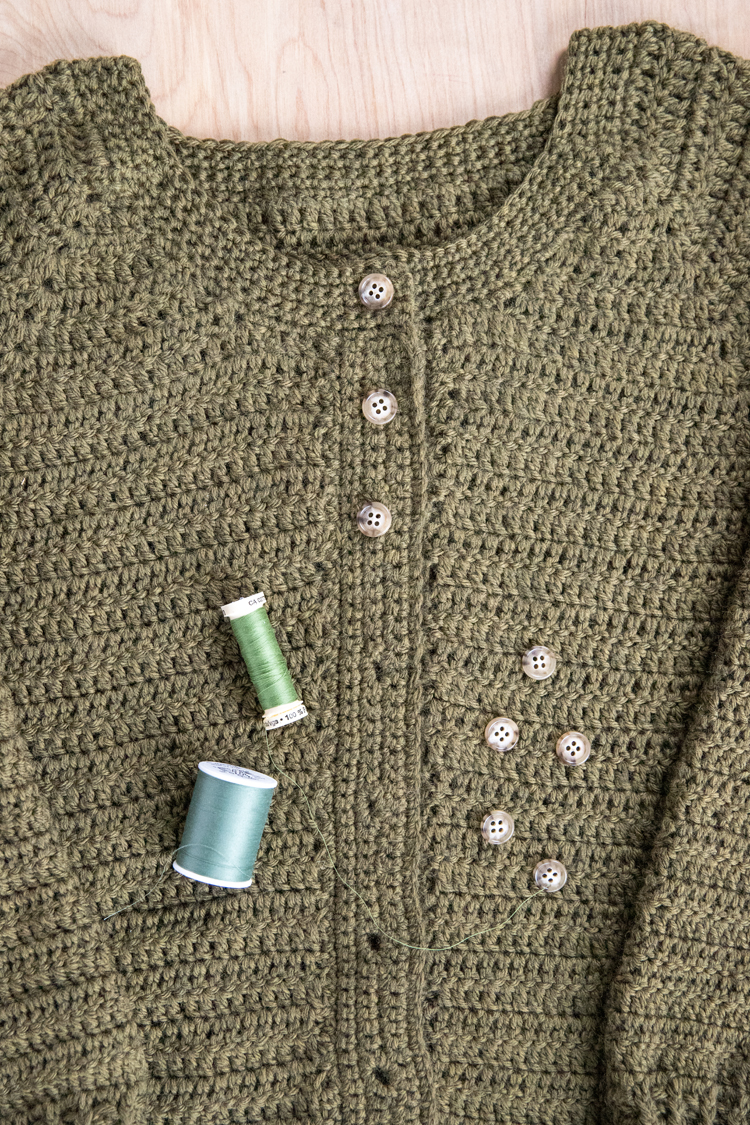
Buttons & Finishing
- Weave in all yarn tails.
- Align buttonhole placket over button placket and mark button placement.
- Sew buttons in place.
Throw a cardi party! You’re done!
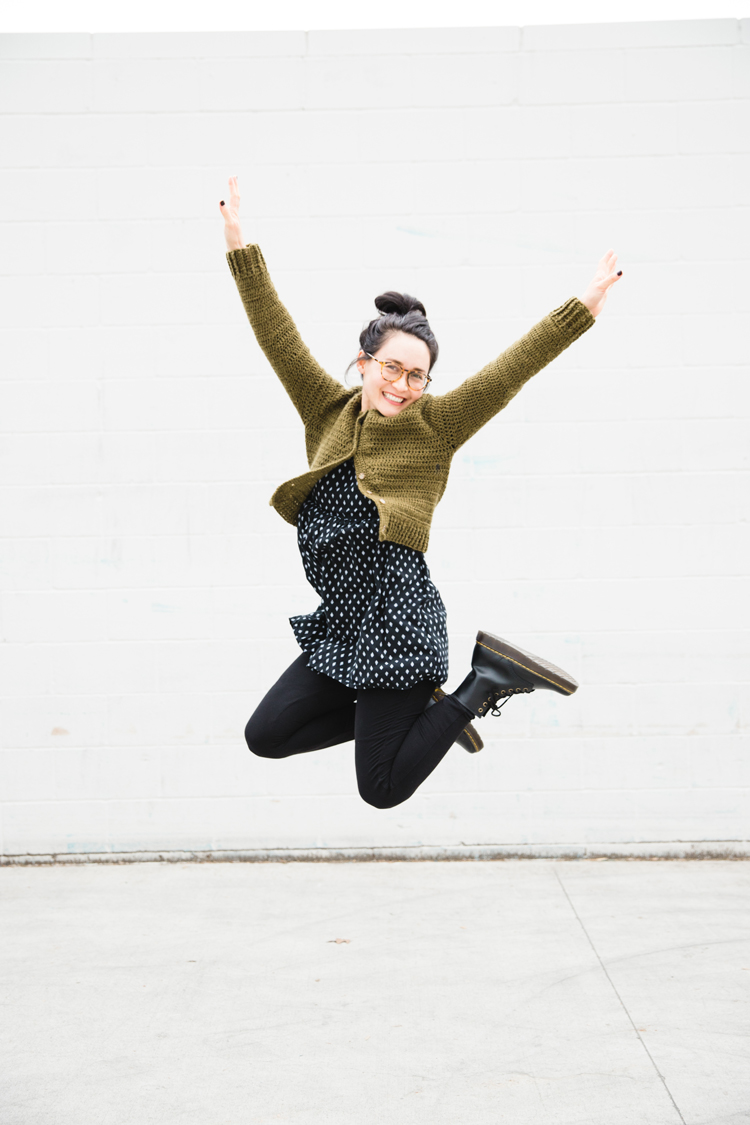
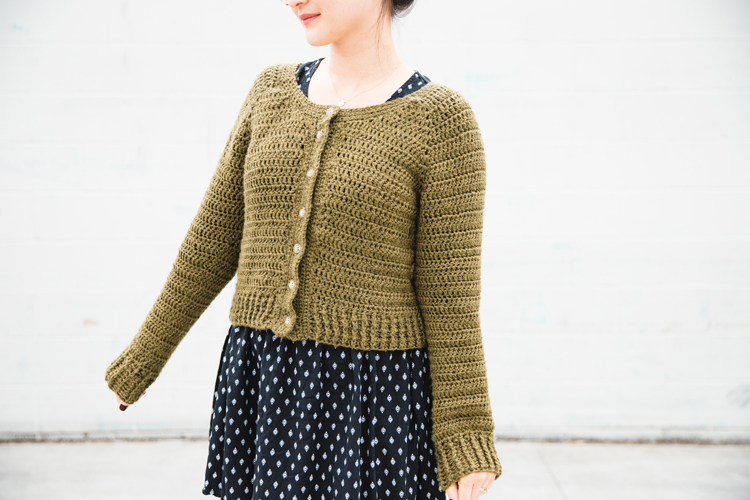
If you’re wondering if I detached the button plackets so I could make the cardigan shorter…yes, I’m a glutton for punishment. But I am so much happier with this length!
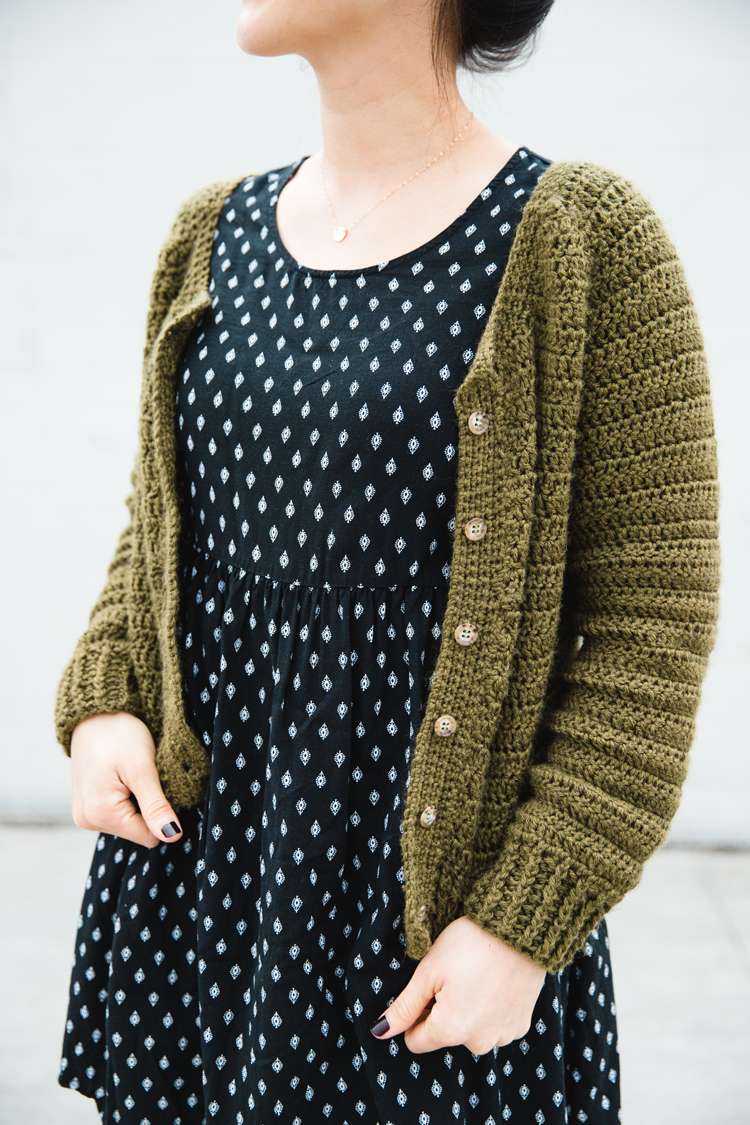
It’s a closer fitting cardigan, I think the cropped length suits it.
If you have any feedback about this pattern, please drop it in the comments. I’ll try to make continual updates to the pattern as I hear from you.
Thank you!
Why did you shorten it?
I tried styling it with the longer length and it didn’t suit me. I am pear shaped so I’m a size xs on top and more like a s or m on the bottom. This cardigan has very little ease, which made it tight at the hips. Even though I usually wear the cardigan half buttoned or open, I wanted the design to be suitable for wearing buttoned all the way up as well.
Wow, Delia! I’m so impressed with this cardigan and with how you’ve turned it into a pattern for others, too!
Thank you Anna!
Wow, Delia! I’m so impressed with this cardigan and with how you’ve turned it into a pattern for others, too!
So much praises doe you! I love this cardigan! It’s a good readable Pattern, works awesomw with the yarm I have chooswn in pink! This was what I was looking For m! Thanx a lot
I’m just getting started and I’ve already torn out Row 1 and restarted 3 times… I’m so confused. Could you please clarify for me – (2 dc, 2 dc, 3 dc)? Is this 2dc in one st, 2dc in the next, & 3dc in the next? Thanks in advance!
OK, nevermind. I got it figured out finally. (duh) But my count is off =(
Wait! I wanted to see the answer for that because I’m totally confused by (2dc, 2dc, 3dc)! Newbie
It indicates what to do for which size you are crocheting. So the first spot would be for size small, medium, and large. I hope that helps.
Is there any way to make this downloadable? I love cardigans however, I’m quite new to making wearables & I’m goddess size(4×)as well as prefer a slouchy style. I’m also the mother of 3 grown daughters who are a wide range of sizes, including little person. There will be many alterations as they will inevitably request at least one! Thank you!
Good question. Right now I am not offering it in a downloadable version, but please feel free to copy and paste it into a word document for your own personal use. If you are on instagram, I would love to see your creations! I’m @deliacreates there.
Hi!
I just completed this cardigan in under a week. I used wool/polyester blend yarn and a 5,5 mm hook and it fits me great! Than you so much for this pattern.
It makes me so happy to hear that you enjoyed the pattern. Thank you for the feedback as well! 🙂
I don’t complete understand the end of row 7 and the start of row 8. It give’s not a smooth row but more like a stair form. What am i ding wrong? Do you have a tutorial of this part?
Renate,
I am SO terribly sorry that I am just now seeing this comment. It wrongly got lumped in with spam comments. As for the stair step look. Yes. It will look like a stair step until you smooth it out when you add the neckline. I hope I understood your question. If you want to reach me more immediately with further questions, please direct message me in instagram (@deliacreates) or email me: [email protected]
Delia
This is such a beautiful cardigan. Do you happen to have any suggestions on how to make it more slouchy? I wouldnt mind doing it panel style, even. I love the texture of the stitches, but as a newer crocheter, Im having a hard time identifying the stitches used. I’d appreciate any help! I am like an XL
Thanks! Because it’s worked raglan style and top down, I would actually choose another style if you want it slouchier. I have some options here:
https://www.deliacreates.com/linen-stitch-crochet-cardigan-free-pattern-xxs-xxl/
or
https://www.deliacreates.com/easy-rectangle-cardigan-free-crochet-pattern/
Oh and I forgot to answer you about which stitch this cardigan is made with. It’s double crochet. This one is also made with double crochet: https://www.deliacreates.com/easy-rectangle-cardigan-free-crochet-pattern/
I would love to make this with worsted weight yarn. How would I do that? Thank you.
I would create a test swatch to see how it compares to the gauge I listed. Yarn size can affect the size of the finished cardigan. To get your gauge to match, you could try going down a hook size if it’s larger or up a hook size if it’s smaller. It is more likely that worsted weight yarn will create a swatch that is larger.
I hope that helps. If you have more questions, I’m happy to help any way I can. I am much faster to respond via email: [email protected]
I love the pattern. I crocheted the cardigan using, Red Heart Roll with It Melange Show Time. The beginning of the pattern was a bit confusing but the cardigan turned out amazing. Thank you for your design.
I am so glad you enjoyed the pattern! <3 Thank you for your comment.
I dont know, what I am doing wrong.. I chained 71 and in the first row, I always end up with a couple of ‘leftover’ chains at the end. So I added a few more DC in the middlepart to form the right shape..
May I ask which size you’re making? I would be happy to help you troubleshoot via email if needed. I’m [email protected]