


I love pulling out cozy crafts when the weather turns crisp in the Fall.
Today’s project is both a cozy craft…crochet…and something you can cozy up with when you’re done!
I originally created it for Jo-Ann’s Fall Look Book which you can read more about HERE.
It’s a big project but I simplified it so a beginner can do it. There is no crocheting in the round, just basic stitches and some increasing and decreasing, which is just a fancy way to say, sometimes you will be crocheting in the same stitch twice, and sometimes you will be crocheting into two stitches at the same time.

Really simple. There is also some sewing involved, but that’s pretty easy too.
Let’s get started!
MATERIALS
- Muslin fabric – 55″wide, 1 yard for small cushion or for large cushion
- Matching thread
- Sewing machine
- Hand sewing needle
- Scissors
- Airtex foam shreds, 3 bags for small cushion, 5 bags for large cushion
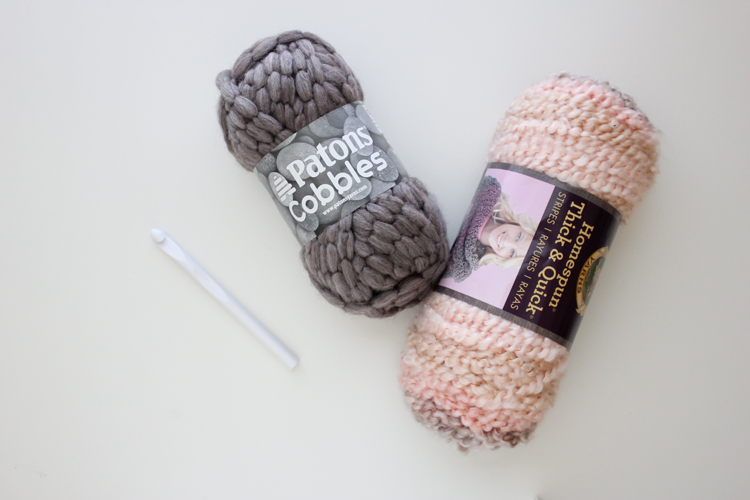
- Super Bulky #6 yarn, 200 yards for small cushion, 300 yards for large cushion*
- Size U.S. P/11.50 mm crochet hook, or size needed to obtain gauge
- Yarn needle
SEW CUSHION FORM
- Cut fabric:
a. For small cushion, cut:
– Two circles with 16″ diameter
– Two rectangles 11″ x 26 1/8″
b. For large cushion, cut:
– Two circles with 20″ diameter
– Two rectangles 13″x 32 3/8″
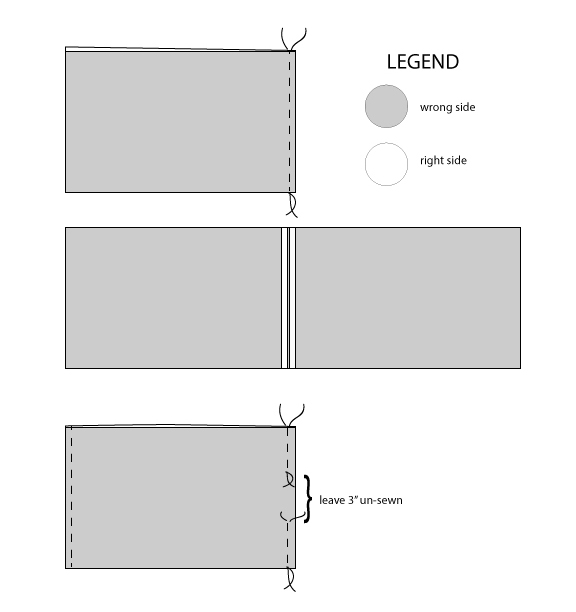
- Sew rectangles together. Sew the short ends of the rectangles together, right sides facing, creating one long rectangle.
- Pin remaining short ends together, right sides facing. Sew together leaving a 3 inch gap un-sewn in the middle of the seam. Remember to back stitch at the beginning and end of the gap.
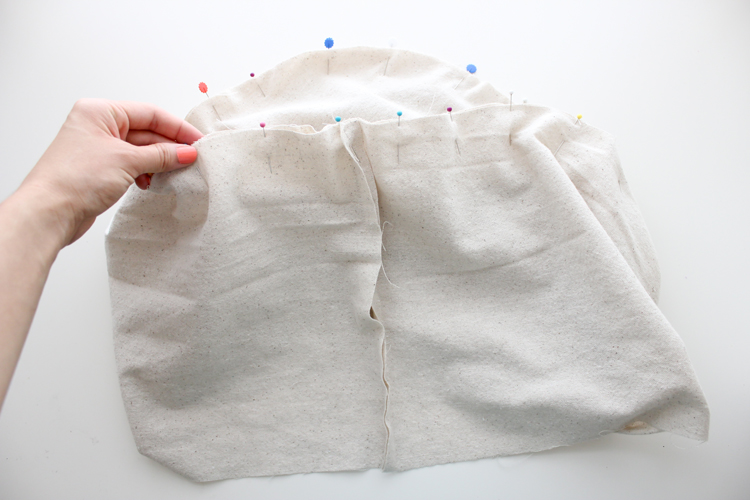
- Pin rectangle loop to the outer edge of one of the circle pieces. Sew together.
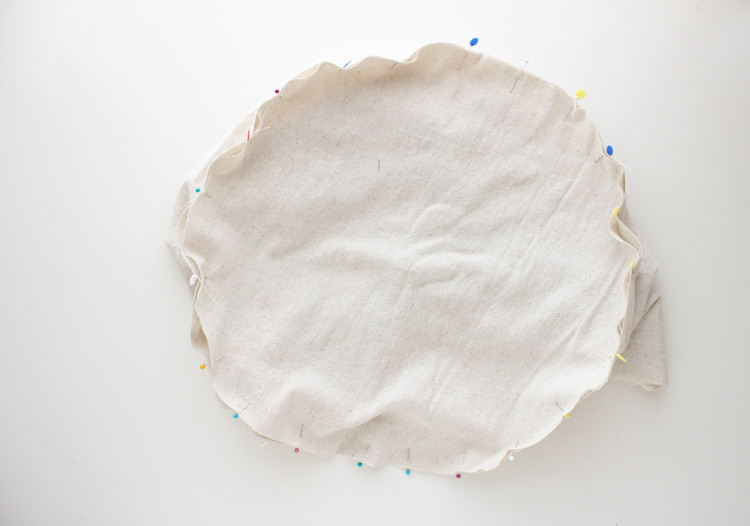
- Repeat with the other circle piece.
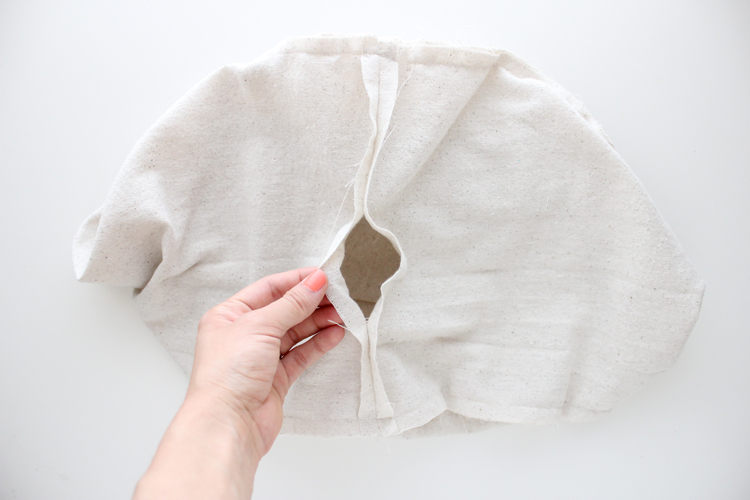
- Turn right side out through un-sewn opening.
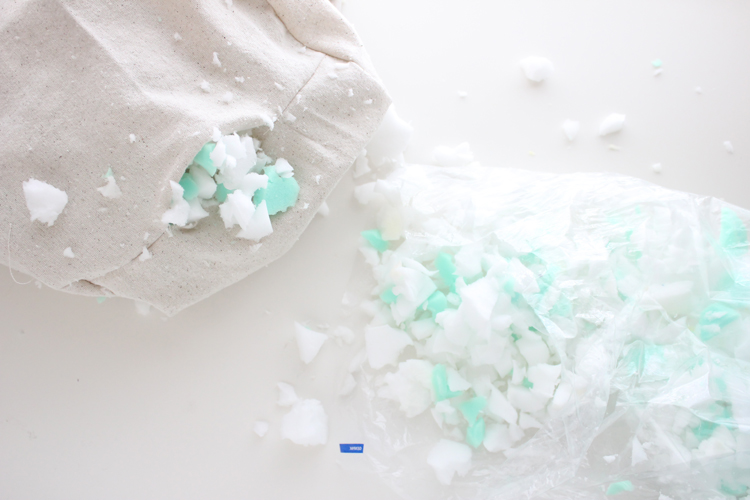
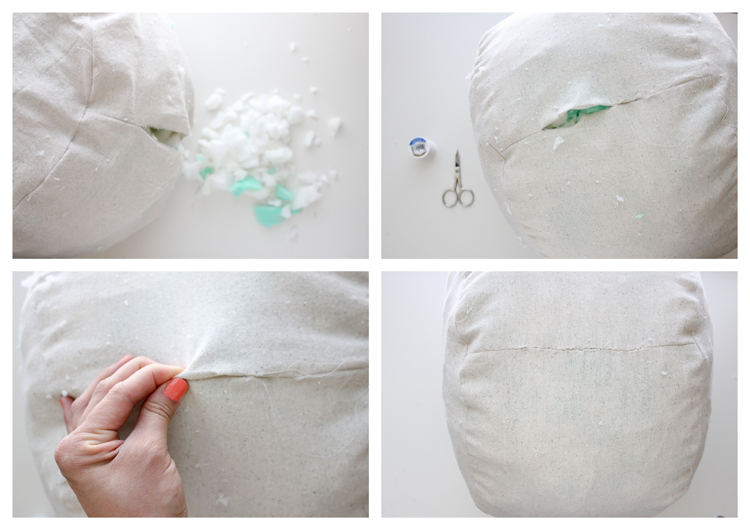
- Fill muslin shell with foam shreds until firm and full.
- Hand sew opening closed with blind ladder stitch. You do do this, by folding the raw edges toward the inside of the cushion, knotting your thread and sewing toward the sewn seam first. When you pull your needle and thread through, sewing toward the sewn seam first, helps conceal the knot. Now turn toward the opening, and sew in between the open folded edges, going back and forth in a ladder like fashion. When you get to the end of the opening, turn around and ladder stitch back to where you started. No need to sew a knot. Sewing back and forth should secure your stitches. Clip your thread and you’re all set to start crocheting!
CROCHET CUSHION PATTERNS
Before we get to the patterns, it will help to be able to visualize how the cover will be crocheted.
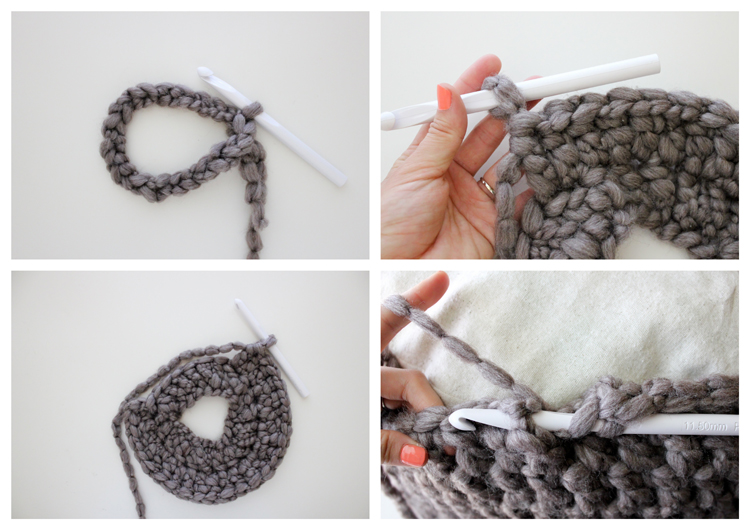
– You will start with a ring of chains.
– When the pattern tells you to crochet two dc in the same stitch, this will help the circle grow and fan out. This is called increasing.
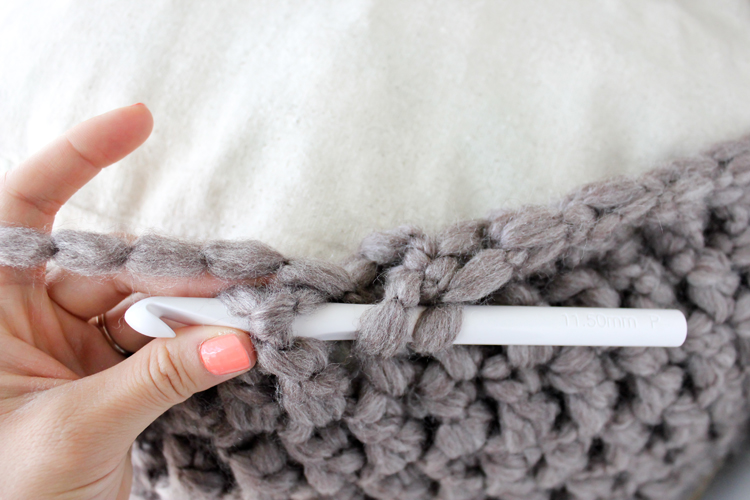
– When you have grown the ring out enough, you will be crocheting the same basic stitches for a while. This is the height of the cushion. When you get close to finishing those, slide the cover over the cushion, then proceed with the pattern. You don’t have to do that. You can squeeze it over the cushion later, but this makes it much, much easier.
– Toward the end of the pattern, you will be asked to crochet two stitches together. Instead of crocheting in one stitch, put your hook through two consecutive stitches, then complete the stitch like normal. That’s it! That’s what you call decreasing.
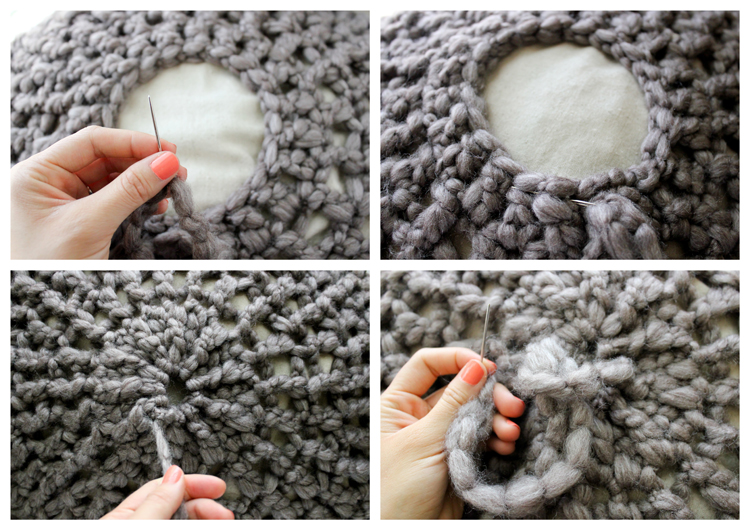
When you are finishing the pattern and it’s time to gather the top and bottom, you will be taking a yarn needle, weaving it through the perimeter of the opening and then pulling it closed. You’ll then need to sew through the center a few times and then weave in the tail. Repeat for both top and bottom openings.
Abbreviations:
Ch, ch = chain
Sl st, sl st = slip stitch
st = stitch
dc = double crochet
Gauge: 4″x 4″square = 5 dc, 3 rows
Note: Ch 2 at beginning of rows counts as dc. Number inside () at the end of each row is the stitch count.
SMALL CUSHION PATTERN
Foundation Row: Ch 20. Sl st into first ch.
Row 1: Ch 2. 19 dc, sl st into top of ch 2. (20)
Row 2: Repeat Row 1. (20)
Row 3: Ch 2. *2 dc in same stitch, dc,* repeat pattern between *’s until end of row. Sl st into top of ch 2. (30)
Row 4: Ch 2. *2 dc in same stitch, dc,* repeat pattern between *’s until end of row. Sl st into top of ch 2. (45)
Row 5: Ch 2. *2 dc in same stitch, dc,* repeat pattern between *’s until end of row. Sl st into top of ch 2. (67)
Row 6: Ch 2. 66 dc. Slip stitch into top of Ch 2. (67)
Row 7-13: Repeat Row 6. Now slip work onto cushion and continue with remaining pattern encasing cushion as you crochet.
Row 14: Ch 2. *2 dc together, dc,* repeat pattern between *’s until end of row. Sl st into top of ch 2. (45)
Row 15: Ch 2. *2 dc together, dc,* repeat pattern between *’s until end of row. Sl st into top of ch 2. (30)
Row 16: Ch 2. *2 dc together, dc,* repeat pattern between *’s until end of row. Sl st into top of ch 2. (20)
Row 17: Ch 2. 19 dc. (20)
Tie off and cut from skein, leaving 12″ long tail. Thread tail into yarn needle. Sew running stitch around the perimeter of circular opening. Pull tight to close opening. Sew through closed, gathered middle several times. Square knot to secure and weave in remaining tail.
Cut a 12″piece of yarn, tie it to a stitch at the opening on the other side of the cushion. Sew a running stitch around the perimeter and close and finish the opening as you did with the other side.
LARGE CUSHION PATTERN*
Foundation Row: Ch 20. Sl st into first ch.
Row 1: Ch 2. 19 dc, sl st into top of ch 2. (20)
Row 2: Repeat Row 1. (20)
Row 3: Ch 2. *2 dc in same stitch, dc,* repeat pattern between *’s until end of row. Sl st into top of ch 2. (30)
Row 4: Ch 2. *2 dc in same stitch, dc,* repeat pattern between *’s until end of row. Sl st into top of ch 2. (45)
Row 5: Ch 2. *2 dc in same stitch, dc,* repeat pattern between *’s until end of row. Sl st into top of ch 2. (67)
Row 6: Ch 2. *2 dc in same stitch, 2 dc,* repeat pattern between *’s until end of row. Sl st into top of ch 2. (89)
Row 7: Ch 2. 88 dc. Slip stitch into the top of ch 2. (89)
Row 8-17: Repeat Row 7. Now slip work onto cushion and continue with remaining pattern encasing cushion as you crochet.
Row 18: Ch 2. *2 dc together, dc,* repeat pattern between *’s until end of row. Sl st into top of ch 2. (67)
Row 19: Ch 2. *2 dc together, dc,* repeat pattern between *’s until end of row. Sl st into top of ch 2. (45)
Row 20: Ch 2. *2 dc together, dc,* repeat pattern between *’s until end of row. Sl st into top of ch 2. (30)
Row 21: Ch 2. *2 dc together, dc,* repeat pattern between *’s until end of row. Sl st into top of ch 2. (20)
Row 22: Ch 2. 19 dc. (20)
Tie off and cut from skein, leaving 12″ long tail. Thread tail into yarn needle. Sew running stitch around the perimeter of circular opening. Pull tight to close opening. Sew through closed, gathered middle several times. Square knot to secure and weave in remaining tail.
Cut a 12″piece of yarn, tie it to a stitch at the opening on the other side of the cushion. Sew a running stitch around the perimeter and close and finish the opening as you did with the other side.
*The Patons Cobbles Yarn shown in the example is labeled as a #6 Super bulky yarn, but is thicker than most super bulky yarns. As a result, the pattern needs to be adjusted for that specific yarn as follows:
Rows 6-16: Ch 2. 66 dc. (67)
Row 17: Ch 2. *2 dc together, dc,* repeat pattern between *’s until end of row. Sl st into top of ch 2. (45)
Row 18: Ch 2. *2 dc together, dc,* repeat pattern between *’s until end of row. Sl st into top of ch 2. (30)
Row 19: Ch 2. *2 dc together, dc,* repeat pattern between *’s until end of row. Sl st into top of ch 2. (20)
Row 20: Ch 2. 19 dc. (20)
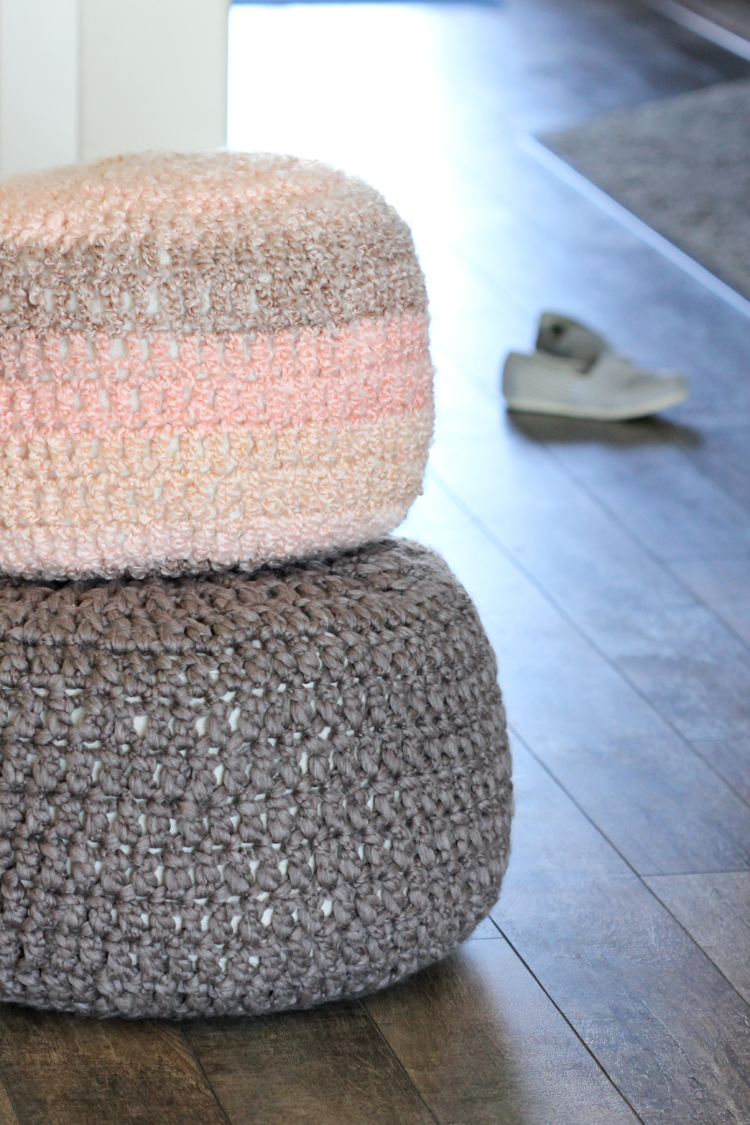
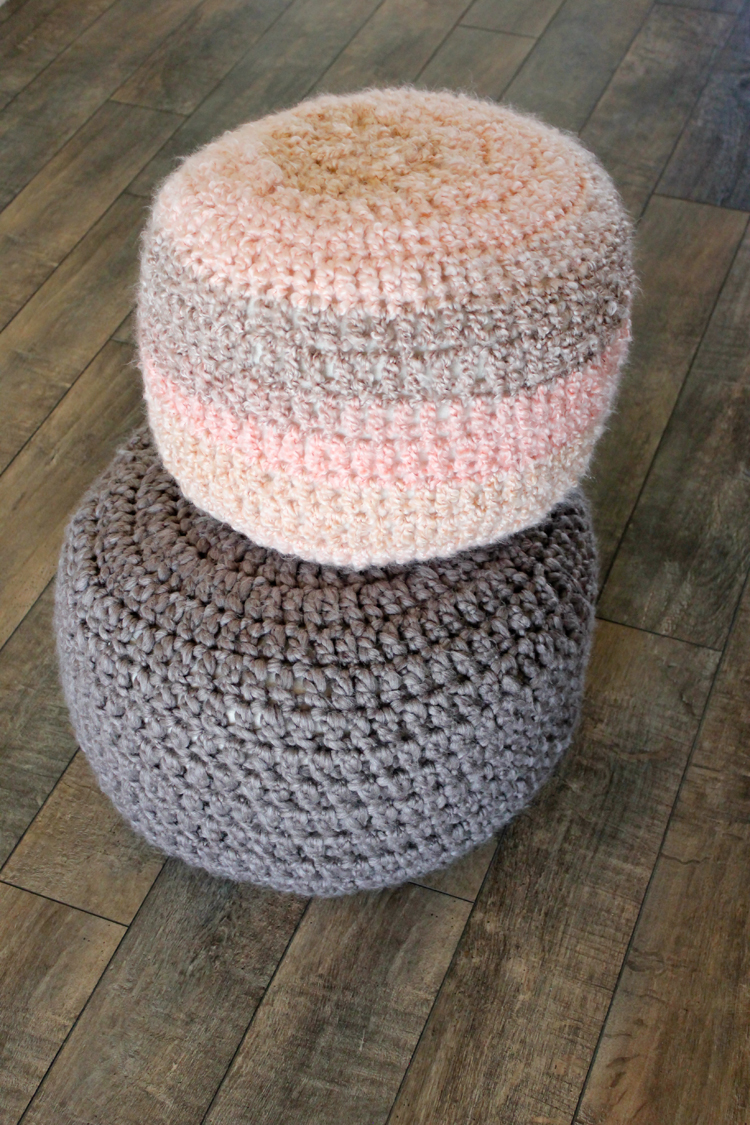
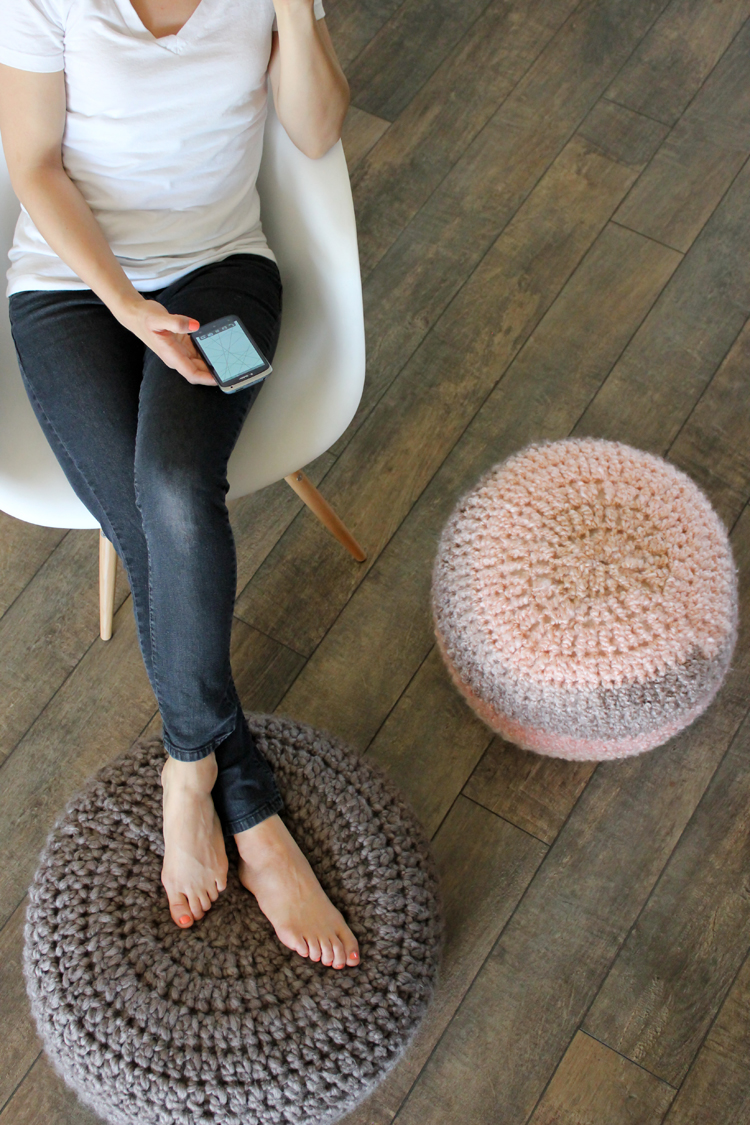
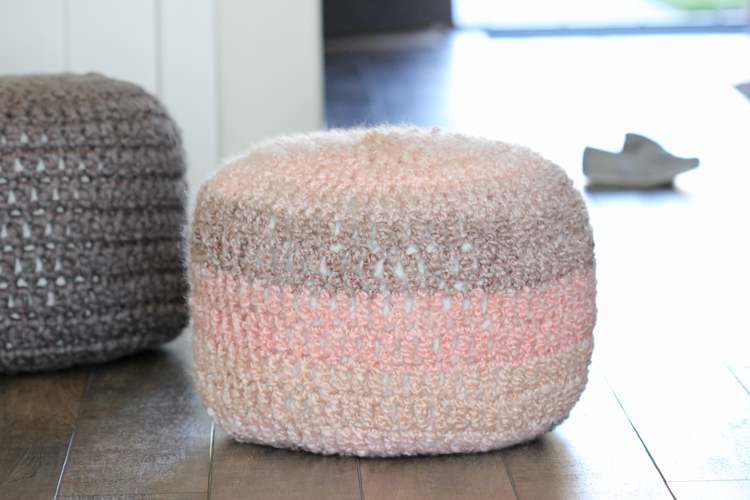
Use them as an ottoman, a floor cushion, or a cozy spot to curl up with a book!
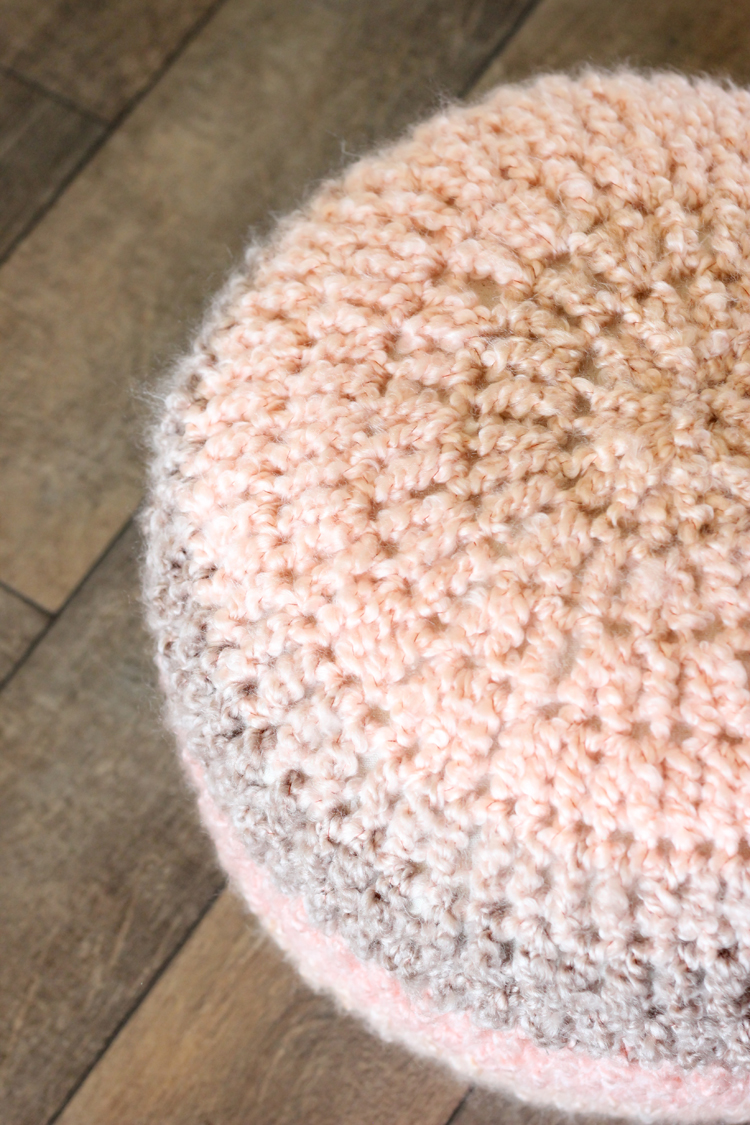
They add great texture and warmth to any room.

Looking for more crochet project and patterns? Go HERE! 🙂
This looks great! I can’t wait to try it for my living room. I have a question though: the length of the rectangles seem too large for the 16 or 20 in. circumference of the circles. Is it supposed to be diameter?
Goodness…you’re right. It was an unfortunate typo, which I just fixed. Yes, 16 or 20 inches in diameter not circumference. 🙂 Thanks Sarah!
These are really cute. =) I’ve never seen the foam shreds before… that’s perfect for a pouf like this!
Thanks Charity!
Row 7 – 13 : Repeat row 6. Now SL work onto cushion and continue with remaining pattern, encasing cushion, as you crochet.
I don’t understand these directions could someone clarify them?
I think I finally figured it out This is instructions for putting the encased muslin bag inside the crochet pattern up to this point then need to continue with the crochet pattern Is this correct? sometimes I have to smack myself in the head to figure it out hahaha I just had to re-read the instructions. This is the first time I have ever made this Making it for my daughter thanks
ha ha. No problem! I have so been there before. I am glad it all worked out for you. Yes, you need to put the muslin cushion in first, before completing the pattern. I hope your daughter enjoys it!
For the large cushion pattern, should row 8-17 say repeat row 7 rather than repeat row 6? I’m not sure, because I’ve never tried this kind if project… But I kept repeating row 6, and it’s making a big wavy circle, rather than a pillow case!
Yes! Goodness. It should be repeat row 7 for the larger cushion. Sorry about that. Thank you for your patience!
Hi This looks great! ..
Just one question, don’t you have a youtube tutorial ??!!
Thanks Andrea! I’m so sorry, but I don’t.
The pattern has you increasing 22 stitches between row 5 and row 6, however if you follow the pattern for row 6, you’re working two dc in each stitch and actually increasing 66 stitches. Should it read “2 dc in next st, 3 dc”?
Also, shouldn’t the directions in Rows 2-6 state 2 dc in “next” stitch, not “same” stitch?
Hi Judy! Thanks for your questions. I hope I am understanding them correctly, let me know if I’m not…. For row 6 you need to simply dc in each stitch along the row, no increasing or decreasing, so the stitch count should stay the same. And yes, I do mean to dc into the same stitch in the previousrows. You dc in the same stitch twice, then do a regular single dc in the next stitch, then work 2 dc in the next stitch, and so on, repeating the pattern. Does that help? Did I understand your questions correctly? If not, I would love to help trouble shoot some more.
Hi, great pattern but i have a question, I’m on row 11 on the large cushion and so far its barely covering the top and I’m afraid its going to be too small.Thank you
Alex,
Good question. So it will probably look a little small until you are done with the pattern and it all comes together, but it’s hard to say if that’s what is happening in your case. Have you measured your gauge? Your tension may be tighter than mine and might be working up smaller OR…sometimes a yarn will list as a certain weight but it is actually thinner and lighter than other similarly labeled yarns in other brands, causing your stitches to work up tighter. Gauge should help you assess this. To get a better gauge measurement, measure the outer edge of the round. Let me know if that helps or if I can help in any other way! 🙂
Delia
Thank you so much I have just finished it and it turned out great!
Oh good! That makes me so happy! 🙂
Delia,
I think my sister would just love this pattern, so I have decided to make it for her. But there are few things in the middle of the cushion pattern that just don’t make sense to me. At the end of row 7 it doesn’t say one should sl st into the top of ch, 2, should I? So where should the chains come from, from the top of ch, 2 or st 89.
Great question. I should have been more clear. Slip stitch into the top of the ch 2. Then ch 2 without turning since you are working in the round. I hope this helps. Thanks for asking for clarification.
There is something at the end of the pattern that I just don’t understand. In row 18 of the pattern the stitches go from 89 to 67, yet the instructions are the same as row 19-21. To get larger from 67 to 89 stitches one should put 2 dc in one stitch and then 2 dc in the next two stitches. To get from 89 to 67 in row 18 one should do something different than the rows after take, to take 1/3 of 89 which happens in 6.
I’m not sure I understand your question, but are you crocheting two stitches together with one dc when it says “2 dc together?” This decreases the number of stitches worked. So even though the instructions are the same in each row, you are decreasing and working with less stitches each time, making the end stitch count smaller and smaller after each row. Did I understand your question? If not, please let me know and we can figure this out together. 🙂