

Seriously, what is cuter on little boys than bow ties!?

I am a little bit bow tie obsessed as you can see HERE, HERE, and HERE. They are simple to make and are a great beginner sewing project.
With only days until Easter, you can totally whip up one or a few by the weekend!

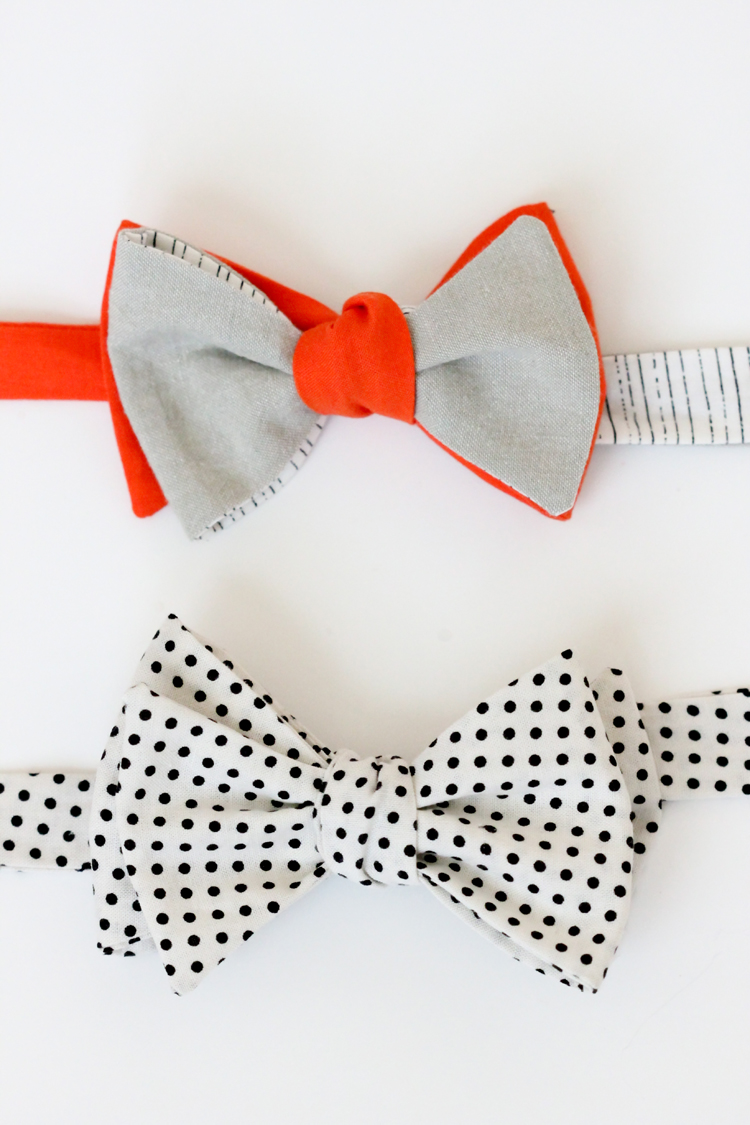
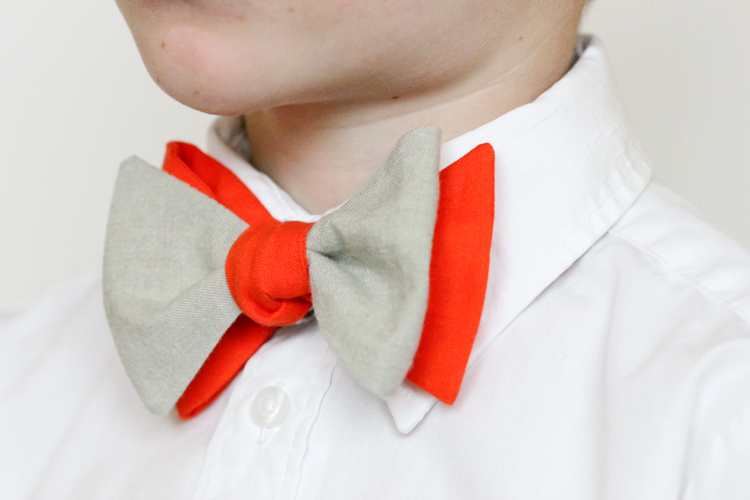
To add an extra element of design, I thought I would shake things up a little bit this time and make these bow ties mix and match.
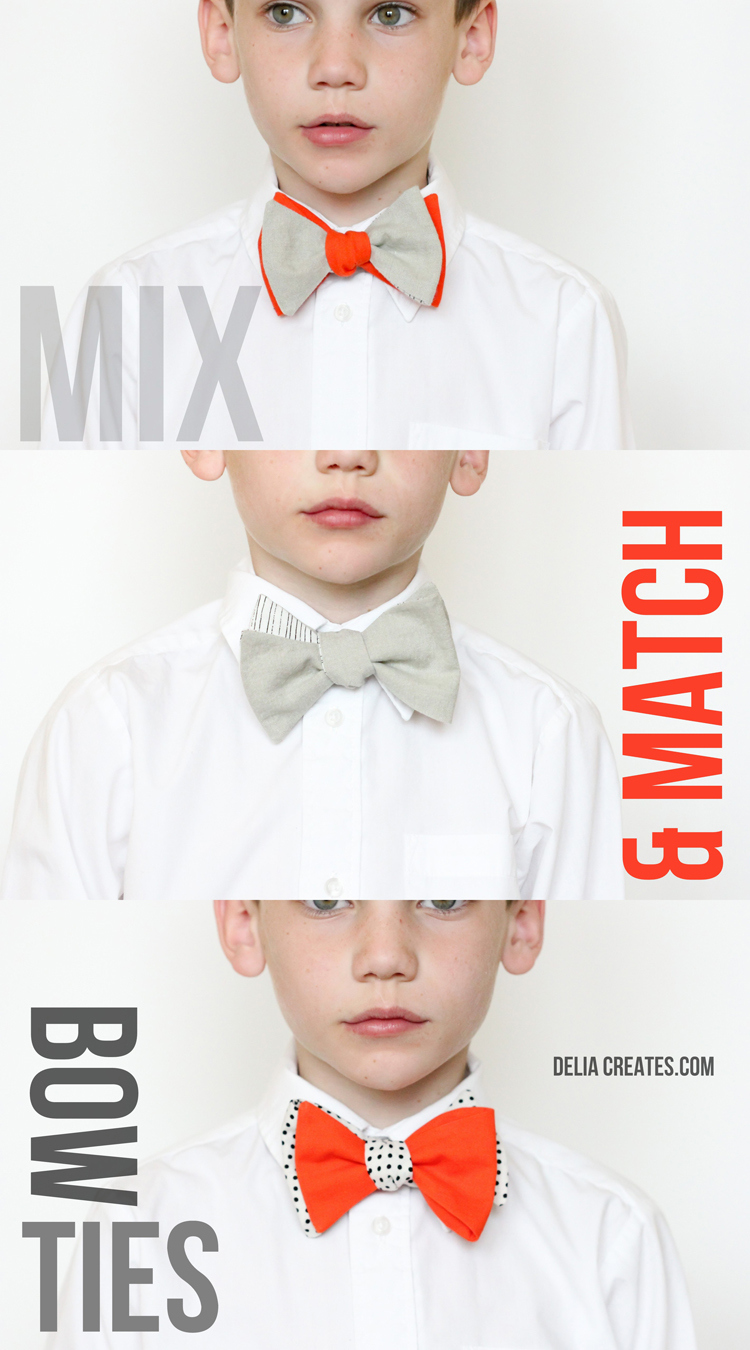 Fun right?
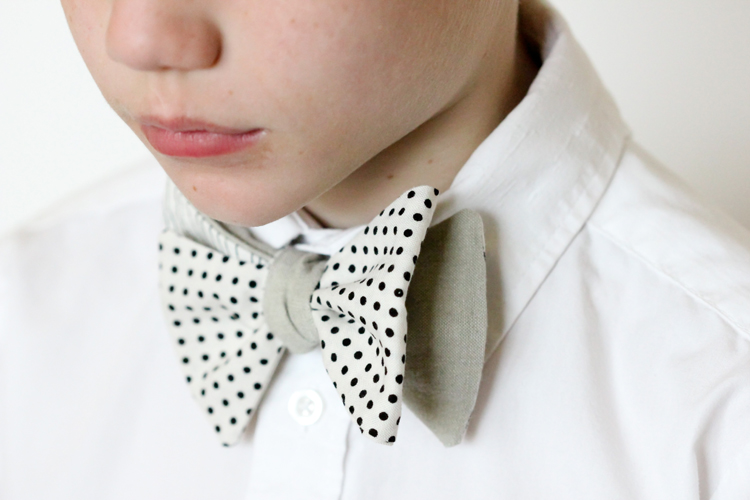
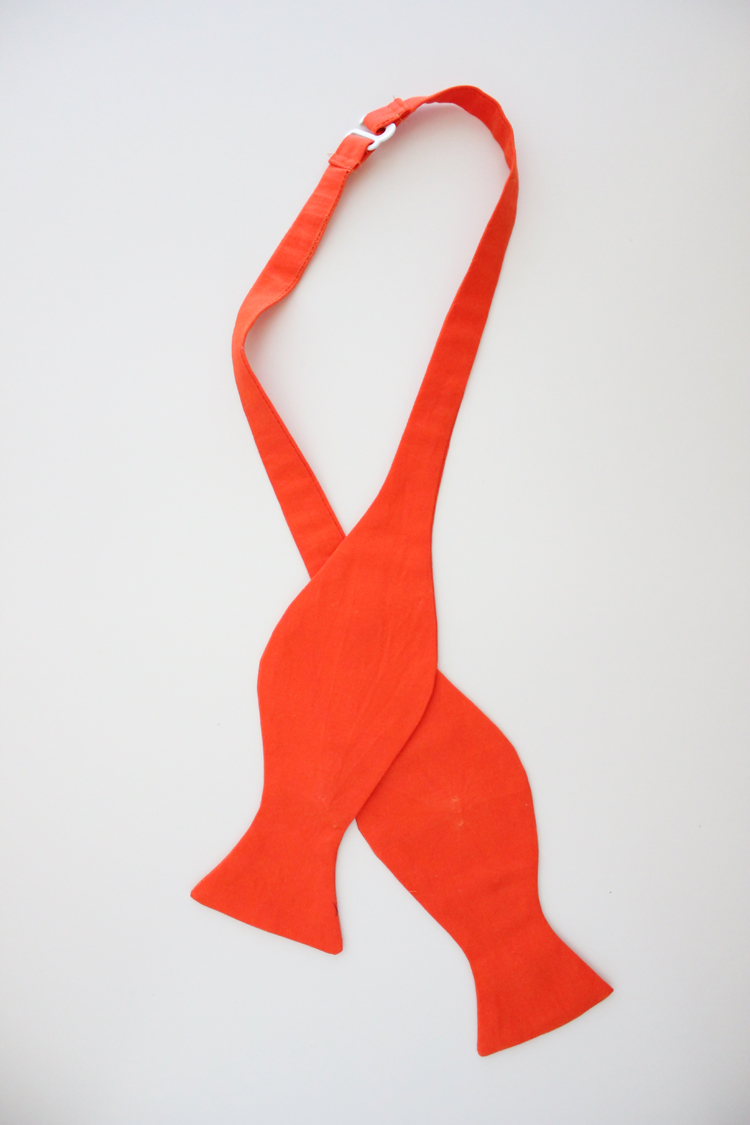
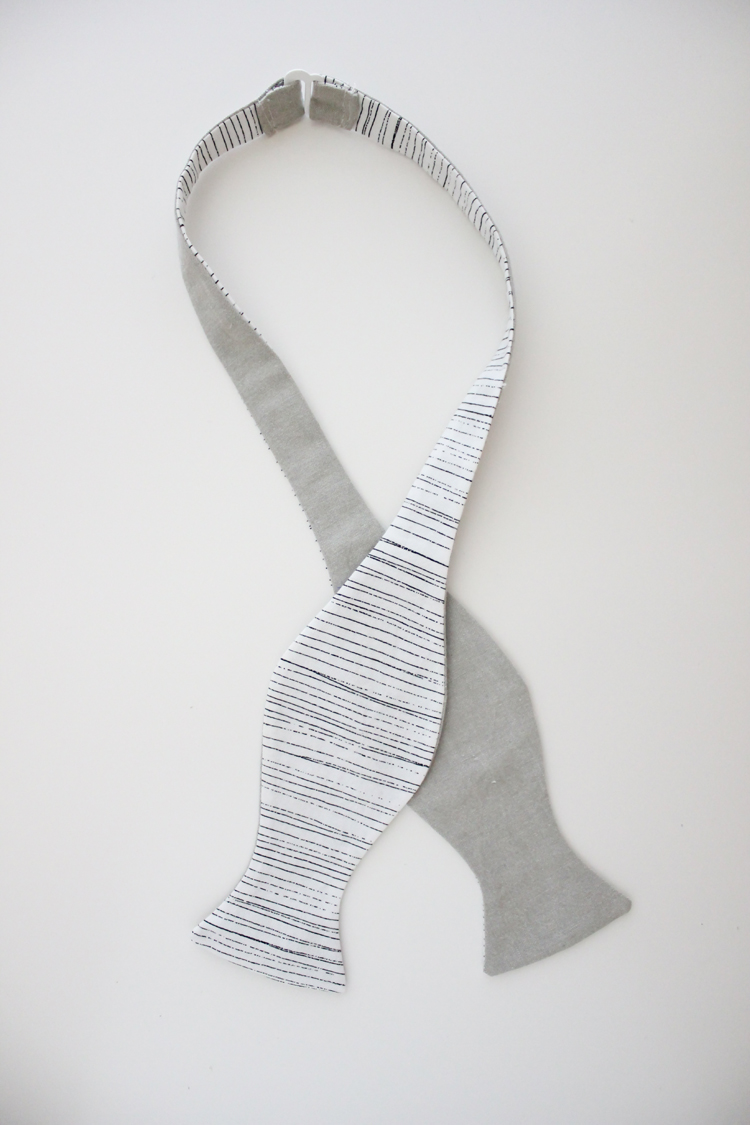
What makes these work, is that these are authentic bow ties that you tie together like the ones I posted about HERE, and they are two separate pieces so that you can mix and match them.
 …or not.
It’s up to you!
The process is the same as the Lil’ Mister Bow Ties. This time, I have just simplified the tutorial a bit and included a free pattern.
Let’s get to it!
 Materials
*fabric – large scraps or 1/4 yard is plenty, if cutting on the bias, you may need as much as 1/3 or 1/2 yard
matching thread
strong safety pin
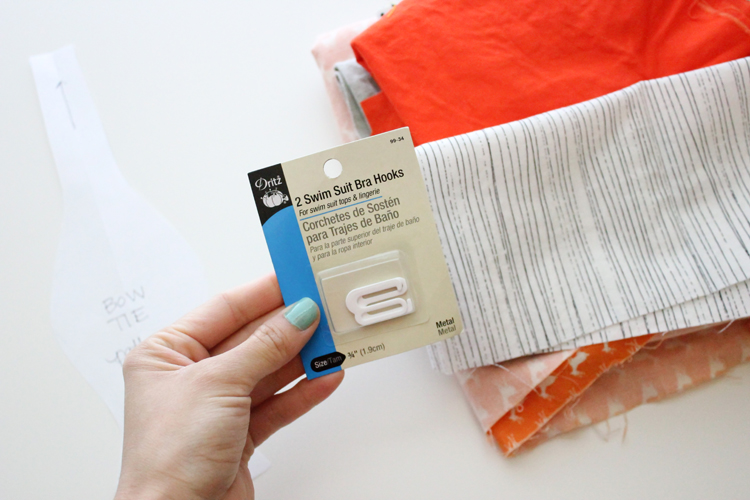
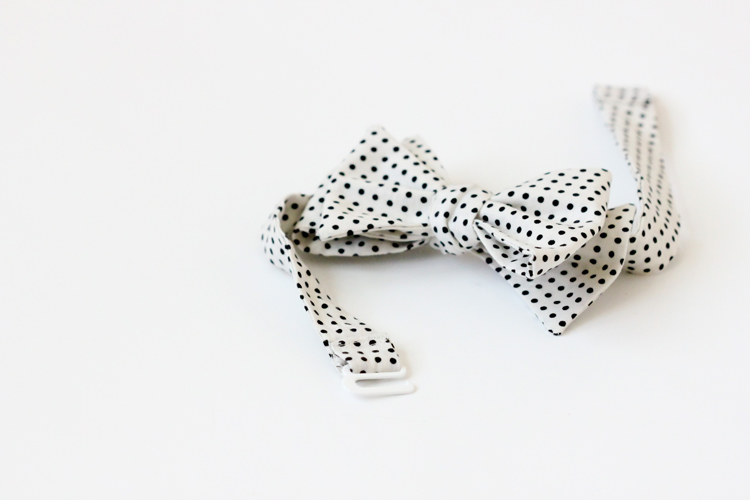
swim suit hooks (can be found on the notions aisle with snaps and buckles, get the 3/4″ size hook, you will need 1 hook per bow tie, see picture above)
*I used good quality woven cotton for all of my bow ties. I think this works fine for boys. Depending on the color and quality it may also work for men but I recommend a silk blend backed with a feather weight interfacing or wool for men. You may also decide to add interfacing to the cotton fabric.
1. Print the free pattern and cut out it out. (My link function isn’t work for some reason, so copy and paste this url into a new window: https://drive.google.com/file/d/0B28r79Y8rkSQblVCal9mSmcyQlk/edit?usp=sharing)
The pattern is offered through Google Drive. You may have to log into Google before you can access it. If you would rather I email you the file, contact me at [email protected]. Please allow email service to take up to a week.
There is a sizing chart with approximately how many inches to add to the end of the bow tie pattern. The sizing chart goes up to size 10-12 or a 14- 14.5 inch neck circumference.
Please note: This is a mostly untested, free pattern. I tested the chart measurements on my two boys, so it is a pretty secure guess, but it has not been tested as thoroughly as a paid pattern. Neck sizes also vary between body types, so your child may not match up perfectly to the size chart by age. If you want to go off your own measurements you can follow the instructions I provide in my original bow tie post here. Just be sure to measure your child’s neck, around the collar, with a dress shirt on. This measurement will be a little bit larger than their actual neck.
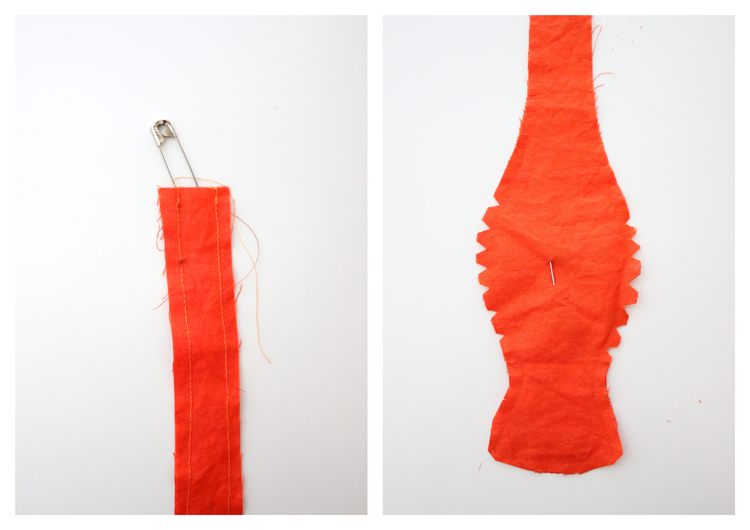
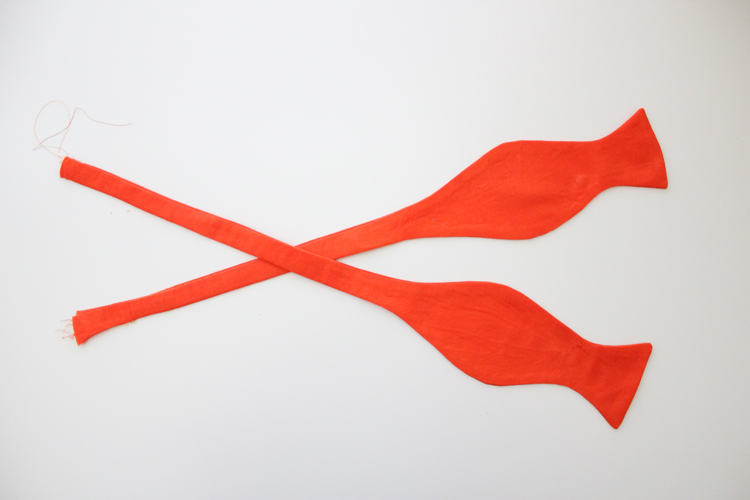
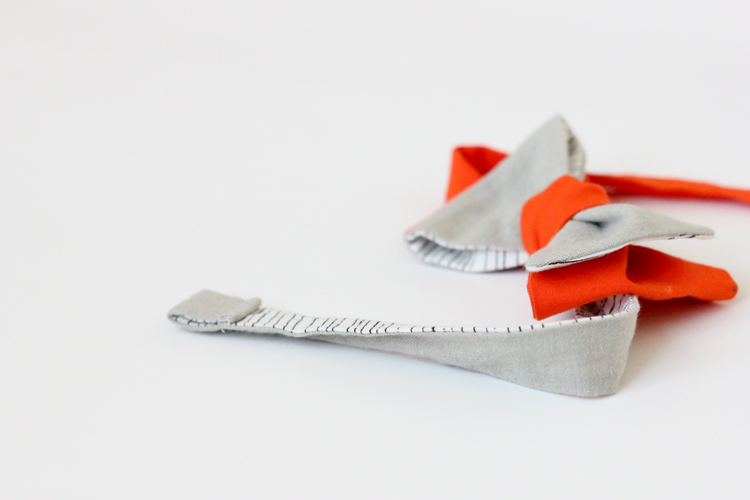
 2. Cut your fabric. You need 4 pieces (two pairs).
A note about grain: Bow ties are traditionally cut on the bias. If you have enough fabric to do this, I recommend it. You will not have to worry about notching and snipping curves. When I make bow ties for my boys, I am usually using scraps, so I don’t have enough to cut on the bias. My pictures and instructions in this tutorial reflect that.
3. Pin and sew.With right sides facing, pin pairs of the bow tie pieces together. Sew with 1/4″ seam allowance.
4. Address the curves.If you did not cut your bow tie on the bias, then snip concave curves and notch convex curves.
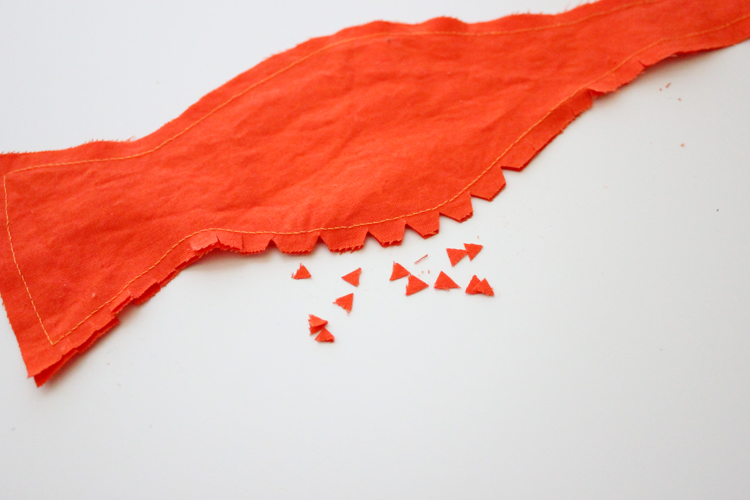
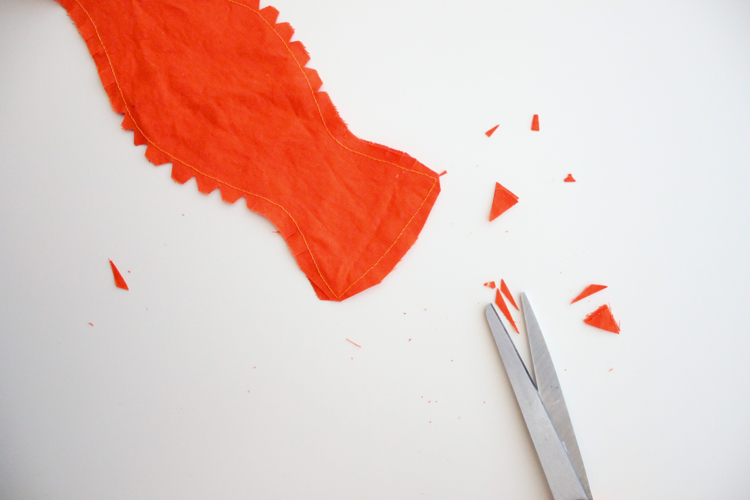 Don’t forget to to snip off the corners as well (be careful not to snip through any stitching). I like to cut the corner off and then snip into the cut corner to further reduce bulk.
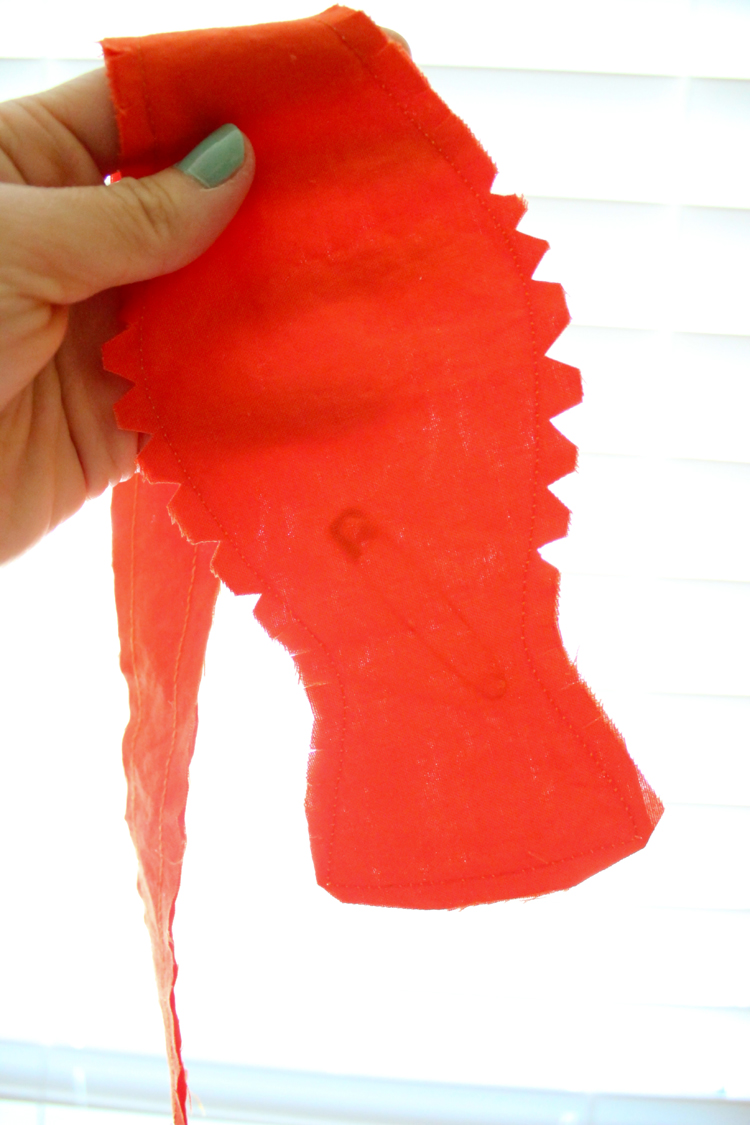 5. Slide a sturdy safety pin into the top and let it slide almost all the way to the bottom. Now, hook the safety pin into one layer of the bow tie. Close the pin from the outside so that it is pinned from the inside.
 6. Turn it right side out. This is the trickiest part and takes a little time and patience. Shimmy the safety pin up through the neck of the bow tie piece and turn it right side out.
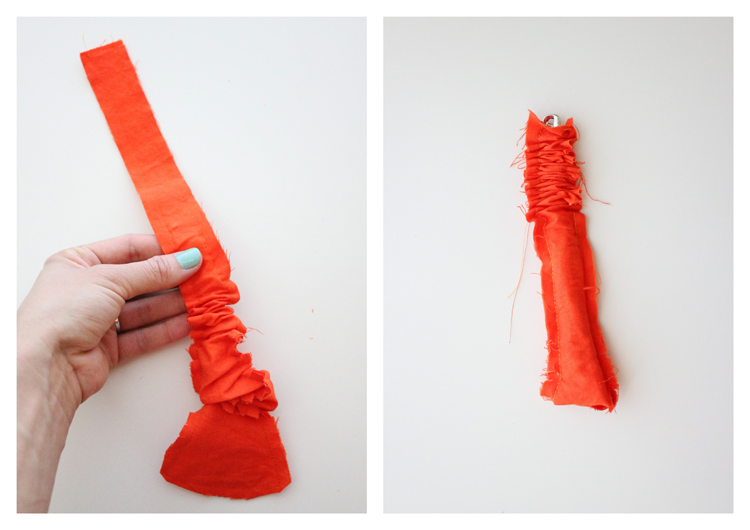
 Speed is not your friend. If you are too hasty, you could create some large holes and some tearing where the safety pin is. Some small holes are unavoidable, but they can easily be pressed out with a steam iron.
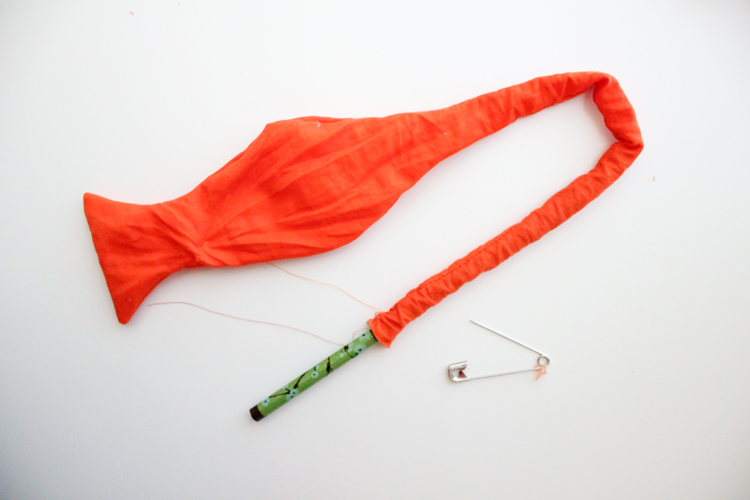 Your bow tie will look like a wrinkly deflated balloon at this point. Slide a chop stick or a dull, sharpened pencil down through the neck to fully turn the bow tie out.
7. Repeat for the other side of the bow tie.
8. Iron. Press both bow tie pieces generously with an iron, preferably with the steam setting on as high as your fabric allows.
 9. Sew your hook and loop.
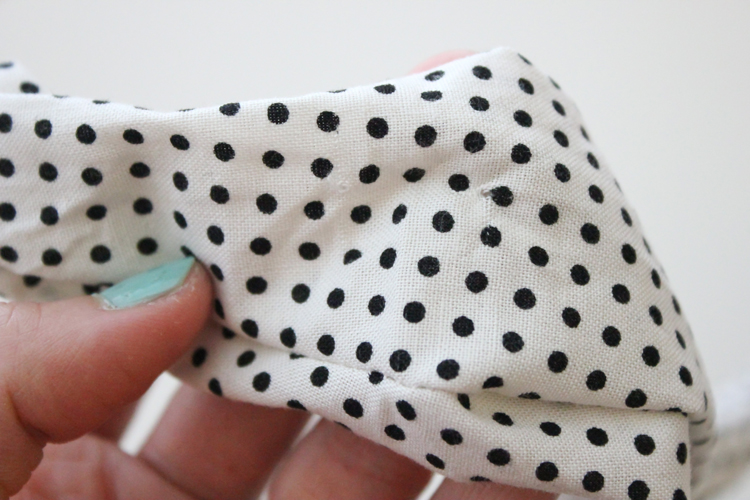
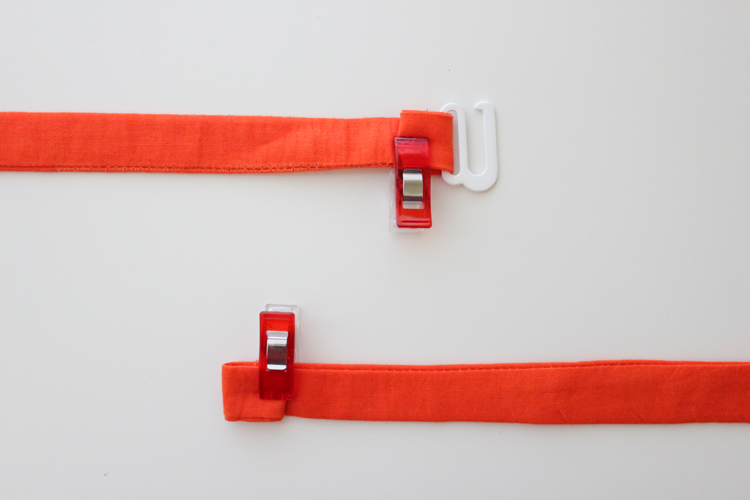 Slide one of the swim suit hooks onto the end of one of the bow tie pieces. Fold the raw edge over 1/4 inch and then again about 1/2-3/4″ inch. Clip or pin and place.
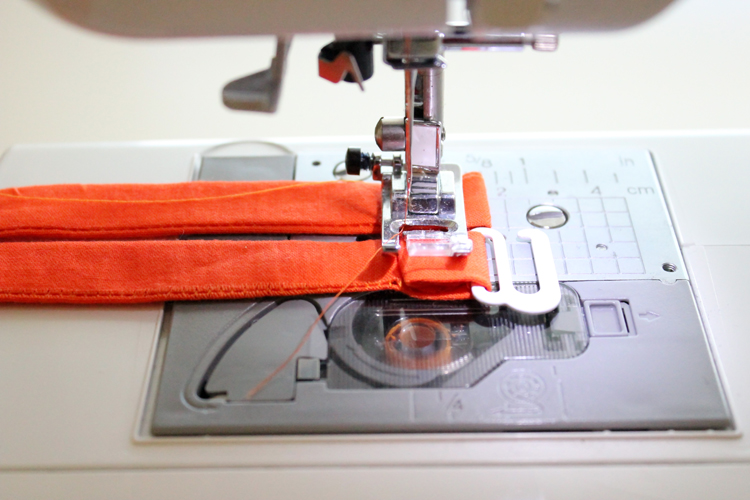
Fold the other bow tie piece in like manner. Fold under 1/4″ and then again about 3/4″.
Sew folds in place with two lines of stitching.
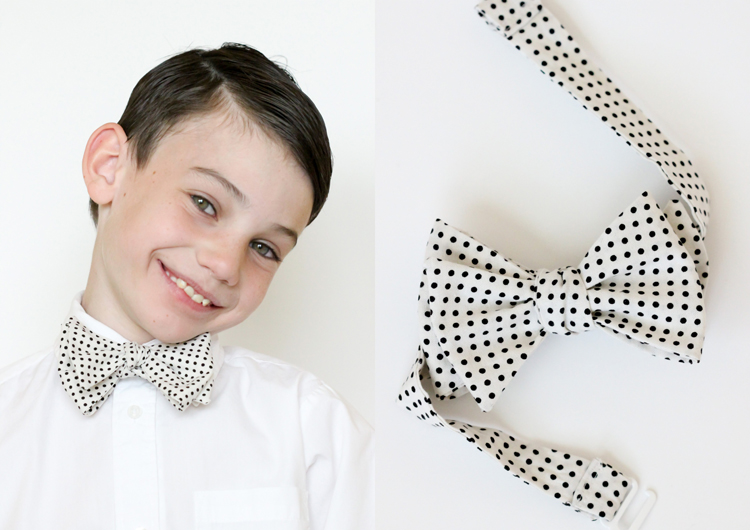
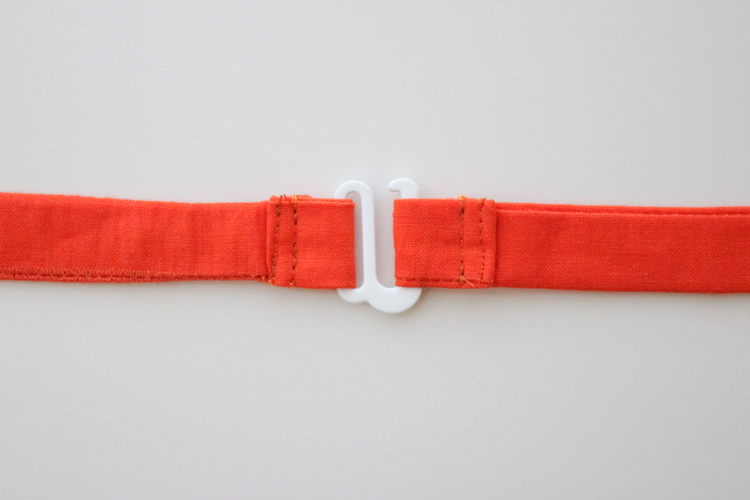 And…you’re all set!
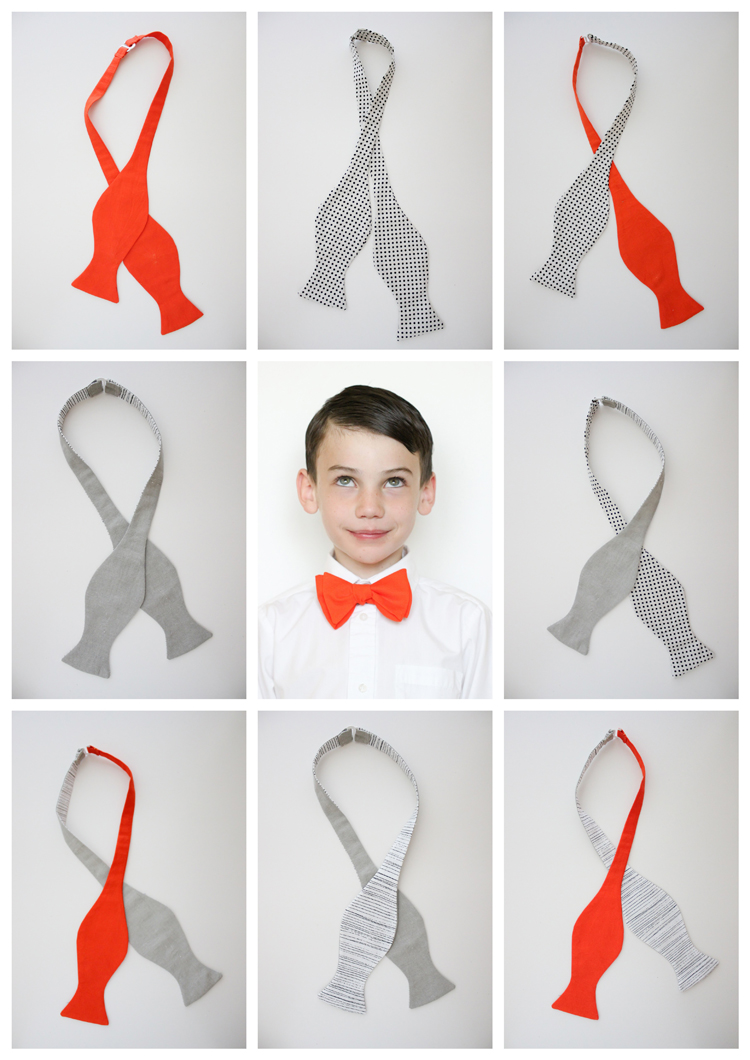
 Tie on as is, or make more and mix and match bow tie pairs:

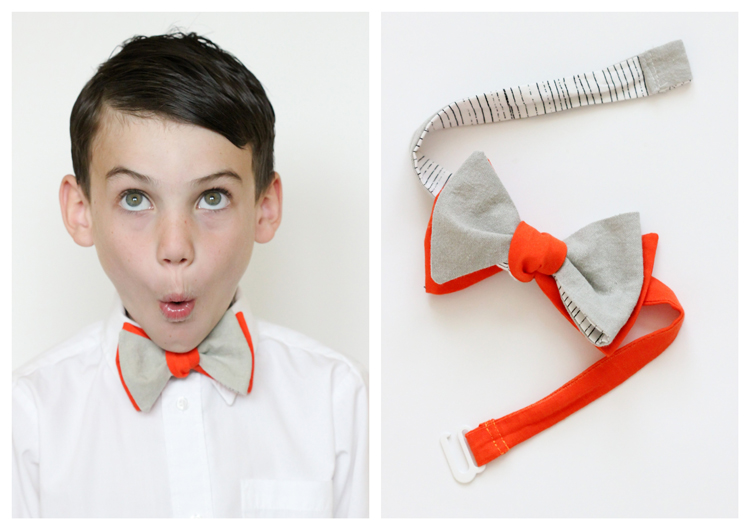
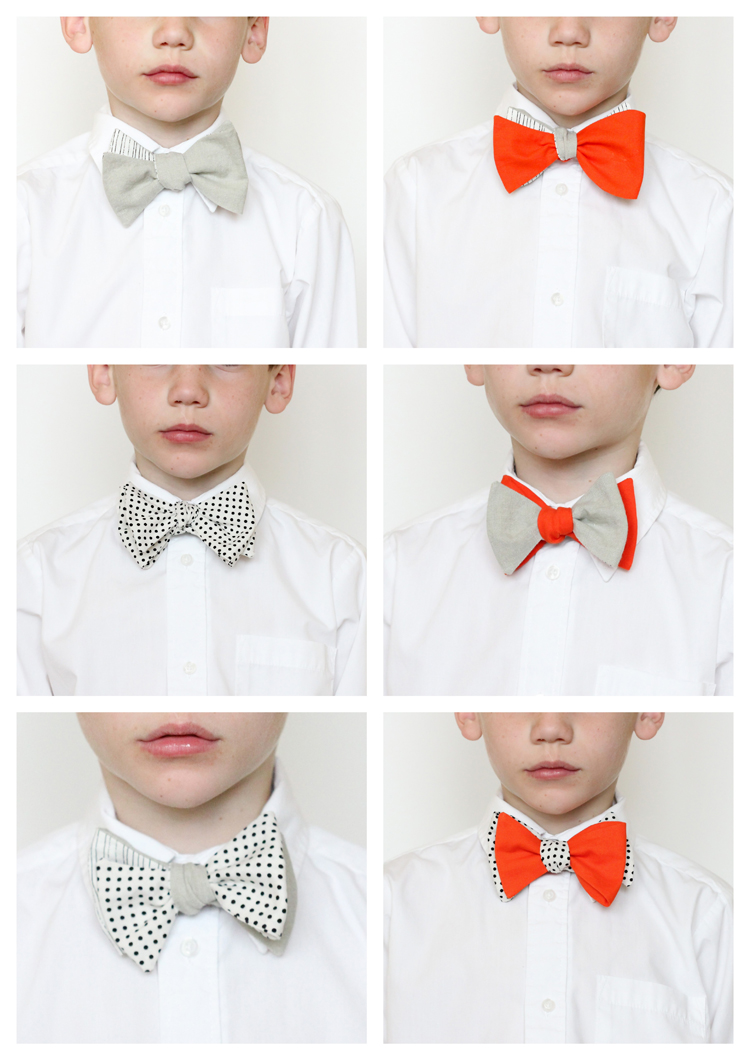 For even more mix and matching fun, sew your bow tie pieces with different colors on each side:
 Then mix and match the two sided bow tie!
 …so many possibilities!
 Not sure how to tie a bow tie?
I’ve got you covered! Scroll to the middle of THIS post for instructions.
In those instructions I show you how to tie it onto a stuffed monkey which is actually really helpful for kids. Instead of trying to tie the bow tie onto a squirmy child, tie it to a stuffed animal or your leg (anything that is about the same circumference as your child’s neck) first. That way it’s all tied and ready to simply hook around your child’s neck with no fuss.
When tying on a mix and matched bow tie, remember that the shorter bow tie piece (in the beginning you pull one side down longer than the other) will be the prominent half. It is the piece that will show up in the front. The longer half ends up as the second, accent layer to the bow tie.
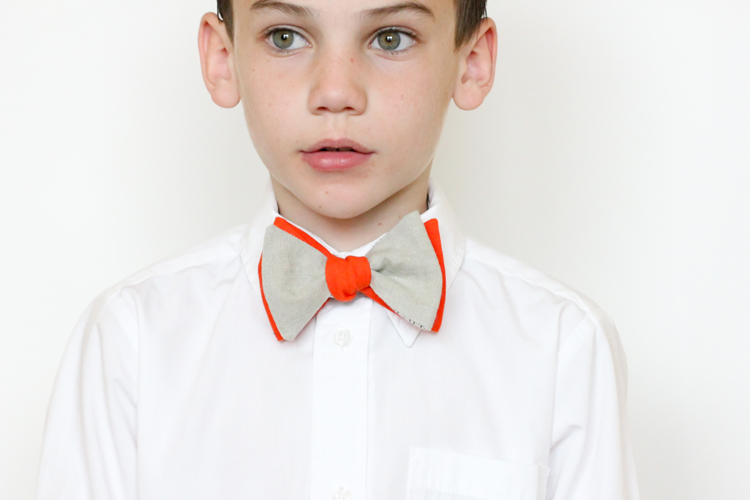 I found that putting a bolder color as the accent layer looks especially dapper.
I love seeing in my boys in handmade duds! If I can convince my husband to wear a bow tie, I totally want to try a wool or silk version for him. Wouldn’t a wool version be so yummy?
Fabric sources: Mango solid from Bella Solids Collection from Ribbon Retreat || Gray Chambray from LiMa Sews || B&W Polka Dot from Hobby Lobby || Crayon Stripe from Benartex from Quitology
Have you seen these wooden ones? I follow his wife’s design blog (they work together) and she (kara pasley) posted about a year ago that her husband had started this business with a friend. SO cute. I can’t get either my big or little guy to wear a bowtie! http://www.woodenbowties.com
oh my goodness. Those are so cool! Thanks for sharing Annet!
I LOVE this idea! I totally want to do it! They look so good on Owen, I’d love to try that on my son. (And might I say you have a very handsome young man there…can I set him up with my daughter in about 10 years? 🙂 ) My husband is not a big fan of bowties unfortunately, but I’m the one who gets our boy dresed for church. HA! May I suggest that you specify getting the larger hooks? Years ago when I made one of your bowties for the first time I got the smaller size and that was an annoying mistake, but I managed to work around it anyway. Now if only I can master the tying technique…
haha…maybe 😉
And thank you for the tip on the larger hooks. I just added the hook size to the tutorial now. Yes, that would be so frustrating to get the smaller hook!
So cute! Great pictures too
Thank you Tara. 🙂
This is SO awesome!! I’ve linked to your tutorial on Craft Gossip:
http://sewing.craftgossip.com/free-pattern-mix-and-match-bow-ties/2014/04/18/
–Anne
Thanks a bunch Anne! 🙂
I never thought about mixing. Awesome. Thanks for the pattern 🙂 I love making bow ties for my boys. I have a suggestion for fabric. I have my dad and hubby save the matching pocket squares they get when they buy ties, then use the pocket squares to make bow ties for the little boys. If there is not enough length I add a loop of elastic to add the difference. Thanks again.
That is a great idea! Thank you for sharing!
these are awesome delia! love the mix and match, you’re a clever one. thanks for the free pattern!
Thanks Kristin. 😉
What a handsome guy! These pictures are just so awesome!
Thanks so much for the tutorial and pattern. My 15 year old loves wearing bow ties! I love your fabric contrasts.
Thanks Andrea!
What a wonderful twist on tie wearing! I would’ve never thought to layer them like that. Thanks for the fantastic tutorial!
Thanks M.e. 🙂
I saw this on craftgawker.com and LOVE it! I’ve been readying to make a bowtie or 2 on my own for myself, so thrilled find a simple how-to. Would never have thought to mix-n-match. So very clever! Can’t wait to make a bunch!! ~cheers
Thanks Tony! Happy sewing! 🙂
Delia,
This are sooo sweet! Not claiming to possess but maybe, one stitch of sewing skill…. this doesn’t look tooo difficult. 😉 My teen daughter has actually recently become hooked on wearing big bow-ties in her hair. What a great teachable opportunity for her to experiment… she actually has quite and interest in sewing and designing. Perhaps, we can also slip her a few leather scraps to try out on this one. 😉
I love that your daughter is into designing! If you want a great felt bow tie pattern for barrettes, O+S has a free one! I just printed it out myself and it looks way cute. http://oliverands.com/blog/2013/03/felt-bows-a-free-pattern-and-tutorial.html
I made bow ties for my son’s wedding last year. I thought I would go insane trying to turn them right side out!!!! Then I discovered that if you moosh in one corner of the tie and stick the pointy end of your chopstick there, you can turn them in a jiffy. Just put the bottom of your chopstick on a hard surface and slide the tie down over it until you run out of chopstick. Keep sliding and adjusting until your tie is right side out; then give it a shake and the chopstick will fall out. Easy peasy and no risk of holes from the pin.
Oooh…great tip. Thanks!
Thank You for the Bow Tie Tutorial. Hopefully my grandson might wear one some day!
Happy Mother’s Day!
Thank you for sharing the pattern and tutorial! I have a question – I am going to make a few for my 6 year old and I would like to use elastic instead of a clasp. How much elastic should I use? Thanks!
I would measure his neck, subtract 1 inch, then divide by two. Use that measurement to measure from about 1/2 an inch from where the bottle neck of the bow tie starts to determine how long to make the strap portion for each side of the bow tie. Then use a 3 inch piece of elastic (which after sewing will shrink down to about 2 inches. That should fit him now and grow with him a little bit. I hope that helps!
Love these!
Thanks Cassie!
Love this! Made and shared your link!
I made four of these last night for my boys and they turned out adorable! I used a solid red and two prints so each half has one solid part and one print. I will definitely be making more of these soon! Thank you for a great tutorial
Awesome! I am so glad you enjoyed the pattern!
Hi, I would like to make this bow tie for my son who is 15 and husband, would you be able to help as to how to adjust the size of the pattern to fit them? Thank you.
HI! Sorry for the delayed response. I created the bow tie to look kind of big on little boys, so for older boys and men it should look sleeker and slimmer but still proportional. You just have to lengthen the straight neck pieces to fit. If you want the bow tie to look bigger and not slimmer, than I would simply enlarge it by maybe a 1/4 of an inch along the curved sides. I hope that helps? Let me know if you have more questions.
I’m going to be a Grannie and my daughter in love saw some baby moccasins on pinterest that I’d like to make for the baby. I believe the moccasin was supposed to be leather but the Pinterest poster named “bonjourmoon” sewed them using felt. She mentioned your site for the pattern I have searched your site and cannot find the pattern for these particular booties. How can we go about getting the pattern for me?
Any help would be appreciated. Thank you so much!
Hi Jackie!
Congrats on becoming a new Grannie! I have a baby leather mary jane pattern: http://www.deliacreates.com/natty-janes-leather-baby-shoe-pattern-release/
And I have a free baby boy modern bootie pattern here: http://www.deliacreates.com/modern-diy-leather-baby-boy-boots-free-pattern-tutorial/
but I don’t specifically have a moccasin pattern. I’m so sorry. If you really want the moccasin look, I know Peekaboo Patterns has a baby moccasin pattern. I hope that helps!
Delia 🙂
Hi, just wanted to let you know that I linked to this tutorial on my blog: http://www.sewingshop.net/blog/thursday-treasures-2-theme-bows/
These bow ties are adorable!
Thank you so much Linda!
Delia,
if I were making for a man should I add interfacing? What keeps them stiff and no flimsy?
Yes, a lightweight interfacing would be great! You don’t want it to be too thick or stiff, or it will not tie well.
Made a set of these for my three grandsons and they wore them on Easter. They looked so cute from the 2 year old up to the eight year old!
That makes me so happy to hear! I bet they were adorable!
I’m trying to find a bow tie pattern for toddlers, but am having no luck, so I’m thinking of sizing down you pattern to try and fit. Can you offer a suggestion on how much I should shrink the pattern to fit a (almost) two year old?
You can make it fit your toddler by shortening the straps. I wouldn’t reduce the size of the actual bow tie, but I personally like big bow ties on little boys. I first made this size bow tie for my middle son when he was two and it looked super cute on him. If you really want it to be smaller, I suggest shrinking the pattern only slightly. If you going too small, it becomes very difficult to turn right side out. I hope that helps! Best of luck! <3
Made one for my little man and it turned out adorable. I mix matched a deep blue with baby avengers for a wedding. Wish I could attach a photo
Awww. Sounds so cute! I’m so happy to hear you enjoyed the pattern.